TABLE OF CONTENTS
- Introduction
- Where are you now?
- The big picture in one minute
- Stage 1: People
- Stage 2: Partner
- Stage 3: Data
- Stage 4: Connectors
- Stage 5: Template
- Stage 6: Config
- Stage 7: Exchange Agreement
- Stage 8: First transfer
- Your first transfer checklist
- Questions and answers
- Glossary
- Related articles
Introduction
Welcome to SchedEx! Your organization is set up, you can sign in, and now you want to send or receive your first schedule with a partner company. This guide takes you there, one stage at a time.
You do not need to be technical. Each stage tells you what it is for, what to decide first, who does it, and how you know you are done. When a stage needs more detail, the guide links to the article that explains it step by step.
Who this is for: the first person at a new organization. You were made Tenant Admin, and you have probably been given Tenant Setup too. With both roles you can do every stage in this guide yourself, or share the work with colleagues.
Not sure this is the right article? If transfers are already set up and you only want to run them, see Execute schedule transfers which have already been set up. If your organization is not on SchedEx yet, start with Signing up your organization to use SchedEx.
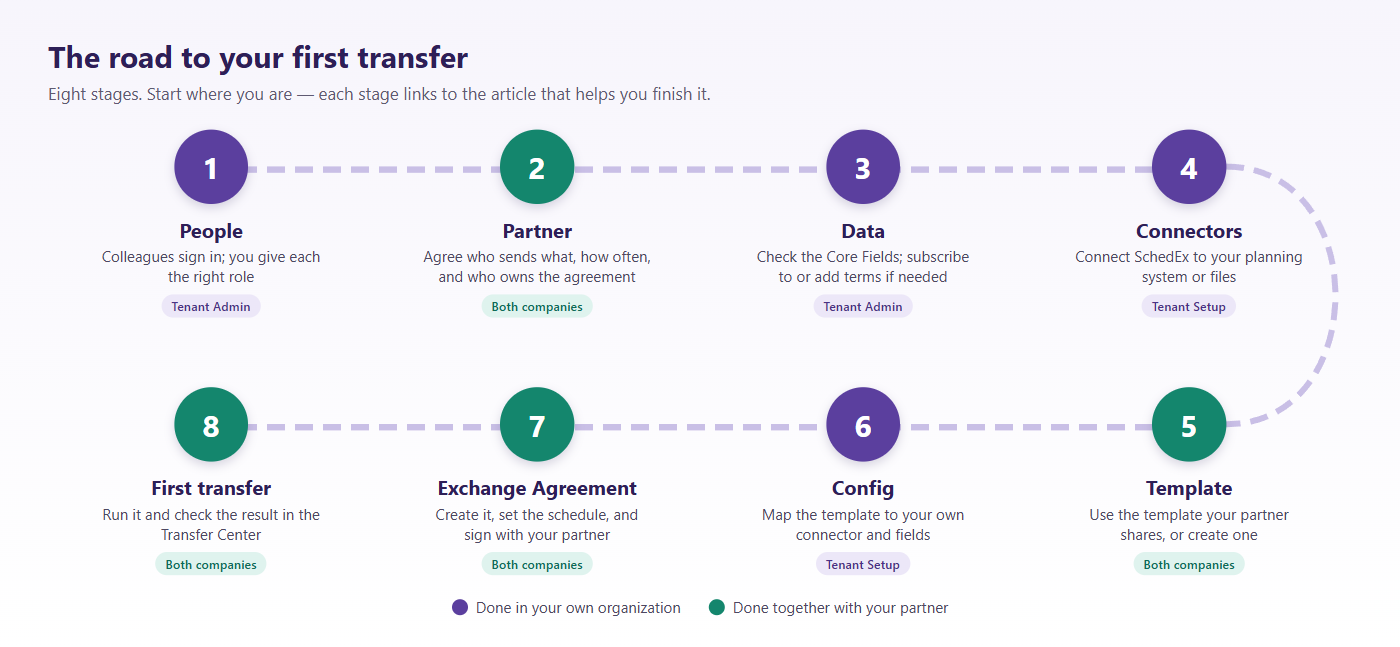 The road to your first transfer: eight stages, from giving your colleagues their roles to watching your first schedule arrive.
1. Where are you now?
You do not have to read this guide from the top. Find the row that sounds like you and jump in.
| Where you are | Start here |
|---|---|
| "I'm alone in SchedEx and need my colleagues in here too." | Stage 1: People |
| "My colleagues can sign in, but they can't do anything." | Stage 1: People |
| "We know who we want to exchange schedules with, but haven't agreed the details." | Stage 2: Partner |
| "We've agreed with our partner. Which data fields do we need?" | Stage 3: Data |
| "We need SchedEx to reach our P6, Safran, SAP, Excel, … system." | Stage 4: Connectors |
| "Our partner already sent (shared) us a template." | Stage 5: Template |
| "We already have connectors." | Stage 5: Template, then Stage 6: Config |
| "We have a template and a Config. Now we want the agreement." | Stage 7: Exchange Agreement |
| "Our partner set up an agreement and is waiting for us." | Stage 7: Exchange Agreement (the partner part) |
| "The agreement is active. Did the transfer work?" | Stage 8: First transfer |
2. The big picture in one minute
A schedule transfer in SchedEx is built from a few pieces that fit together like this:
- A connector tells SchedEx how to reach a planning system, such as Primavera P6 or Safran.
- A template is the list of data both sides agree to exchange.
- A Config connects the template to your system: it says which field in your system holds each piece of data.
- An Exchange Agreement (EA) ties it all together: who sends, who receives, which schedule, and how often.
Each company builds its own connector and its own Config. Both Configs use the same template. The sending side uploads its schedule. The receiving side downloads it into its own system.
| Stage | What you get at the end | Who usually does it |
|---|---|---|
| 1 People | Your colleagues have the right roles | Tenant Admin |
| 2 Partner | A short list of things agreed with your partner | You and your partner |
| 3 Data | The terms you need are available to your organization | Tenant Admin |
| 4 Connectors | SchedEx can reach your planning system | Tenant Setup role (with IT) |
| 5 Template | One template that both sides use | Tenant Setup (often on the partner's side) |
| 6 Config | Your mapping, ready for an agreement | Tenant Setup |
| 7 Exchange Agreement | A signed, active agreement | Tenant Setup, then the representatives |
| 8 First transfer | An upload and a download listed as Performed | The representatives (or the Autonomous Component) |
3. Stage 1: People
Goal: everyone who will work in SchedEx has the role they need.
Questions to answer first
- Who will build the setup (connectors, templates, Configs)?
- Who are the planners that send or receive schedules?
- Who should help me run the organization in SchedEx, so I am not the only admin?
Who does it: a Tenant Admin.
The four roles
In SchedEx, a role is a set of things you are allowed to do. Roles are not a ladder: a Tenant Admin does not automatically have Tenant Setup. If someone needs two areas, give them both roles.
| Role | What it lets you do | Who typically gets it |
|---|---|---|
| Application User | Work on the Exchange Agreements you are named on: sign your side, run uploads and downloads, resolve conflicts, pause and resume. Everyone has this role. | Planners and schedulers who send or receive schedules |
| Tenant Setup | Build the content: connectors, templates and Configs. Create new Exchange Agreements. Shows the Setup menu. | One or two people who know your planning system |
| Tenant Admin | Run your organization: users and roles, terms, tenant settings, clients, encryption keys, data retention. Can act on every agreement in your organization, and sees reports. Shows the Tenant Admin menu. | You, plus one backup person |
| System Admin | The whole platform: organizations, global terms, client releases. | Promineo staff only. You cannot give this role. |
What decides what a person can do is their role plus whether they are named on an agreement. A Application User can do a lot, but only on the agreements where they are a representative. See User roles in SchedEx: who can see and do what.
Steps
- Ask your colleagues to sign in to SchedEx once with their normal work account. There is no separate invitation step. The first time someone signs in, SchedEx adds them to your organization automatically as a Application User. As a Tenant Admin you get a New User Registered notification when this happens.
- In the top menu, select Tenant Admin. Under Tenant, select Users.
- Find the person. Select the ⋮ (three-dot) menu on their row, then Edit.
- In Application role, tick the roles they need. You can tick more than one.
- Select Save. SchedEx shows "User has been updated."
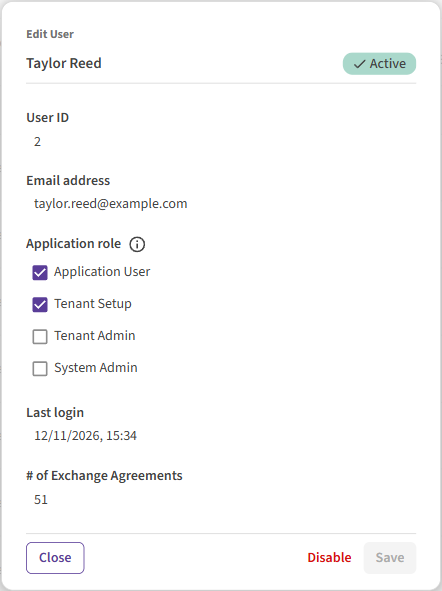 Tick the roles the person needs in the Edit User window, then select Save.
The same Edit User window has a Disable button. Use it when someone leaves. A disabled person cannot sign in until you select Activate again. Nothing is deleted.
A few rules
- You cannot change your own roles. Ask another Tenant Admin. This is a good reason to have two.
- You can give Application User, Tenant Setup and Tenant Admin, but never System Admin.
- Only people with the status Active can get a new role.
People in more than one organization
A SchedEx account belongs to one organization. Which one depends on the work account a person signs in with. There is no "switch organization" button. A consultant who works for you and for another company signs in with a separate account for each company.
Done when: each colleague appears in Tenant Admin → Tenant → Users with the status Active and the roles you chose. At least one person has Tenant Setup.
Go deeper
4. Stage 2: Partner
Goal: you and your partner agree, in plain words, what you will exchange and how.
Questions to answer first
- Who are we exchanging schedules with?
- Do they send to us, or do we send to them?
- Which planning systems do we each use?
- What data do we need, and how often?
Who does it: you, together with a contact person at the partner company. A short meeting or call is usually enough.
Owner and partner, sender and receiver
Every Exchange Agreement has two sides:
- The owner creates the agreement and chooses most of its settings, such as the template and how often transfers run. The owner signs last, and that signature makes the agreement active.
- The partner is invited by the owner. The partner fills in its own side and signs first.
Separately, one side is the sender and the other is the receiver. The sender uploads the schedule from its planning system. The receiver downloads it into its own system. The owner can be either one, but most often the owner is the receiver: the company that wants the schedule sets up the agreement.
Good to know: to create agreements, your organization must be allowed to be an owner. Promineo sets this when your organization is created. If you do not see New Exchange Agreement on the Active EAs page even though you have the Tenant Setup role, ask Promineo support, or let your partner be the owner.
Conversation checklist with your partner
Go through this table with your partner. Write down the answers. You will need them in the later stages.
| Question to agree | Why it matters | Where it goes in SchedEx |
|---|---|---|
| Which company owns the agreement? | The owner creates the agreement, picks the template and signs last. | Owner: New Exchange Agreement wizard, step 1 |
| Who sends and who receives? | Decides who uploads and who downloads. | Exchange role in the wizard; Direction in each Config |
| Which planning system does each side use, and which environment (test or live)? | Each side needs a connector for its own system and environment. | Stage 4, Setup → Connectors |
| Which schedule (project) is sent, and which schedule receives it? | Each side picks its own schedule in the agreement. | Schedule identifier in the wizard; schedule selection in the Config |
| Which data fields do we exchange, beyond the standard schedule data? | These become the terms in the template. | Stage 3 (terms) and Stage 5 (template) |
| Are there rules for the values (for example, only certain discipline codes)? | Can be checked automatically on upload. | Content control on the template or tenant terms |
| Who builds the template, and who shares it with whom? | Both sides must use the same template. | Stage 5, the Share button on the template |
| Do we send the whole schedule or only part of it? | The sender can filter which activities are sent. | Upload filter in the agreement (sender side) |
| How often, on what day and at what time (UTC)? | Sets when transfers are created and when one becomes overdue. | Frequency in the wizard, step 3 |
| When does the agreement start and end? | Transfers only run between these dates. | Start date and Expiration date |
| Who are the responsible people on each side? | Only representatives (and Tenant Admins) can sign and run transfers. | Owner representatives and Partner representative |
| Will a person click to run transfers, or should it run on its own? | Decides between the Desktop Client and the Autonomous Component. | Each connector's execution component |
| What happens if the same activity was changed on both sides? | Conflicts can be stopped for a human decision or handled automatically. | Conflict settings in the agreement |
| Who do we call when something fails? | Saves time on the first problem. | Write it in the agreement's Comments |
What if …
- … our partner is not on SchedEx yet? The partner must be an organization in SchedEx, and the partner representative must be a person who has signed in at least once. Send them Signing up your organization to use SchedEx. It is usually done within a day.
- … the "partner" is our own company (for example, from P6 to Excel, or between two departments)? That is fine. You are then both owner and partner of the same agreement. SchedEx lets you fill in both sides and sign both in one go. A template does not need to be shared.
- … a third company only needs to drop or collect files? On an agreement inside your own organization that uses SchedEx file storage, you can add that company as a contributor. See Contributor tenant.
Done when: you have the answers to the checklist, written down, and the partner knows what it must build on its side.
Go deeper
5. Stage 3: Data
Goal: the data fields you agreed on are available in SchedEx, so they can be added to a template.
Questions to answer first
- Is the standard schedule data (activity ID, name, dates, progress) enough for us?
- Which extra fields does our partner need, such as Discipline, Area or WBS?
- Do those fields already exist in SchedEx's global list?
Who does it: a Tenant Admin.
Core Fields and terms, in plain words
- Core Fields are the standard schedule data: activity ID, description, start and finish dates, percent complete, and so on. They are part of every transfer automatically. You do not need to choose them.
- Terms (SchedEx Terms) are extra fields that describe activities, such as Discipline, Location or Phase. You choose which terms go into a template.
Promineo keeps a global list of terms that every organization can use. Your organization sees only the global terms it subscribes to. If you need a field that is not in the global list, a Tenant Admin can create a tenant-specific term.
Do I need tenant-specific terms?
| Your situation | What to do |
|---|---|
| You only exchange standard schedule data (dates, progress, names). | Nothing. Core Fields are always included. |
| You need extra fields, and they are in the global list. | Subscribe to those global terms. |
| You need an extra field that is not in the global list. | Create a tenant-specific term. |
| You need very detailed control between the same system on both sides (P6 to P6, Safran to Safran). | Use the host-system-specific terms. See Understanding SchedEx Terms. |
| Not sure? | Subscribe to the global terms you recognize first. Ask Promineo support before you create your own. |
Tip: prefer global terms. A term created only for your organization is fine, but your partner sees it only through the template you share.
Steps
- In the top menu, select Tenant Admin. Under Terms, select Global.
- Select Manage Visibility. The Select visible Terms window opens.
- Tick the terms your organization needs, then select Save terms.
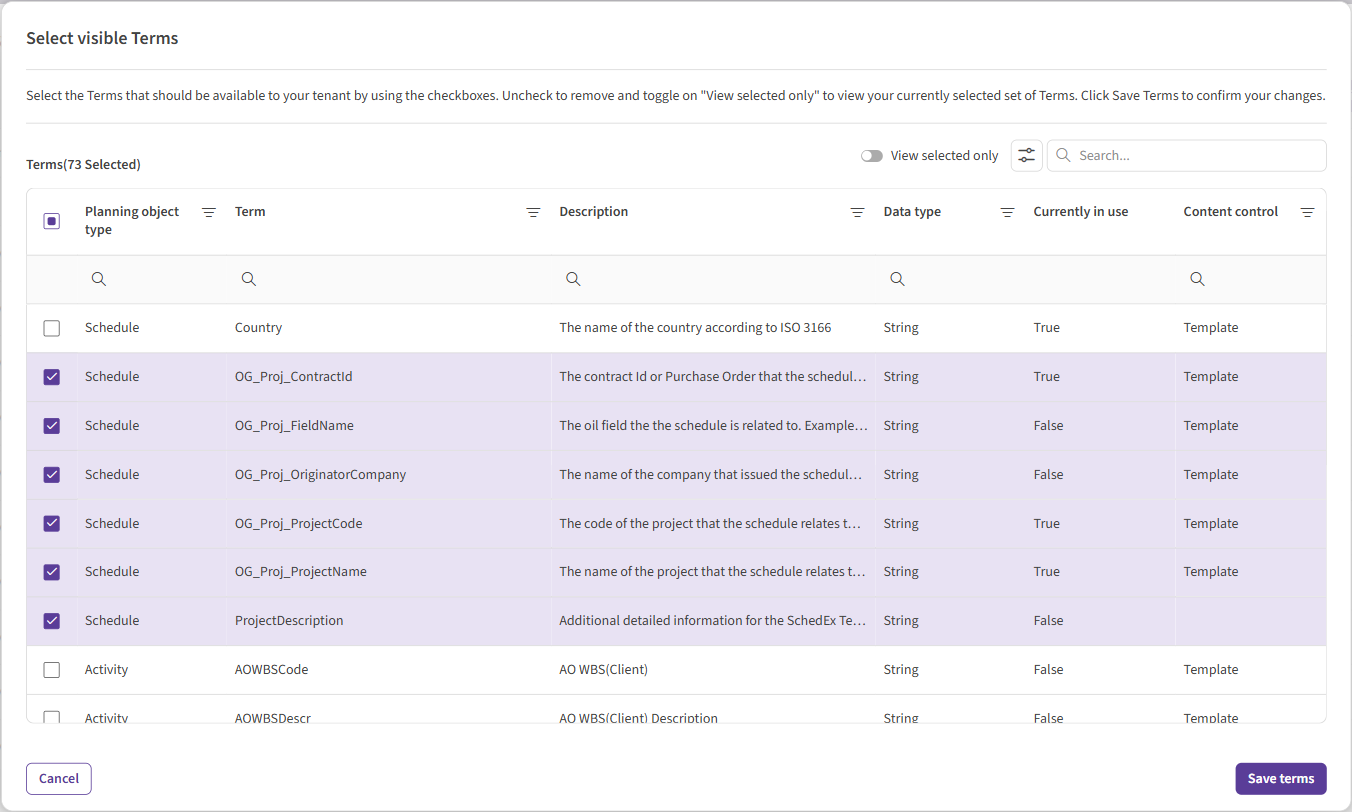 Tick the global terms your organization needs, then select Save terms.
- Optional: for each term, choose whether its allowed values are controlled per Template (the default) or for your whole organization (Tenant).
- Only if you need a term that is not in the global list: under Terms, select Tenant Specific, then New Item, and fill it in.
Done when: every extra field from your partner conversation is either a subscribed global term or a tenant-specific term, and shows in Tenant Admin → Terms.
Go deeper
- Understanding SchedEx Terms
- Setting up SchedEx Terms for a Tenant
- Example of setting up Content Control for a SchedEx Term
- Which Core Fields each system fills in: for example How Core Fields are populated on Upload from P6, … from Safran, … from SAP, … from Microsoft Project, … from Schedule Analytics, and on download to P6, to Safran, to SAP.
6. Stage 4: Connectors
Goal: SchedEx can reach your planning system, and it has read the list of your schedules.
Questions to answer first
- Which planning system holds our schedule: P6, Safran, SAP, Microsoft Project, Excel, an XER file, Schedule Analytics, or another system with a REST API?
- Test or live environment? Each one needs its own connector.
- Will a person run transfers from a PC (Desktop Client), or should a server run them on its own (Autonomous Component)?
- Who in IT can give us the address and sign-in details?
Who does it: a user with the Tenant Setup role, with values from your IT department or system administrator.
What a connector is
A connector is SchedEx's "address book entry" for one planning system in one environment. You need one connector per system and per environment. A P6 test system and a P6 live system are two connectors.
The transfer itself runs on a program inside your network, called the executing component:
- the Desktop Client, a Windows program a person uses to click Upload or Download, or
- the Autonomous Component, which runs on a server and does transfers on its own schedule.
Steps
- Install the executing component. As a Tenant Admin you can download the installers from Tenant Admin → Installation Center.
- In the top menu, select Setup, then New Connector.
- Choose the host system and the executing component, then follow the article for your system (table below).
- Test the connector, then Persist it. Persisting makes SchedEx read the list of schedules it can see. Without it, you cannot pick a schedule later.
| Your system | Article |
|---|---|
| Primavera P6 (Web Service or REST API) | Primavera P6 connectors: overview |
| Safran | Creating a Safran connector |
| SAP | Creating a SAP connector |
| Microsoft Project | Creating a Microsoft Project connector |
| Microsoft Excel | Creating a Microsoft Excel connector |
| Primavera P6 XER file | Creating a Primavera P6 XER file connector |
| Schedule Analytics | Creating a Schedule Analytics connector |
| Another system with a REST API | Creating a Generic REST API connector |
| Files in a shared folder | Creating a File Storage connector |
| Not sure where files should live? | Choosing where your schedule files are stored and Connecting SchedEx to SharePoint |
Done when: your connector shows as working in Setup → Connectors, it has been persisted, and your schedule appears in its list of schedules. Your partner has done the same on its side.
Go deeper
- Creating, Editing and Copying a Connector
- Testing and Persisting a Connector
- Checking your connectors: the overview and the connector list
- Installing the SchedEx desktop client, Deploying the SchedEx desktop client with Microsoft Intune, Downloading the desktop client installer from the Installation Center
- Autonomous Component Installation Overview
7. Stage 5: Template
Goal: both sides have the same template, which lists the terms you agreed to exchange.
Questions to answer first
- Did our partner already share a template with us?
- If not, who builds it: us or the partner?
- Which terms from Stage 3 go into it?
Who does it: a user with the Tenant Setup role. Usually one company builds the template and shares it. Often that is the owner of the agreement.
What a template is
A template is the agreed list of data, the "shopping list" for the transfer. Core Fields are always included, so a template lists only the extra terms. A template with no terms at all is allowed: then only Core Fields are exchanged.
A template is built once and used many times. The organization that creates it can share it with other organizations. They can see it and use it for their Configs, but they cannot change it.
Steps: you received a template
- Select Setup. Under Templates, select Received Templates.
- Open the template from your partner and check that it has the terms you agreed. You can view it, but not edit it.
- Go to Stage 6: Config.
Steps: you build the template
- Select Setup. Under Templates, select New Template.
- Give it a clear title and a description, for example who it is for.
- Add the terms you agreed on. Optional: set allowed values (content control) for a term.
- Save the template.
- To share it, open the template and select Share. Choose your partner's organization and confirm. The template now appears under Received Templates at your partner.
When the template changes later
SchedEx never changes a working setup behind your back. When a template changes, each Config and agreement built on it gets an Update available tag. Each side updates its own Config. Then the owner of the agreement accepts the update. Until then, transfers keep running as before. See Accepting template updates on Configs and agreements.
Done when: the same template is listed under Own Templates at one company and under Received Templates at the other (or, for an agreement inside your own company, under Own Templates).
Go deeper
- Creating, Editing, Sharing and Copying Templates
- The Setup Admin form for setting up Connectors, Templates and Configs
8. Stage 6: Config
Goal: a published Config that connects the template to your schedule, in the right direction.
Questions to answer first
- Are we sending or receiving?
- Which schedule (or schedules) does this Config cover?
- In our system, which field holds each term in the template? For example, is "Discipline" a user field, an activity code or a column?
Who does it: a user with the Tenant Setup role, ideally someone who knows how your schedules are built.
What a Config is
The template says what data is exchanged. The Config says where that data lives in your system. Each side builds its own Config:
- the sender builds a Sending Config, and
- the receiver builds a Receiving Config.
Both use the same template, the connector from Stage 4, and the schedule you agreed on.
Steps
- Select Setup. Under Configs, select New Config.
- Fill in the title, the Template, the Connector and the Direction (sending or receiving). Tip: end the title with _s or _r, so pairs are easy to find.
- Select the schedule or schedules the Config applies to.
- Map each term to a field in your system. Use a value transformation if your codes differ from your partner's codes.
- Check the host system parameters. They are the default settings for agreements that use this Config.
- Save and publish the Config.
Done when: your Config shows the status Published in Setup → Configs, and your partner's matching Config is published too.
Go deeper
- Creating, Editing, Testing and Copying Configs
- How to work with mapping formulas
- Host System Parameters for each host system
9. Stage 7: Exchange Agreement
Goal: a signed Exchange Agreement that is Active and creates transfers on the schedule you agreed.
Questions to answer first
- Are we the owner or the partner?
- Who are our representatives, the people who will sign and run transfers?
- What start date, end date and frequency did we agree?
Who does it: a user with the Tenant Setup role on the owner side creates the agreement. Then the representatives of each side finish their side and sign.
How an agreement moves through its life
| What you see | Where | What it means |
|---|---|---|
| Being Created | New EAs | The owner has started it. The partner still has to fill in its side, or someone still has to sign. |
| Pending EA start | New EAs | Both sides have signed. The agreement is waiting for its start date. |
| Listed in Active EAs | Active EAs | Signed and started. SchedEx creates transfers on the agreed frequency. |
| Paused | Active EAs | Someone paused it. Nothing runs until it is resumed. |
| Listed in Archived EAs | Archived EAs | Expired or archived. No more transfers. |
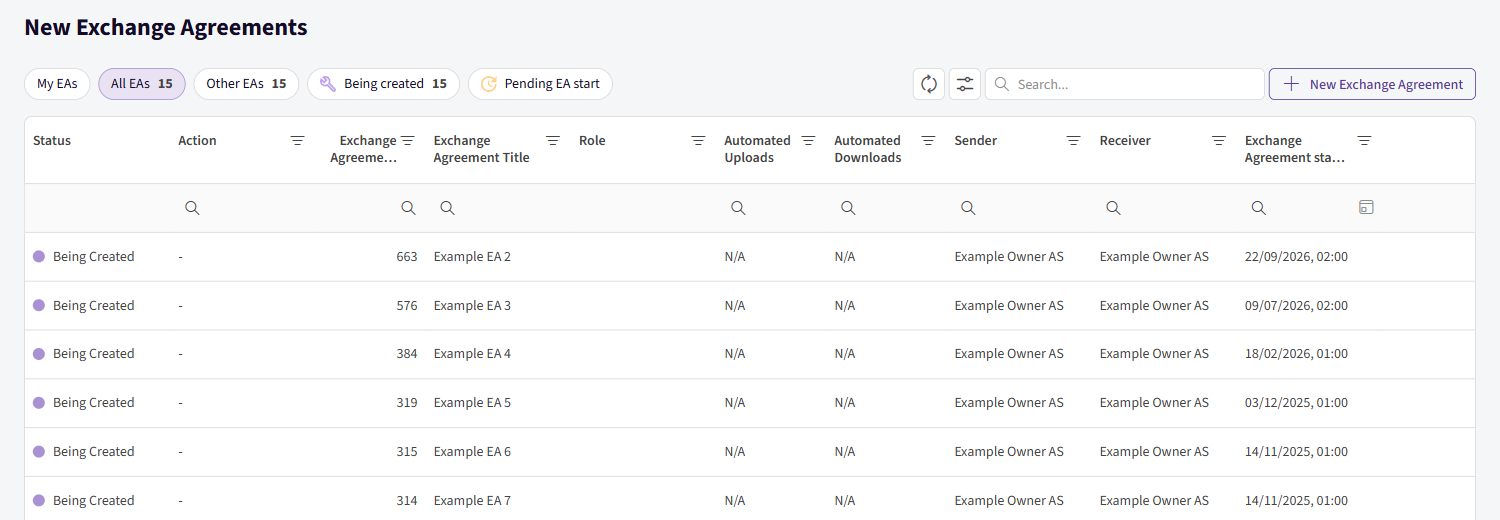 New EAs lists agreements that are not active yet. The filters at the top show those being created and those waiting for their start date.
Steps for the owner
- In the top menu, select Active EAs, then New Exchange Agreement.
- Step 1: give it a title. Choose your Exchange role (receiver or sender), the Template, the Partner tenant and the Partner representative.
- Step 2: choose your Connector and Schedule identifier. SchedEx finds your matching Config. Add your Owner representatives.
- Step 3: set the Start date, the Expiration date and the Frequency.
- Step 4: check the host system parameters. If you are the sender, also set the upload filter.
- Submit. The agreement now waits for the partner.
Can't find your connector or schedule in step 2? Then no published Config matches this template, connector, schedule and direction. Go back to Stage 6.
Steps for the partner
- In the top menu, select New EAs and open the agreement.
- Choose your connector and schedule, and add your representatives.
- Check the host system parameters. If you are the sender, set the upload filter.
- Sign. SchedEx asks you to confirm.
Signing
The partner signs first. The owner signs last, and that signature makes the agreement active. If owner and partner are the same company, you can sign both sides in one go.
Pause and resume
From the agreement's Options menu, Pause transfers stops everything: no new transfers are created, and waiting ones do not run. Select Resume transfers to continue.
Done when: the agreement shows signatures from both sides and is listed in Active EAs (or in New EAs as Pending EA start, if the start date is still ahead).
Go deeper
- Creating/Editing Exchange agreements (EAs)
- Configuring Frequency settings for an EA
- Defining and Editing a Filter for an EA
- Defining and Editing Validations for an EA (upload and download)
- Exchange Agreements (EAs)
10. Stage 8: First transfer
Goal: your first schedule has moved from the sender's system to the receiver's system, and you can see that it worked.
Questions to answer first
- Will the first transfer run on schedule, or do we want to start one now?
- Who clicks Upload and Download, or is the Autonomous Component doing it?
- Who checks the result in the receiving system?
Who does it: the representatives of each side, or the Autonomous Component on its own. A Tenant Admin can do it too.
Steps
Start a transfer. A scheduled transfer appears by itself. To start one right away, open the agreement and select Options → Create transfer event.
Upload (sender side). In the Desktop Client, select Upload on the transfer. With the Autonomous Component and automatic uploads on, this happens by itself.
Download (receiver side). In the Desktop Client, select Download. With the Autonomous Component, the download runs by itself, or after someone selects Approve, depending on the agreement.
Check it in the Transfer Center. Select Transfer Center in the top menu. Upcoming transfers are on the Scheduled and On-demand tabs. Finished ones are on the Performed tab.
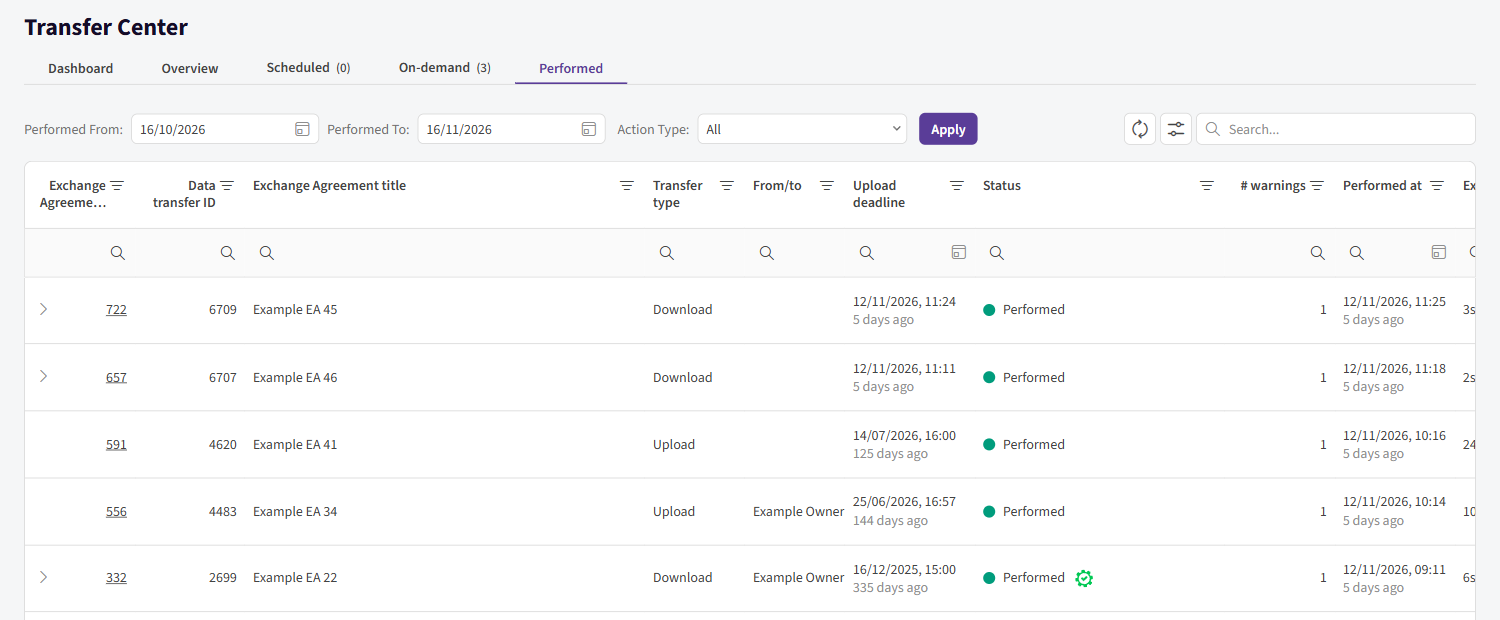 The Performed tab lists finished uploads and downloads. A successful one has the status Performed.
Look in the receiving system. Open the schedule and check a few activities.
Tip: to try the mapping without moving a full schedule, use Options → Create test transfer event on the agreement. It uploads a small sample (the first 50 rows that pass the filter).
What the statuses mean
| Status | What it means | What to do |
|---|---|---|
| Pending | Waiting for its time, or for approval. | Nothing, or select Approve if it is waiting for you. |
| Running | Moving data right now. | Wait. |
| Success (shown as Performed on the Performed tab) | Done. The data arrived. | Celebrate, then check the receiving schedule. |
| Failed | It did not finish. | Open the transfer's log, fix the cause, then retry. |
| Failed due to conflict | The same item was changed on both sides, and SchedEx needs a decision. | Select View conflicts and decide what should happen. |
| Overdue | Its time has passed, and it has not run. | Run the upload. Check that the executing component is running. |
| Skipped | Someone chose not to run this one. | Nothing. The next transfer is not affected. |
Done when: both the upload and the download are listed on the Performed tab with the status Performed, and the data looks right in the receiving system.
Where to get help
- Select the ? (help) icon in the top bar. SchedEx help center opens the help articles, and Contextual Help opens the help widget.
- If support needs to look at a transfer, send them its logs from inside SchedEx. See Support logs: sending transfer logs to the support team.
Go deeper
- The Transfer Center: running and managing your transfers
- How to use the Desktop client
- Controlling transfers for the Autonomous Component
- Reading the Autonomous Component Dashboard
- Conflict resolution in SchedEx
11. Your first transfer checklist
Tick these off as you go. When all eight are done, you have made your first transfer.
- 1 People: my colleagues have signed in and have the right roles. At least one is a Setup Admin, and there is a second Tenant Admin.
- 2 Partner: we went through the conversation checklist with our partner and wrote down the answers.
- 3 Data: the terms we need are subscribed (or created as tenant-specific terms).
- 4 Connectors: our connector is tested and persisted, and our schedule is in its list.
- 5 Template: both sides have the same template (own or received).
- 6 Config: our Config is published, with the right direction. The partner's Config is published too.
- 7 Exchange Agreement: both sides have signed, and the agreement is active.
- 8 First transfer: the upload and download show Performed in the Transfer Center, and the data looks right.
12. Questions and answers
My colleague signed in but sees almost nothing. Is something broken? No. New people start as Application Users, and a Application User only sees agreements they are named on. Give them a role in Tenant Admin → Tenant → Users, or add them as a representative on an agreement.
How do I invite someone who has never used SchedEx? Send them the SchedEx address and ask them to sign in with their work account. They are added automatically the first time they sign in. Then give them a role.
I made a mistake with my own roles. Can I fix it? No. Nobody can change their own roles. Ask another Tenant Admin in your organization, or Promineo support if you are the only one.
Can one person have more than one role? Yes. Tick several roles in the Edit User window. That is how you got both Tenant Admin and Tenant Setup.
A consultant works for us and for our partner. How do they get access to both? They need a separate account for each organization, because an account belongs to one organization. They sign in with the work account of the company they are acting for.
Our partner has not joined SchedEx. Can we still start? You can do Stages 1, 3, 4 and 6 already. The agreement (Stage 7) needs the partner organization and at least one partner person in SchedEx. Point them to Signing up your organization to use SchedEx.
Do we really need our own template, or can we use the partner's? Use the partner's if they shared one. Both sides must use the same template, so building a second one would not help.
We only want the dates and progress. Do we need terms at all? No. Core Fields such as dates and percent complete are always included. A template without terms is allowed.
Why can't I find my schedule when I create the agreement? Either the connector has not been persisted, or no published Config matches that template, connector, schedule and direction. Check Stage 4 and Stage 6.
I don't see the New Exchange Agreement button. You need the Tenant Setup role, and your organization must be allowed to own agreements. If you have the role, ask Promineo support, or let your partner own the agreement.
Who has to sign first? The partner signs first. The owner signs last, and that makes the agreement active.
The agreement is signed, but nothing happens. Check whether it is in New EAs as Pending EA start: the start date is still ahead. Also check that it is not Paused, and that the frequency is not On Demand. With On Demand, you start each transfer yourself.
What times does SchedEx use? Frequency and download times are in UTC. Convert from your local time when you set them.
A transfer failed. Is our data damaged? A failed transfer stops before it finishes, and you can retry it after fixing the cause. Open the log in the Transfer Center. If you need help, send the logs to support from inside SchedEx.
The template changed. Do we have to start over? No. Update your Config, then the owner accepts the update on the agreement. Until then, transfers keep running as before.
13. Glossary
| Word | What it means |
|---|---|
| Tenant | Your organization in SchedEx. Everyone from your company belongs to the same tenant. |
| Exchange Agreement (EA) | The agreement between two sides about what is sent, by whom, to whom and how often. |
| Owner / Partner | The owner creates the agreement and signs last. The partner is invited and signs first. |
| Sender / Receiver | The sender's schedule is the source. The receiver gets the data into its own system. |
| Upload / Download | Upload: the sender's schedule goes into SchedEx. Download: SchedEx writes it into the receiver's system. |
| Representative | A person named on one side of an agreement. Representatives sign and run transfers. |
| Host system | The planning system that holds a schedule, such as Primavera P6, Safran, SAP, Microsoft Project or Excel. |
| Connector | SchedEx's connection to one host system in one environment. |
| Template | The agreed list of extra data (terms) to exchange. Both sides use the same one. |
| Config | Your mapping from the template to the fields in your own host system, for sending or receiving. |
| Core Field | Standard schedule data, such as activity ID, dates and progress. Always included. |
| Term | An extra field, such as Discipline or Area. Global terms come from Promineo. Tenant-specific terms are your own. |
| Desktop Client | The Windows program a person uses to run uploads and downloads. |
| Autonomous Component | A program on a server that runs transfers by itself, without anyone clicking. |
For more words, see the Glossary.
14. Related articles
- Introduction to SchedEx
- The Building Blocks of SchedEx
- SchedEx Exchange Agreements (EAs)
- Signing up your organization to use SchedEx
- Sign Up to SchedEx on behalf of my company and transfer schedule(s)
- User roles in SchedEx: who can see and do what
- The Tenant Admin form
- Creating, Editing and Copying a Connector
- Creating, Editing, Sharing and Copying Templates
- Creating, Editing, Testing and Copying Configs
- Creating/Editing Exchange agreements (EAs)
- The Transfer Center: running and managing your transfers
- Glossary
Was this article helpful?
That’s Great!
Thank you for your feedback
Sorry! We couldn't be helpful
Thank you for your feedback
Feedback sent
We appreciate your effort and will try to fix the article