TABLE OF CONTENTS
- Introduction
- The three storage types at a glance
- Which SchedEx program reads the files
- Web Storage (files)
- SharePoint
- Local File
- Which host systems support which storage type
- Which should I choose?
- Comparison table
- Glossary
- Related articles
Introduction
Some planning tools do not talk to SchedEx over a live connection. Instead, they save the schedule
as a file: a Microsoft Project file (.mpp), a Primavera P6 export (.xer) or an Excel
workbook (.xlsx). The SchedEx connectors for these tools are called file-based connectors.
A file-based connector must know where the files are kept. When you create the connector, the wizard asks you to choose one of three storage types:
- Web Storage (files): the files are uploaded into SchedEx itself.
- SharePoint: the files are kept in a folder on your organization's SharePoint.
- Local File: the files are kept in a folder on a computer or a network drive.
This article explains each storage type: how the files get there, which SchedEx program reads them, what your IT department must set up, and the limits. It ends with a guide to help you choose. The step-by-step instructions for the wizard are in a separate article for each connector:
- Creating a Microsoft Project connector
- Creating a Microsoft Excel connector
- Creating a Primavera P6 XER file connector
Not sure you need a file-based connector? If you use Primavera P6 EPPM (P6 in a web browser), a live connection is usually better. See Primavera P6 connectors: overview.
1. The three storage types at a glance
You choose the storage type in Step 3 of the connector wizard, under Storage Type. A short line under the buttons repeats what each one means.
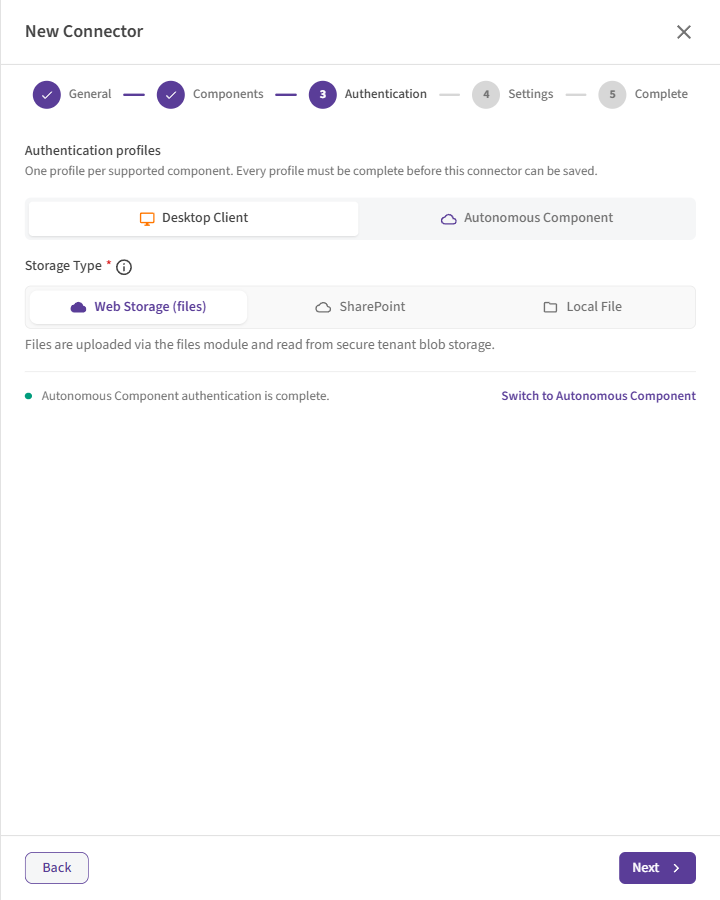 Step 3 of the wizard: the three storage types. Web Storage (files) is selected by default.
| Storage type | What the wizard says | In plain words |
|---|---|---|
| Web Storage (files) | Files are uploaded via the files module and read from secure tenant blob storage. | People upload files on the SchedEx Files page. SchedEx keeps them, encrypted, for your organization only. |
| SharePoint | Files are accessed from a SharePoint site. Authentication is required. | SchedEx reads the files from a SharePoint folder. SchedEx must be allowed to sign in to SharePoint. |
| Local File | Files are read from a local or network folder path on this machine. | SchedEx reads the files from a folder on the computer that runs the transfer. |
Web Storage (files) is selected by default when you create a new Microsoft Project, Excel or XER connector.
The storage type and the folder are the same for every component. If the connector serves both the Desktop Client and the Autonomous Component, they share one storage type, one SharePoint address and one folder path. Only the sign-in method can differ between them.
Not the same as the File Storage connector. SchedEx also has a separate File Storage connector. It is not one of these storage types. It reads ready-made SchedEx exchange files (
.ilap) from a container in your organization's own Azure Blob Storage, and it can only send. If your files are Microsoft Project (.mpp), Excel or XER files, use one of the three storage types in this article. See Creating a File Storage connector.
2. Which SchedEx program reads the files
SchedEx does not read SharePoint or your folders from the SchedEx cloud. The files are read by the SchedEx program that runs the transfer. In Step 2 of the wizard you choose which program that is. Each Exchange Agreement then uses one of them.
| SchedEx program | Where it runs | What that means for the files |
|---|---|---|
| Desktop Client | On a user's PC. Someone must be signed in. | With Local File, the folder must be reachable from that PC. With SharePoint, the user signs in to Microsoft in a browser window. |
| Autonomous Component | On a server, without a person. Used for automatic transfers. | With Local File, the folder must be reachable from that server. With SharePoint, it signs in with a certificate that IT installs on the server. |
With Web Storage (files), both programs fetch the file from SchedEx itself. Nothing on the PC or server needs access to your file shares or SharePoint.
3. Web Storage (files)
Web storage is file storage inside SchedEx. It works like a drop point: you drop a file into SchedEx, and the next Data Transfer sends it to your partner.
How files get there
- On the sending side, a user uploads the file on the Files page, on the Upload Files tab, in the web app or in the Desktop Client. They can drag the file onto the tab or select Upload File. See File-based drop point transfers (web storage).
- Who can upload: a representative of the sending side of the Exchange Agreement, a Tenant Admin, or a contributor with the Send role. See Uploading files as a contributor (Send role).
- The file name decides where the file goes. SchedEx matches the name to a schedule on the
connector. For
.mppand.xerfiles the name must be the schedule's name, for examplePROJ-1042.xer. For.xlsxfiles it must be the schedule's title. - On the receiving side, SchedEx produces a new file from the transferred data. The receiver downloads it from Files > Receiver Files. (Microsoft Project connectors only send. See section 6.)
How schedules are created
With web storage, SchedEx does not search a folder for files, so the connector has no Persist step. Instead, a user with the Tenant Setup role creates each schedule:
- Microsoft Project: New MPP File. Upload a sample
.mppfile. SchedEx reads its fields, not its rows. - Primavera P6 XER: New XER File. Upload a sample
.xerfile. - Excel: New Excel Template. The Excel Template wizard builds the schedule and a workbook to fill in. (Excel connectors always work this way, whatever the storage type.)
You find these actions in the connector's menu, and on Files > Schedules & Templates.
What IT must set up
Nothing. There are no addresses, folders or sign-in details to enter. The wizard hides the Authentication Method list for web storage.
Limits
- One web storage connector per host system and component. Your organization can have only one web storage connector of each type (for example, one Excel connector) for the Desktop Client, and one for the Autonomous Component. For Excel and XER connectors the wizard greys out Web Storage (files) when one already exists, and the tooltip says: A Web Storage connector already exists for Desktop Client (…). Only one Web Storage connector per type and execution component is allowed. For Microsoft Project, SchedEx stops you when you save.
- One file per schedule. A new upload replaces the previous file. There is no version history.
- 100 MB per file. Accepted formats are
.mpp,.xerand.xlsx. - Files are removed after a while. A Tenant Admin sets how long SchedEx keeps files, under Files > Manage Files. See Managing files — Manage Files, retention, and Schedules & Templates.
Good to know
- Pros: no IT setup; works from any PC or server that can reach SchedEx; partners and contributors can upload and download through SchedEx; files are encrypted per organization.
- Cons: someone must upload each new version by hand; the file name must match the schedule exactly; only one web storage connector of each type per component.
4. SharePoint
SchedEx reads the files from a folder in your organization's SharePoint Online.
How files get there
People save or copy the files into the SharePoint folder themselves, for example by saving from Microsoft Project straight to SharePoint. Nothing is uploaded on the SchedEx Files page. The Exchange Agreement does not appear on the Upload Files tab.
When the connector receives data (Excel and XER only), SchedEx writes the produced file into the same folder.
How schedules are created
- Microsoft Project and XER: select Persist. SchedEx reads every file in the folder and creates one schedule for each file. The schedule is named after the file, without the extension.
- Excel: use the Excel Template wizard, as with every Excel connector.
What IT must set up
Your IT department registers an app in Microsoft Entra ID, gives it access to the SharePoint site (Sites.Selected is recommended), and installs a certificate for the Autonomous Component. In the Desktop Client, each user signs in with their own work account and needs access to the folder.
The SharePoint address
Open the folder in SharePoint and copy the address from the browser address bar. A site, a document library or a folder inside one all work. The folder must already exist.
Which addresses are refused, what each step for IT involves, how sign-in works and what the messages mean: see Connecting SchedEx to SharePoint.
Limits
- SharePoint Online only. On-premises SharePoint servers are not supported.
- One folder per connector. SchedEx reads the files directly in that folder, not in its subfolders.
- One connector per address. Two connectors of the same type cannot use the same SharePoint address for the same component.
- Microsoft sign-in in the Desktop Client. The first time, a browser window opens and the user signs in.
Good to know
- Pros: files stay in a place your organization already manages and backs up; people save new versions there directly; no upload step; works for automatic transfers with the Autonomous Component.
- Cons: needs IT to register an app and grant site access; the Autonomous Component also needs a certificate; partners cannot upload through SchedEx.
5. Local File
SchedEx reads the files from a folder on a disk or on a network drive.
How files get there
People save or copy the files into the folder themselves. Nothing is uploaded on the SchedEx Files page.
The folder is read on the computer that runs the transfer: the user's PC for the Desktop
Client, or the server for the Autonomous Component. So the same path must work there. A network
share (for example \\fileserver\Schedules) or a folder that OneDrive or SharePoint keeps in sync
on the PC are common choices.
When the connector receives data (Excel and XER only), SchedEx writes the produced file into the same folder.
How schedules are created
- Microsoft Project and XER: select Persist. SchedEx reads the files in the folder and creates one schedule for each file.
- Excel: use the Excel Template wizard.
What IT must set up
- The folder must exist and be reachable from every PC or server that runs transfers.
- Read permission for the user (Desktop Client) or for the account the Autonomous Component runs as. Write permission too, if the connector receives data.
The folder path
You enter it in File System Root Folder Path. Use a full path, for example C:\Projects or
\\fileserver\Schedules\MSP. The path may contain Windows variables such as %USERPROFILE%. Each
PC then uses its own user's folder, which is handy for a synced SharePoint folder, for example
%USERPROFILE%\Contoso\Projects - Documents.
Limits
- One folder per connector. SchedEx reads the files directly in that folder, not in its
subfolders. It only reads files of the connector's type (
.mpp,.xeror.xlsx). - One connector per path. Two connectors of the same type cannot use the same path for the same component.
Good to know
- Pros: simplest setup; no sign-in; works with file shares you already have.
- Cons: every PC or server that runs transfers must see the same path; partners cannot upload through SchedEx; a wrong or missing folder is only noticed when you test.
6. Which host systems support which storage type
All three file-based connectors offer all three storage types.
| Host system | Web Storage (files) | SharePoint | Local File | Sends | Receives |
|---|---|---|---|---|---|
Microsoft Project (.mpp) |
Yes | Yes | Yes | Yes | No |
Microsoft Excel (.xlsx) |
Yes | Yes | Yes | Yes | Yes |
Primavera P6 XER File (.xer) |
Yes | Yes | Yes | Yes | Yes |
Go straight to the set-up steps for your connector and storage type:
| Host system | Web Storage (files) | SharePoint | Local File |
|---|---|---|---|
| Microsoft Project | Set up | Set up | Set up |
| Microsoft Excel | Set up | Set up | Set up |
| Primavera P6 XER File | Set up | Set up | Set up |
- Sends means SchedEx reads your file and sends its data to a partner.
- Receives means SchedEx writes a partner's data into a new file for you. With web storage you download it from Files > Receiver Files. With SharePoint or Local File, SchedEx saves it in the connector's folder.
- Microsoft Project only sends. SchedEx cannot write a
.mppfile. To receive a schedule for Microsoft Project, use another host system on your side, for example Excel.
7. Which should I choose?
- Choose Web Storage (files) if you want to start quickly, if partners or contributors should upload files through SchedEx, or if your IT department cannot set up SharePoint access. This is the default and the right choice for most organizations.
- Choose SharePoint if your planners already save schedules in SharePoint, and you want SchedEx to pick up the latest version without anyone uploading it. Plan time for IT to register the app and grant access.
- Choose Local File if the files are on a network share, and every PC or server that runs transfers can reach that share.
- If transfers must run automatically, without a person, use the Autonomous Component. It works with all three storage types. With SharePoint it needs a certificate; with Local File the folder must be reachable from its server.
- You already have a web storage connector of this type? You cannot create a second one for the same component. Reuse the one you have, or choose SharePoint or Local File.
Then follow the article for your connector:
- Creating a Microsoft Project connector
- Creating a Microsoft Excel connector
- Creating a Primavera P6 XER file connector
8. Comparison table
| Web Storage (files) | SharePoint | Local File | |
|---|---|---|---|
| Where the files are | Inside SchedEx, encrypted per organization | A SharePoint Online folder | A folder on a disk or network drive |
| How a new file arrives | A user uploads it on Files > Upload Files | Someone saves it into the SharePoint folder | Someone saves it into the folder |
| Partners and contributors can upload through SchedEx | Yes | No | No |
| Fields in the wizard | None | Authentication Method, SharePoint URL, Microsoft Entra ID Client ID (For SharePoint), Microsoft Entra Tenant Id (For SharePoint) | File System Root Folder Path |
| IT setup | None | App registration, site access, and a certificate for the Autonomous Component | Folder and permissions |
| How schedules are created | New MPP File, New XER File or New Excel Template | Persist (Microsoft Project, XER) or New Excel Template | Persist (Microsoft Project, XER) or New Excel Template |
| Where a received file ends up (Excel, XER) | Files > Receiver Files | In the SharePoint folder | In the folder |
| Desktop Client | Yes | Yes, with Microsoft sign-in | Yes, if the PC can reach the folder |
| Autonomous Component | Yes | Yes, with a certificate | Yes, if the server can reach the folder |
| How many per organization | One per host system and component | One per address and component | One per path and component |
9. Glossary
| Term | Meaning |
|---|---|
| Autonomous Component | A SchedEx service that runs on a server and performs transfers automatically, without a person. |
| Certificate | A digital key. The Autonomous Component uses one to sign in to SharePoint without a password. |
| Connector | The SchedEx object that knows how to reach one planning system, or one place where files are kept. |
| Desktop Client | The SchedEx program that runs on a user's PC. |
| Document library | A collection of files and folders in a SharePoint site, such as Documents. |
| Drop point | Another name for web storage: you drop a file into SchedEx, and the next transfer sends it. |
| Execution component | The SchedEx program that runs a transfer: the Desktop Client or the Autonomous Component. |
| Microsoft Entra ID | Microsoft's sign-in service for work accounts (formerly Azure Active Directory). |
| App registration | An entry in Microsoft Entra ID that lets a program, such as SchedEx, sign in and use SharePoint. It has a Client ID. |
| Persist | Reading the files from the folder into SchedEx, so that their schedules and fields can be used in Configs. |
| Schedule | One project schedule inside a connector. For file-based connectors, one file is one schedule. |
| Tenant ID | The identifier of your organization in Microsoft Entra ID. |
| Web storage | File storage inside SchedEx, reached through the Files page. |
10. Related articles
- Creating a Microsoft Project connector
- Creating a Microsoft Excel connector
- Creating a Primavera P6 XER file connector
- File-based drop point transfers (web storage)
- Managing files — Manage Files, retention, and Schedules & Templates
- Connecting SchedEx to SharePoint: where SchedEx uses SharePoint, how it signs in, which addresses work and what IT must set up.
- Configure-SharePoint-Access
- SharePoint access to document libraries or internal folders
- Creating, Editing and Copying a Connector
- Testing and Persisting a Connector
Was this article helpful?
That’s Great!
Thank you for your feedback
Sorry! We couldn't be helpful
Thank you for your feedback
Feedback sent
We appreciate your effort and will try to fix the article