TABLE OF CONTENTS
- Introduction
- At a glance
- What to ask your IT administrator for
- Open the connector wizard
- Step 1: General
- Step 2: Components
- Step 3: Storage and sign-in: Web Storage · SharePoint · Local File
- Step 4: Complete, test and create a template
- How files are added, and file rules: Web Storage · SharePoint and Local File
- Messages and what to do
- Questions and answers
- Related articles
Introduction
This article shows you, step by step, how to create a Microsoft Excel connector. This connector
lets SchedEx exchange schedules as Excel workbooks (.xlsx). It is a good choice when the
person who owns the data works in a spreadsheet rather than in a planning tool.
An Excel connector sends and receives:
- Sending: you fill in a workbook and SchedEx sends its data to a partner.
- Receiving: SchedEx writes a partner's schedule into a workbook for you.
Excel works a little differently from other file-based connectors. You do not export the workbook from a planning tool. SchedEx gives it to you: you design an Excel Template with the Excel Template wizard, and SchedEx generates the workbook to fill in. That is why an Excel connector never needs Persist.
Who can do this: a user with the Tenant Setup role in SchedEx.
You do not need to be technical. You only need to decide where the workbooks are kept. If they are kept in SharePoint, section 2 lists what to ask your IT department for.
Not sure where to keep the workbooks? Read Choosing where your schedule files are stored. It compares the three storage types in full. Using Microsoft Project or Primavera P6 files instead? See Creating a Microsoft Project connector or Creating a Primavera P6 XER file connector.
1. At a glance
Creating the connector takes about five minutes.
- Decide where the workbooks will be kept (section 6).
- Ask your IT department for the SharePoint values, if you choose SharePoint (section 2).
- Fill in the four-step wizard in SchedEx (sections 3 to 6).
- Test the connector and create an Excel Template (section 7).
Which storage type? Pick one, then jump straight to its parts of this article. The other storage types' sections can be skipped.
| Storage type | In plain words | Set it up in the wizard | How files are added | After saving |
|---|---|---|---|---|
| Web Storage (files) | People upload filled workbooks on the SchedEx Files page, and download received ones there. No IT setup. The default, and the right choice for most organizations. | Option A | Web Storage (files) | Create an Excel Template |
| SharePoint | SchedEx reads and writes the workbooks in a SharePoint folder. Needs IT setup. | Option B. IT setup: Connecting SchedEx to SharePoint | SharePoint and Local File | Test, then create an Excel Template |
| Local File | SchedEx reads and writes the workbooks in a folder on the PC or server that runs the transfer. | Option C | SharePoint and Local File | Test, then create an Excel Template |
The full comparison is in Choosing where your schedule files are stored.
Checklist before you open the wizard:
- I know which storage type to use.
- I know whether transfers run on a person's PC (Desktop Client), on a server (Autonomous Component), or both.
- Web storage only: my organization has no Excel web storage connector for that component yet. (Only one is allowed.)
- SharePoint only: I have the folder's SharePoint address, the Client ID and the Tenant ID from IT.
- Local File only: I have the folder path.
2. What to ask your IT administrator for
With Web Storage (files) you need nothing from IT. Skip to section 3.
With SharePoint or Local File, ask your IT department or SharePoint administrator for the items below. Tell them whether SchedEx will work from users' PCs (Desktop Client), from a server (Autonomous Component), or both, and that SchedEx will both read and write workbooks.
| Ask for | Why SchedEx needs it | Where it goes |
|---|---|---|
| Only if SharePoint: the address of the SharePoint folder for the workbooks. | So SchedEx knows where to read and write. | Step 3: SharePoint URL |
| Only if SharePoint: the Application (client) ID of the Microsoft Entra ID app registered for SchedEx. | SchedEx signs in to SharePoint through this app. | Step 3: Microsoft Entra ID Client ID (For SharePoint) |
| Only if SharePoint: your organization's Tenant ID in Microsoft Entra ID. | Tells Microsoft which organization to sign in to. | Step 3: Microsoft Entra Tenant Id (For SharePoint) |
| Only if SharePoint: write access for the app to the SharePoint site. Share Configure-SharePoint-Access with them. | SchedEx reads workbooks you fill in, and writes workbooks it receives. | Set up in Microsoft Entra ID and SharePoint by IT |
| Only if SharePoint and the Autonomous Component: the app's certificate installed on the Autonomous Component's server. | The Autonomous Component signs in with the certificate, without a person. | Set up on the server by IT |
| Only if SharePoint and the Desktop Client: access to the SharePoint folder for each person who runs transfers. | In the Desktop Client, SchedEx works in SharePoint as the signed-in person. | Set up in SharePoint by IT |
| Only if Local File: the folder path, and read and write access to it for users' PCs or for the Autonomous Component's server. | SchedEx works in the folder from the computer that runs the transfer. | Step 3: File System Root Folder Path |
No password is stored: with SharePoint, SchedEx signs in with a Microsoft account, and with Web Storage or Local File no sign-in is needed, so this connector stores no password or secret. Read how SchedEx protects the credentials of other connectors in Checking your connectors.
3. Open the connector wizard
- Select Setup in the top menu.
- On the Connector List card, select New Connector.
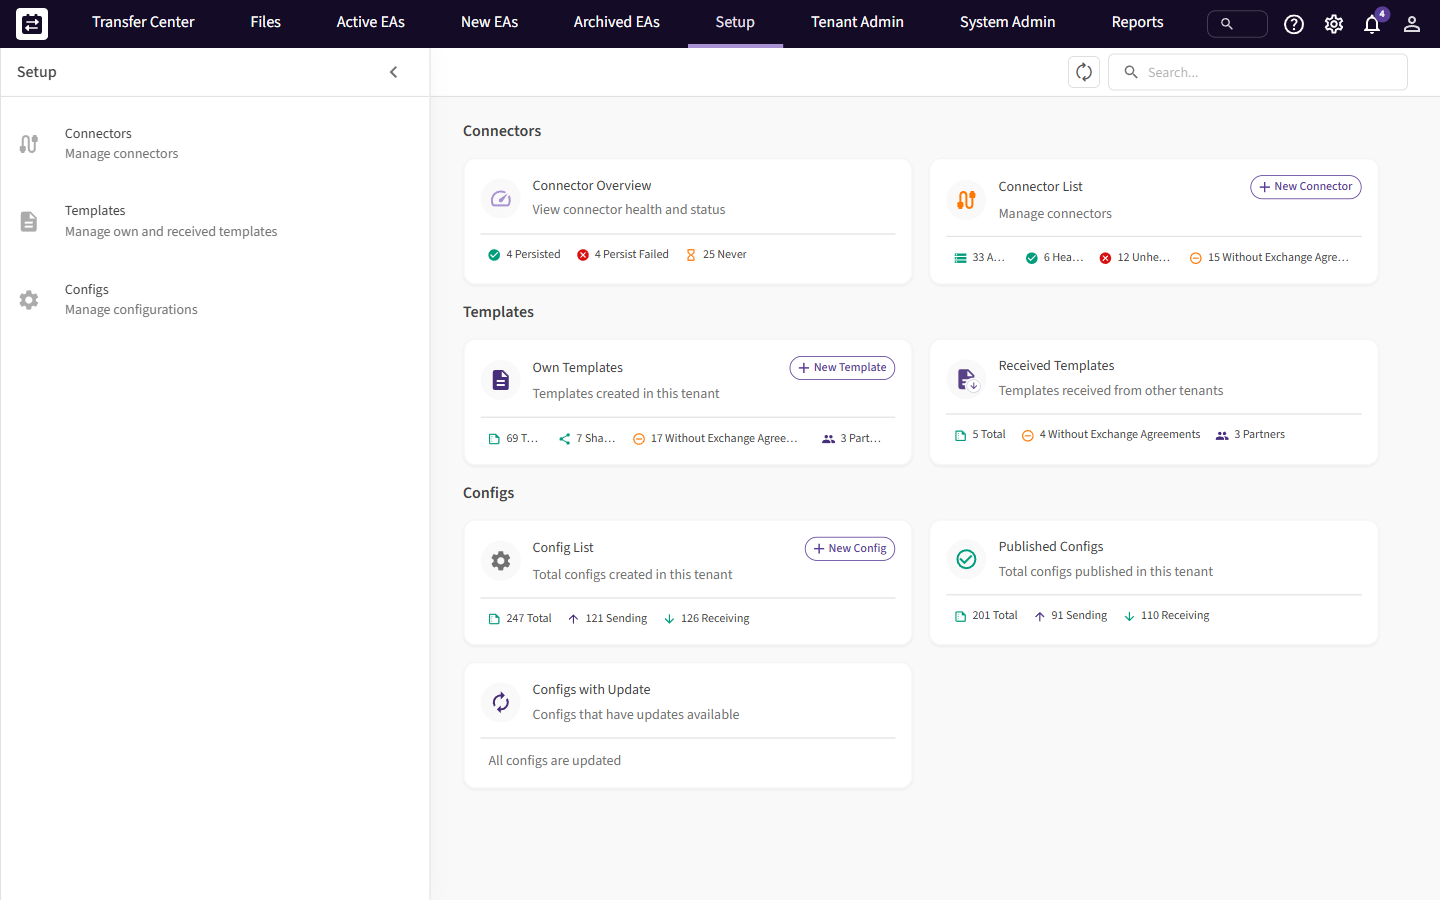 The Setup page. New Connector is on the Connector List card.
The New Connector wizard opens on the right. It has four steps: General, Components, Authentication and Complete. Every field has an ⓘ icon. Point at it to see a short help text. Next stays grey until every required field on the step is filled in.
4. Step 1: General
| Field | What to enter |
|---|---|
| Connector Name (required) | A name that tells your colleagues what this is, for example Excel - Web storage. The name is shown everywhere the connector is used, such as in Configs and Exchange Agreements. |
| Host System (required) | Select Microsoft Excel. |
| Import from existing (optional) | Copies the settings of a connector you already have, so that you only change what is different. |
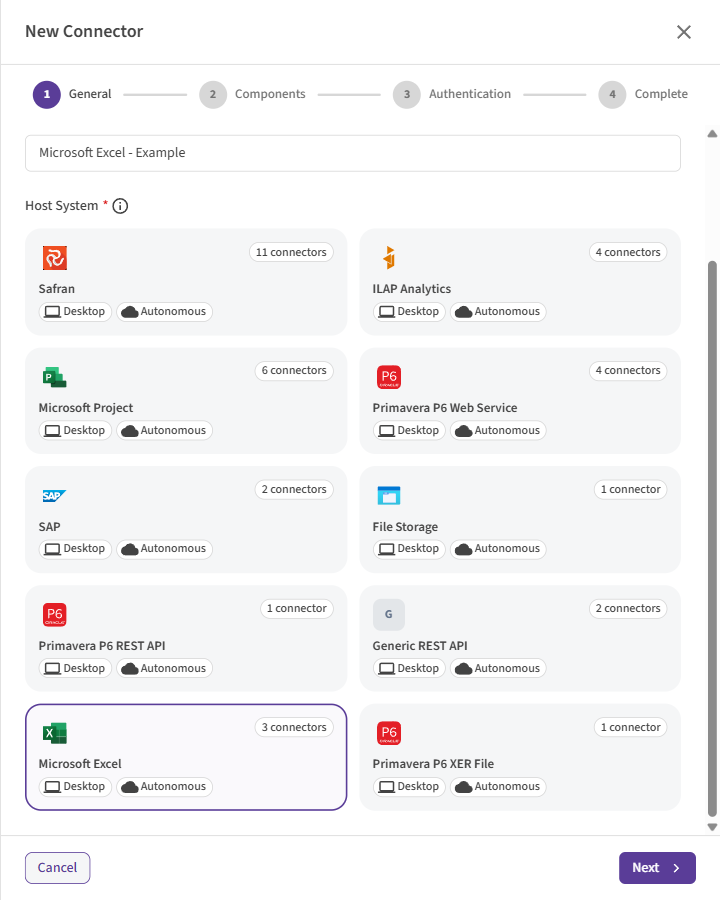 Step 1: the Microsoft Excel card selected.
Select Next.
5. Step 2: Components
An execution component is the SchedEx program that runs the transfer and reads or writes the workbooks.
| Option | What it means | Choose it when |
|---|---|---|
| Desktop Client | The SchedEx desktop program on a user's PC. Someone must be signed in to start a transfer. | People start transfers by hand. |
| Autonomous Component | A SchedEx service that runs on a server, without a person. | Transfers must run automatically on a schedule. |
You can select both. The connector then gets one sign-in profile for each component. With SharePoint, you fill in both in the next step. The storage type, the SharePoint address and the folder path are the same for both.
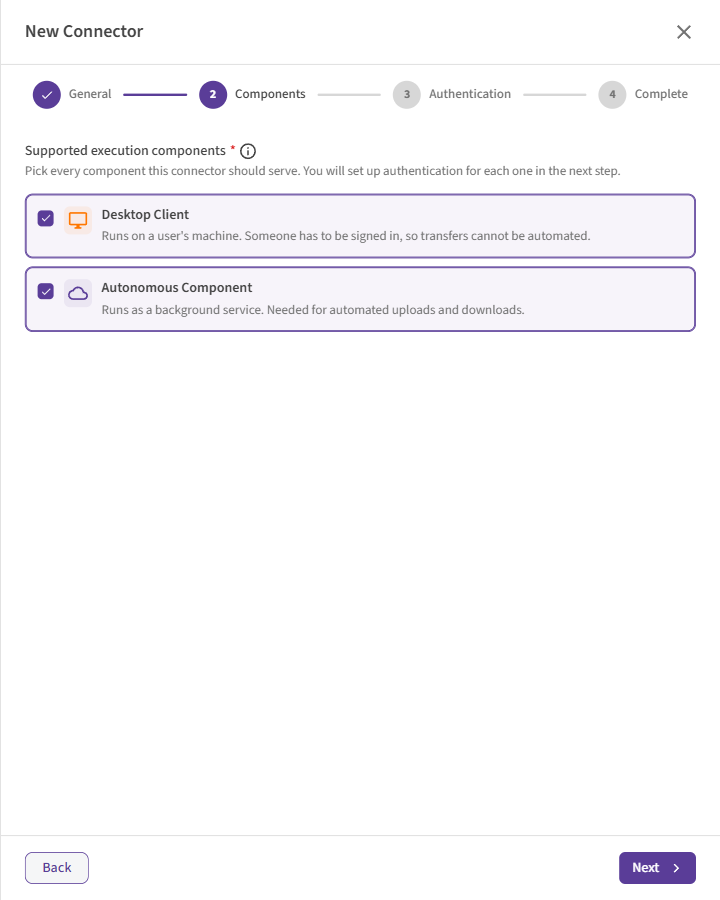 Step 2 with both components selected.
Select Next.
6. Step 3: Storage and sign-in
The step is called Authentication. At the top, under Authentication profiles, you see one tab for each component you selected in Step 2. Then choose the Storage Type. The fields below it change to match your choice.
| Storage Type | You enter | Desktop Client | Autonomous Component |
|---|---|---|---|
| Web Storage (files) | Nothing | Yes | Yes |
| SharePoint | Authentication Method, SharePoint URL, Client ID and Tenant ID | Yes, with Microsoft sign-in | Yes, with a certificate |
| Local File | File System Root Folder Path | Yes | Yes |
Option A: Web Storage (files)
Select Web Storage (files). This is selected by default. There is nothing else to fill in, and the Authentication Method list is hidden.
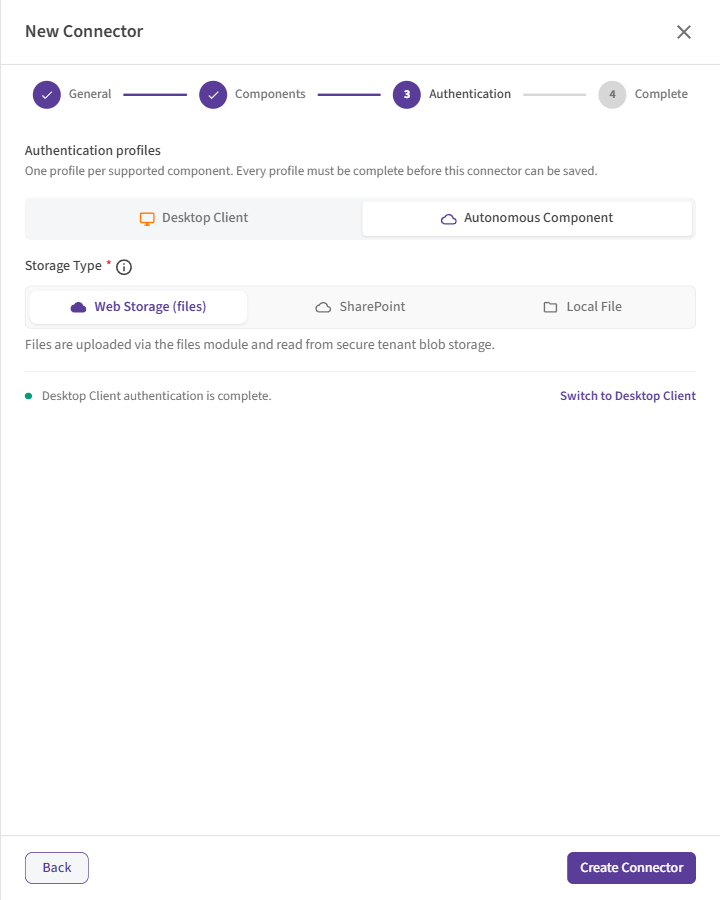 Web Storage (files): no further fields.
Only one Excel web storage connector per component. If your organization already has one for this component, Web Storage (files) is greyed out and SharePoint is selected instead. Point at the button to see why: A Web Storage connector already exists for Desktop Client (…). Only one Web Storage connector per type and execution component is allowed. Use the existing connector, or choose SharePoint or Local File.
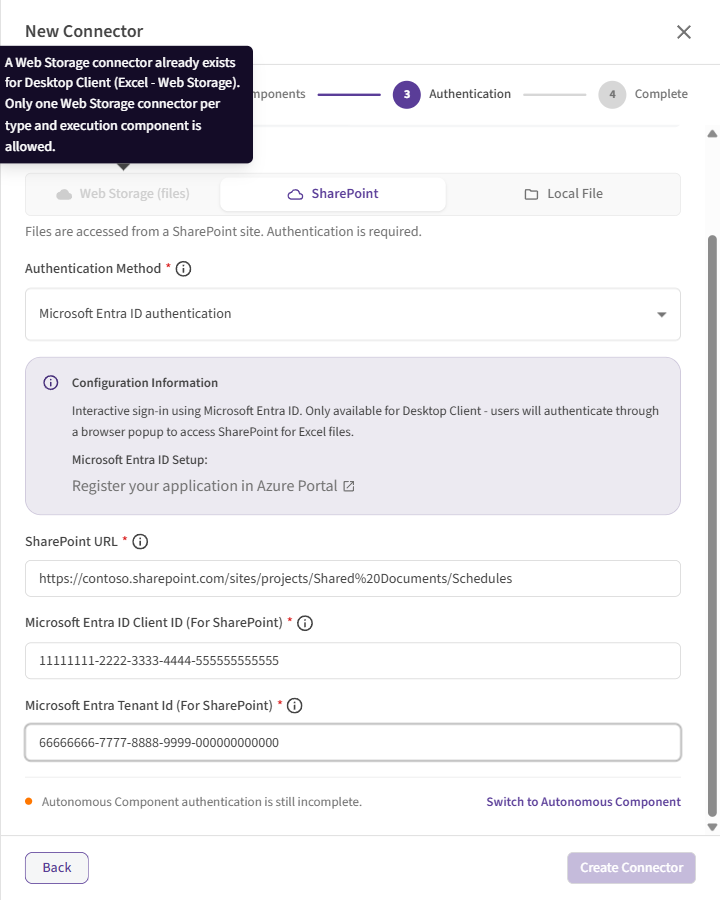 Web Storage (files) is greyed out when an Excel web storage connector already exists.
Done with this storage type? Skip the other options and go to Step 4: Complete, test and create a template.
Option B: SharePoint
Before you start: your IT department must have set up SharePoint access for SchedEx. What they need to do, which addresses work and how SchedEx signs in are explained in Connecting SchedEx to SharePoint. This section only covers the fields in this wizard.
Select SharePoint. Then fill in the fields below. If you selected both components, fill in the Authentication Method, Client ID and Tenant ID on each tab.
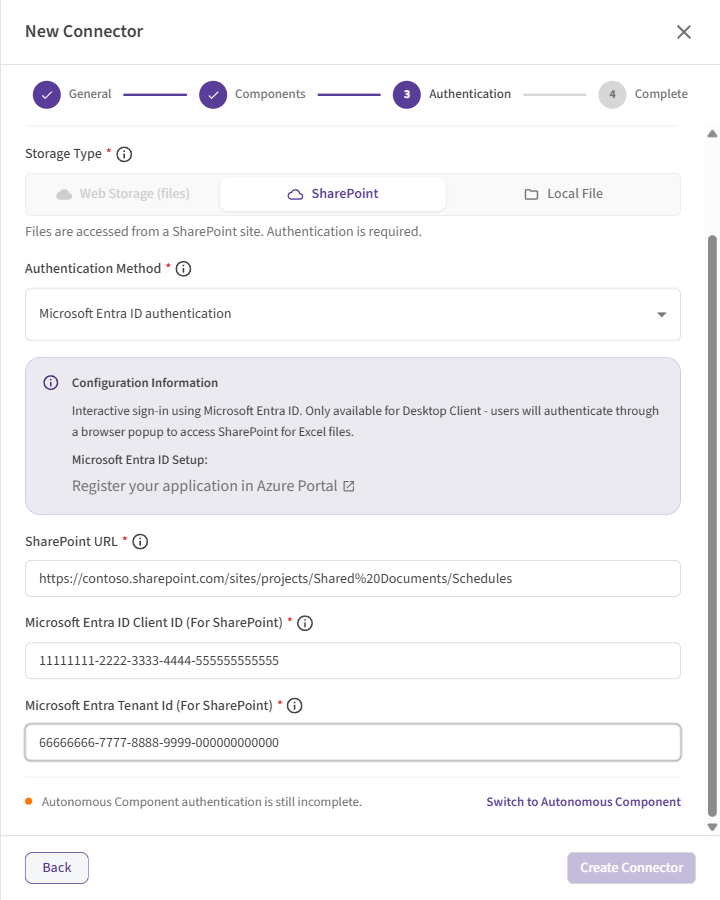 SharePoint on the Desktop Client tab.
| Field | What it means | Example |
|---|---|---|
| Authentication Method (required) | How SchedEx signs in to SharePoint. The list only offers the method that works for the tab you are on. See below. | |
| SharePoint URL (required) | The address of the SharePoint folder for the workbooks. A site address uses that site's default document library. To use another library or folder, open it in SharePoint and copy the address from the browser address bar. The folder must already exist. | https://contoso.sharepoint.com/sites/projects/Workbooks |
| Microsoft Entra ID Client ID (For SharePoint) (required) | The Application (client) ID of the app that SchedEx uses for SharePoint. Found in the Azure portal under App registrations → your app. | xxxxxxxx-xxxx-xxxx-xxxx-xxxxxxxxxxxx |
| Microsoft Entra Tenant Id (For SharePoint) (required) | Your organization's Tenant ID. Found in the Azure portal under Microsoft Entra ID → Overview. | xxxxxxxx-xxxx-xxxx-xxxx-xxxxxxxxxxxx |
Authentication methods:
| Method | Tab | What happens |
|---|---|---|
| Microsoft Entra ID (Interactive) | Desktop Client | The first time the connector runs, a browser window opens. The user signs in with their Microsoft work account. SchedEx then works in SharePoint as that user. |
| Microsoft Entra ID App Certificate (SharePoint) | Autonomous Component | The Autonomous Component signs in on its own, with the certificate that IT installed on its server. No person is needed. |
When you save, SchedEx checks the SharePoint address. If it ends in what looks like a file name,
for example .../Workbooks/Plan A.xlsx, it asks Is that a file or a folder?. SchedEx always
works in a folder. Select Use this folder to save the folder's address, or Keep what I
entered if the name really is a folder.
Done with this storage type? Skip the other options and go to Step 4: Complete, test and create a template.
Option C: Local File
Select Local File. Then fill in one field.
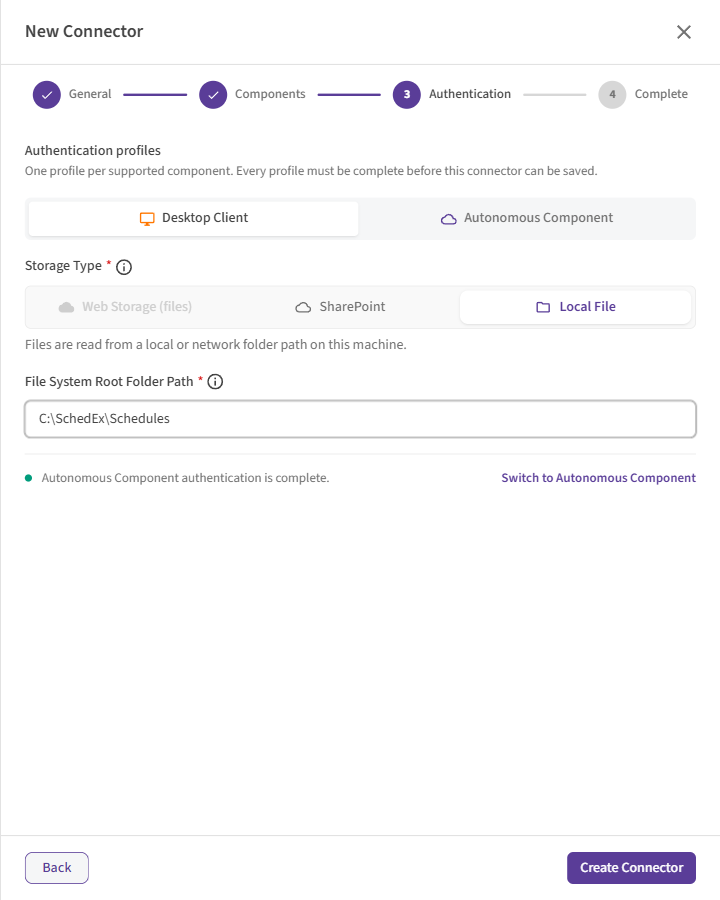 Local File: the folder path.
| Field | What it means | Example |
|---|---|---|
| File System Root Folder Path (required) | The folder for the workbooks. Use a full path. The folder is used on the PC or server that runs the transfer, so the path must work there. You can use %USERPROFILE% for a folder that OneDrive keeps in sync on each PC. |
\\fileserver\Schedules\Excel |
Select Create Connector when all required fields are filled in. This connector type has no Settings step.
7. Step 4: Complete, test and create a template
The last step confirms that the connector is saved. Its Next Steps list ends with Create Excel Template. Select View Connector to open the connector, or Close.
Test the connector
In the SchedEx desktop client, open Connectors and select Test on the connector's row.
- Web storage: the test only confirms the setting and shows Web storage configured.
- SharePoint or Local File: SchedEx opens the folder and looks for
.xlsxworkbooks. The folder must contain at least one.xlsxfile, or the test fails. With SharePoint, a Microsoft sign-in window may open.
Connected means everything works. Test Failed: followed by a message means something is wrong. See section 9.
Create an Excel Template
An Excel connector has no Persist. Its schedules come from Excel Templates:
- Open the connector and select New Excel Template in its menu. (You can also do this on the connector's Excel Templates tab, or on Files > Schedules & Templates.)
- The Excel Template wizard opens. Choose the fields (columns) and the objects the workbook carries: activities, and optionally links, resources and resource assignments.
- The wizard creates the schedule and its fields, and a workbook that you can download.
Each template is one schedule. Create one template for each schedule you exchange. The full guide to the wizard is in Excel file transfers.
If transfers run on the Autonomous Component
A test in the desktop client runs from your PC. It proves that your PC can reach the folder, not that the Autonomous Component's server can. To check the server:
- Ask a Tenant Admin to check the dashboard. In Clients > Autonomous Component > Dashboard, the Connectors panel shows each connector's health. The connector should be Healthy. If it is Unhealthy, point at the error icon to see why. See Reading the Autonomous Component Dashboard.
There is no Persist Within 3 Minutes for an Excel connector, because Excel never persists.
Check the connector later
In the web app, Setup > Connectors shows every connector's Status and Last Health Check. A connector that has not been checked for more than 7 days is marked as such: run Test again to refresh it.
More about testing: Testing and Persisting a Connector.
8. How files are added, and file rules
Always start from a generated workbook
Every workbook SchedEx generates has a hidden, signed sheet that ties it to its schedule and its columns. Fill in the workbook that SchedEx generated. Do not copy your rows into a new spreadsheet, and do not change the hidden sheet. Otherwise SchedEx refuses the file with Template signature metadata (_meta) is missing.
Web Storage (files)
- Sending: fill in the generated workbook. Open Files > Upload Files in the web app or the desktop client, and drop the workbook on the tab. The next Data Transfer sends it.
- The file name must match the schedule's title, plus
.xlsx, for examplePlan A.xlsx. Upper and lower case do not matter; everything else must match. - Receiving: after a transfer, download the produced workbook from Files > Receiver Files.
- One file per schedule. A new upload replaces the previous file for every Exchange Agreement that sends from that schedule.
The full steps are in Excel file transfers.
SharePoint and Local File
- Sending: save the filled workbook into the folder, named after the schedule. At transfer time, SchedEx reads the workbook with that name from the folder.
- Receiving: SchedEx fills a workbook with the partner's data and saves it in the same folder.
- Only the folder itself. SchedEx does not look in subfolders.
- Keep only
.xlsxfiles in a SharePoint folder. With Local File, SchedEx only looks at.xlsxfiles. With SharePoint, it reads every file in the folder.
Every storage type
| Rule | Detail |
|---|---|
| Format | Excel workbooks with the .xlsx extension, generated by SchedEx. |
| Size (web storage) | Up to 100 MB per file. |
| Direction | Send and receive. |
9. Messages and what to do
While you fill in the wizard or save
| Message | What it means | What to do |
|---|---|---|
| A Web Storage connector already exists for … Only one Web Storage connector per type and execution component is allowed. | Tooltip on the greyed-out Web Storage (files) button. | Use the existing Excel web storage connector, or choose SharePoint or Local File. |
| SharePoint URL is required | The SharePoint URL is empty. | Paste the folder's address. |
| Enter a complete address starting with https:// | The address is not complete, or starts with http://. |
Copy the address again from the browser's address bar. |
| OneDrive addresses are not supported. Use a SharePoint document library or folder. | You pasted a OneDrive address. | Use a SharePoint library address. |
| That address is not on SharePoint Online… | The address does not end in .sharepoint.com. |
Use your organization's SharePoint Online address. |
| Sharing links cannot be used. Open the folder in SharePoint and copy the address from the browser address bar. | You pasted a sharing link. | Open the folder and copy the address bar instead. |
| SharePoint Client ID is required / SharePoint Tenant ID is required | One of the two IDs is empty on one of the tabs. | Fill in both, on each tab. |
| File system root folder path is required when using local file path | File System Root Folder Path is empty. | Enter the folder path. |
| Is that a file or a folder? | The SharePoint address seems to end in a file name. | Select Use this folder, or Keep what I entered if it really is a folder. |
| A connector with this URL or path already exists. Please update the URL or path and try saving again. | Another Excel connector already uses this SharePoint address or folder. | Use the existing connector, or a different folder. |
When you test or transfer
| Message | What it means | What to do |
|---|---|---|
| Web storage configured. | The web storage connector is set up correctly. | Nothing. Create an Excel Template. |
| No Excel file found in the configured directory. | Local File: the folder has no .xlsx file. |
Save at least one workbook into the folder, then test again. |
| No Excel file found in the SharePoint directory. | SharePoint: the folder has no files. | Save at least one workbook into the SharePoint folder. |
| We couldn't find the selected directory. Please verify that it exists and is accessible. | Local File: the path does not exist on this PC or server. | Check the path, and that the network drive is connected. |
| You or this application do not have access to … | SharePoint refused access to the user or to the app. | Ask IT to check the app's site access and the user's permissions. |
| The configured folder '…' does not exist in this document library… | The folder was renamed, moved or deleted. | Open the folder in SharePoint and copy its address again. |
| Template signature metadata (_meta) is missing. | The workbook was not generated by SchedEx, or its hidden sheet was removed. | Download the generated workbook again and fill that one in. |
| File name must match the sender schedule. Rename the file to "….xlsx" and upload again. | Web storage: the file name does not match the schedule's title. | Rename the file as the message says. |
| Only .xlsx files are supported for Excel source uploads. | Web storage: the file is not an .xlsx workbook. |
Save it as .xlsx. |
| Excel import failed. … / Excel export failed. … | A transfer could not write or read the workbook. The rest of the message says why. | Check that the folder exists and that SchedEx may write to it. |
10. Questions and answers
Why is there no Persist button? Excel schedules come from Excel Templates, which you create with the Excel Template wizard. There is nothing to read from the folder in advance.
Can I have two Excel web storage connectors? Not for the same component. You can have one for the Desktop Client and one for the Autonomous Component. For more, use SharePoint or Local File.
Can I use any spreadsheet? No. Always fill in a workbook that SchedEx generated from an Excel Template. SchedEx refuses other workbooks.
Where do I find a workbook that SchedEx received for me? With web storage, on Files > Receiver Files. With SharePoint or Local File, in the connector's folder.
Can I change the storage type later? Yes. Edit the connector and choose another storage type, then test again. Check your Exchange Agreements afterwards, because the place where workbooks are uploaded or saved changes.
11. Related articles
- Choosing where your schedule files are stored: the three storage types compared.
- Creating a Microsoft Project connector
- Creating a Primavera P6 XER file connector
- Excel file transfers
- File-based drop point transfers (web storage)
- Connecting SchedEx to SharePoint: where SchedEx uses SharePoint, how it signs in, which addresses work and what IT must set up.
- Configure-SharePoint-Access
- Creating, Editing and Copying a Connector
- Testing and Persisting a Connector
- Reading the Autonomous Component Dashboard
Was this article helpful?
That’s Great!
Thank you for your feedback
Sorry! We couldn't be helpful
Thank you for your feedback
Feedback sent
We appreciate your effort and will try to fix the article