TABLE OF CONTENTS
- Introduction
- At a glance
- What to ask the API owner for
- Open the connector wizard
- Step 1: General
- Step 2: Components
- Step 3: Authentication: Addresses and paths · Option A: Service Token · Option B: Microsoft Entra ID Sign In
- Step 4: Settings
- Step 5: Complete, test and persist
- Messages and what to do
- Questions and answers
- Glossary
- Related articles
Introduction
This article shows you, step by step, how to create a Generic REST API connector. This connector lets SchedEx exchange schedules with a planning system that SchedEx has no ready-made connector for, such as an in-house or custom system. It works when that system offers a web interface (a REST API) that follows the SchedEx Generic REST API standard.
The connector works in both directions. SchedEx can read schedules from the API (send data to a partner) and write schedules into it (receive data from a partner).
Who can do this: a user with the Tenant Setup role in SchedEx.
You do not need to be technical. Most values come from the team that owns the API. Section 2 lists exactly what to ask them for.
Building the API yourself? This article is for the person who sets up the connector in SchedEx. Developers who build the API on your side should read the technical articles instead: Generic REST API Connector — Concept Overview, Generic REST API Connector — Implementation Guide and the reference Generic REST API Connector.
1. At a glance
Creating the connector takes about ten minutes once you have the values from the API owner.
- Ask the API owner for the values in section 2.
- Fill in the five-step wizard in SchedEx (sections 3 to 7).
- Test and persist the connector (section 8).
Checklist before you open the wizard:
- I have the Base URL of the API, for example
https://api.example.com/schedex/v1. - I have the paths for at least the Test, Get All Schedules, Schedule and Activity endpoints.
- I know the Schedule ID Query Parameter the API expects, for example
scheduleId. - I have a service token, or we sign in to the API with a Microsoft work account.
- I know whether transfers run on a person's PC (Desktop Client), on a server (Autonomous Component), or both.
2. What to ask the API owner for
Ask the team that built or runs the API for the items below. Tell them whether SchedEx will connect from users' PCs (Desktop Client), from a server (Autonomous Component), or both.
| Ask for | Why SchedEx needs it | Where it goes |
|---|---|---|
| The Base URL: the start of the address that all endpoints share. | So SchedEx can find the API. | Step 3: Base URL |
| The path of each endpoint, written after the Base URL. At least Test, Get All Schedules, Schedule and Activity. Also Calendar, Resource, Activity Link, Resource Assignment and Custom Fields, if the API has them. | SchedEx adds each path to the Base URL to reach that part of the schedule. | Step 3: the … Path fields |
The name of the query parameter the API uses for a schedule's ID, for example scheduleId. |
SchedEx adds it to the address when it asks for one schedule's data. | Step 3: Schedule ID Query Parameter |
| How SchedEx signs in: a service token, or Microsoft Entra ID (Microsoft work accounts). | The two methods need different values. | Step 3: Authentication Method |
Only for a service token: the token and the word that goes in front of it (the scheme), usually Bearer. |
SchedEx sends the token with every request. | Step 3: Service Token, Service Token Scheme |
| Only for Microsoft Entra ID: the Authority, Client ID and Scopes of the app that protects the API. | Needed to sign in with a Microsoft work account. | Step 3: Authority, Client ID, Scopes |
| Whether the API accepts PATCH for updates. | Decides how SchedEx sends changes when it writes into the API. | Step 3: Use PATCH for updates |
| Only if a gateway sits in front of the API: any extra headers it needs, such as a subscription key. | SchedEx sends them with every request. | Step 4: Custom Headers |
| Any limit on how many items the API accepts or returns in one request. | So you can set the batch sizes to match. | Step 4: Read Batch Size, Write Batch Size |
| Confirmation that the API can be reached from users' PCs or the Autonomous Component's server. | SchedEx connects to the API directly from there. | Network, set up by IT |
How SchedEx keeps these values safe: the passwords, client secrets and tokens you enter in the wizard are encrypted with AES-256 before SchedEx saves the connector. The encryption key is kept in Azure Key Vault, separate from the database. Custom header values are not encrypted. Read more in Checking your connectors.
3. Open the connector wizard
- Select Setup in the top menu.
- On the Connector List card, select New Connector.
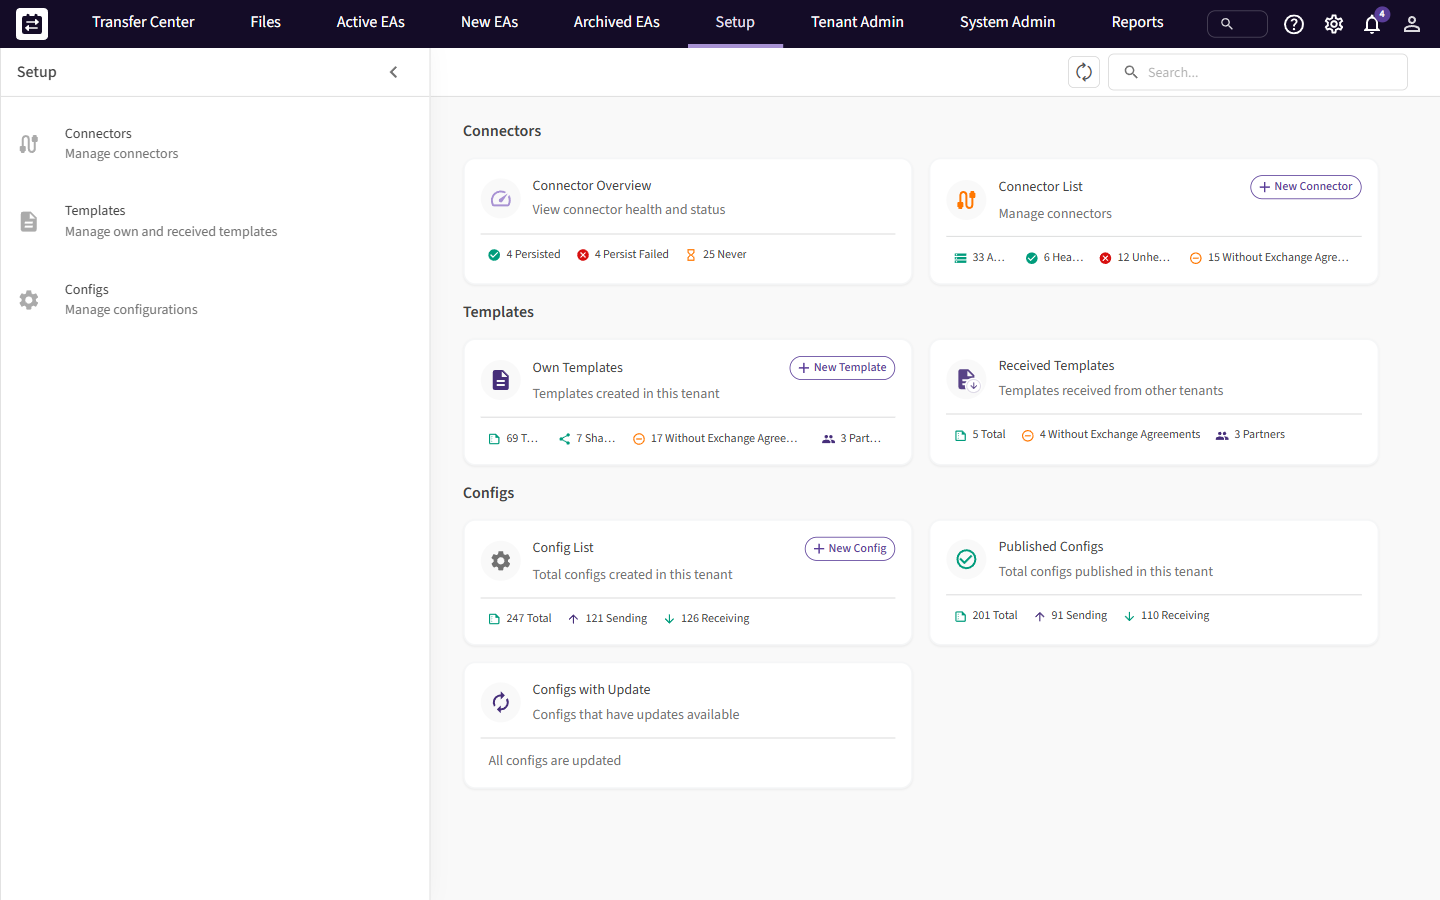 The Setup page. New Connector is on the Connector List card.
The New Connector wizard opens on the right. It has five steps: General, Components, Authentication, Settings and Complete. Most fields have an ⓘ icon. Point at it to see a short help text. Next stays grey until every required field on the step is filled in.
4. Step 1: General
| Field | What to enter |
|---|---|
| Connector Name (required) | A name that tells your colleagues which system this is, for example Planner X Production (REST). The name is shown everywhere the connector is used, such as in Configs and Exchange Agreements. |
| Host System (required) | Select the Generic REST API card ("Connect to any REST API endpoint"). Scroll down the list of host systems to find it. |
| Import from existing (optional) | Copies the settings of a connector you already have, so that you only change what is different. |
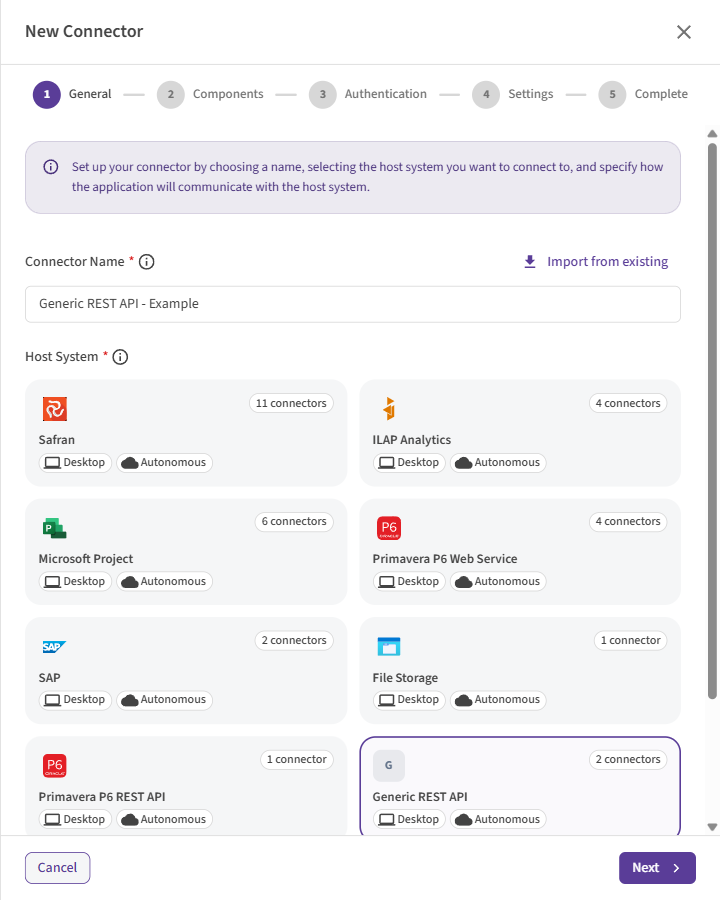 Step 1: the Generic REST API card selected.
Select Next.
5. Step 2: Components
An execution component is the SchedEx program that runs the transfer and talks to the API.
| Option | What it means | Choose it when |
|---|---|---|
| Desktop Client | The SchedEx desktop program on a user's PC. Someone must be signed in to start a transfer. | People start transfers by hand, or you want to sign in with a Microsoft work account. |
| Autonomous Component | A SchedEx service that runs on a server, without a person. Needed for automated uploads and downloads. | Transfers must run automatically on a schedule. |
You can select both. The connector then gets one sign-in profile for each component, and you fill in both in the next step. They can use different sign-in methods. For example, the Desktop Client can use Microsoft sign-in while the Autonomous Component uses a service token.
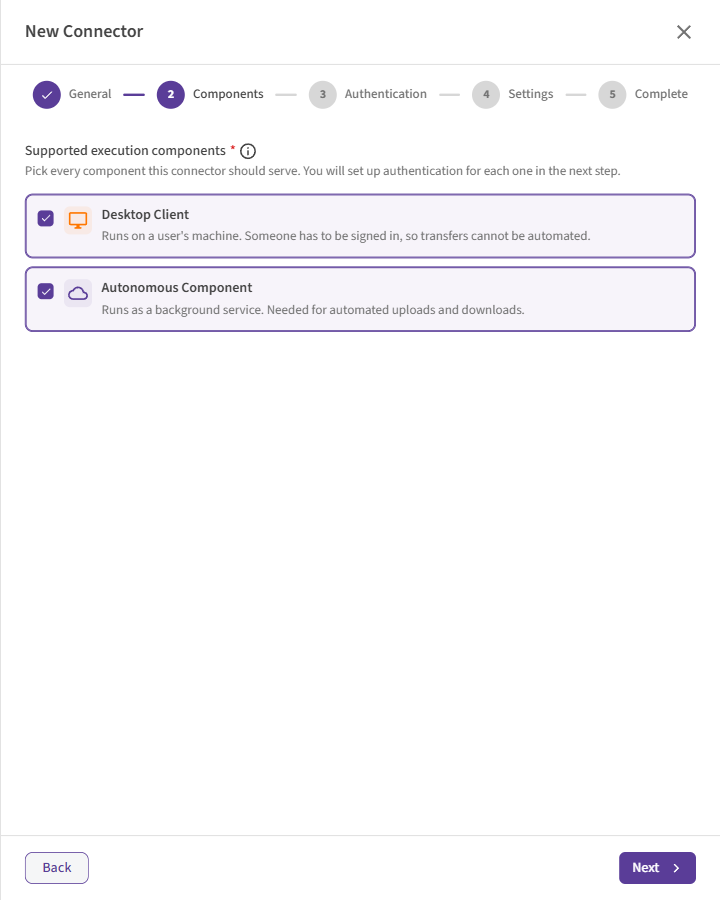 Step 2: choose where transfers run. With both selected, Step 3 shows a tab for each one.
SchedEx connects to the API directly from where the component runs: the user's PC or the Autonomous Component's server. The API must be reachable from there.
Select Next.
6. Step 3: Authentication
This step holds two kinds of information:
- How SchedEx signs in (the Authentication Method and its fields). This can differ per component.
- Where the API is (the Base URL and the paths). This is the same for both components. When you switch tabs, you see the same values.
If you selected both components in Step 2, you see two tabs: Desktop Client and Autonomous Component. Fill in both. The line at the bottom tells you whether the other profile is complete, for example Autonomous Component authentication is still incomplete. Select Switch to … to go there.
First choose the Authentication Method: how SchedEx proves to the API who it is. The fields below the list change to match your choice.
| Method | You enter | Desktop Client | Autonomous Component |
|---|---|---|---|
| Service Token | A token and its scheme | Yes | Yes |
| Microsoft Entra ID Sign In | Authority, Client ID and Scopes | Yes | No |
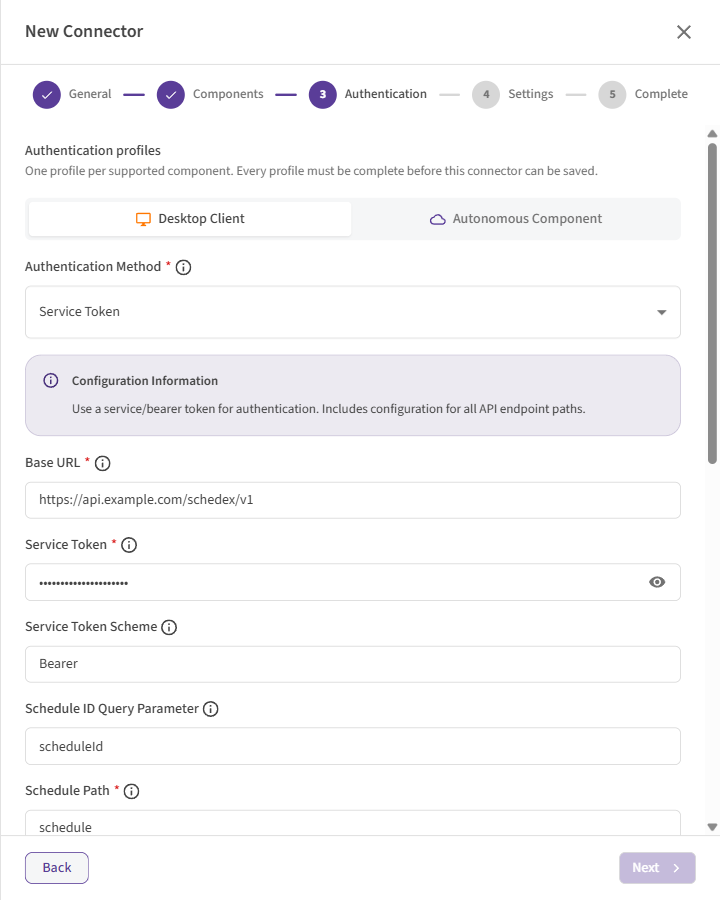 Step 3, Desktop Client tab, Service Token. The Base URL comes first, then the sign-in fields, then the paths.
Addresses and paths (every method)
Fill these in whichever method you choose. The sign-in fields for your method appear between the Base URL and the paths.
How SchedEx builds an address: it puts the Base URL and a path together. With Base URL
https://api.example.com/schedex/v1 and Test Path status, SchedEx calls
https://api.example.com/schedex/v1/status.
Type the addresses exactly, with no spaces before or after them. Do not end the Base URL with
/, and do not start a path with/. The grey example text in the path fields starts with/, but a path that starts with/gives an address with a double//, which many APIs reject.
| Field | What it means | Example |
|---|---|---|
| Base URL (required) | The start of the address that all endpoints share. It must start with http:// or https://. |
https://api.example.com/schedex/v1 |
| Schedule ID Query Parameter | The name the API uses for a schedule's ID in the address, for example ?scheduleId=23. Always fill this in, even though it is not marked as required. The grey scheduleId you see in an empty field is only an example and is not saved. |
scheduleId |
| Schedule Path (required) | Where SchedEx reads and updates one schedule. | schedule |
| Resource Path | Where SchedEx reads, creates and updates resources. Leave empty if the API has no resources. | resources |
| Calendar Path | Where SchedEx reads, creates and updates calendars. Leave empty if the API has no calendars. | calendars |
| Activity Path (required) | Where SchedEx reads, creates, updates and deletes activities. | activities |
| Activity Link Path | Where SchedEx reads, creates and updates the links between activities (dependencies). Leave empty if the API has none. | activitylinks |
| Resource Assignment Path | Where SchedEx reads, creates and updates which resources work on which activities. Leave empty if the API has none. | resourceassignments |
| Get All Schedules Path (required) | Where SchedEx reads the list of schedules. Used when you persist the connector. | schedules |
| Get Custom Fields Path | Where SchedEx reads the API's own extra fields, so you can map them in Configs. Leave empty if the API has none. | customfields |
| Test Path (required) | Where SchedEx checks that the API is up and that the sign-in works. Used by Test. | status |
| Use PATCH for updates | A switch. Off (default): SchedEx sends changes as a full update (PUT). On: SchedEx sends them as a partial update (PATCH). Switch it on only if the API owner confirms that the API supports PATCH. | Off |
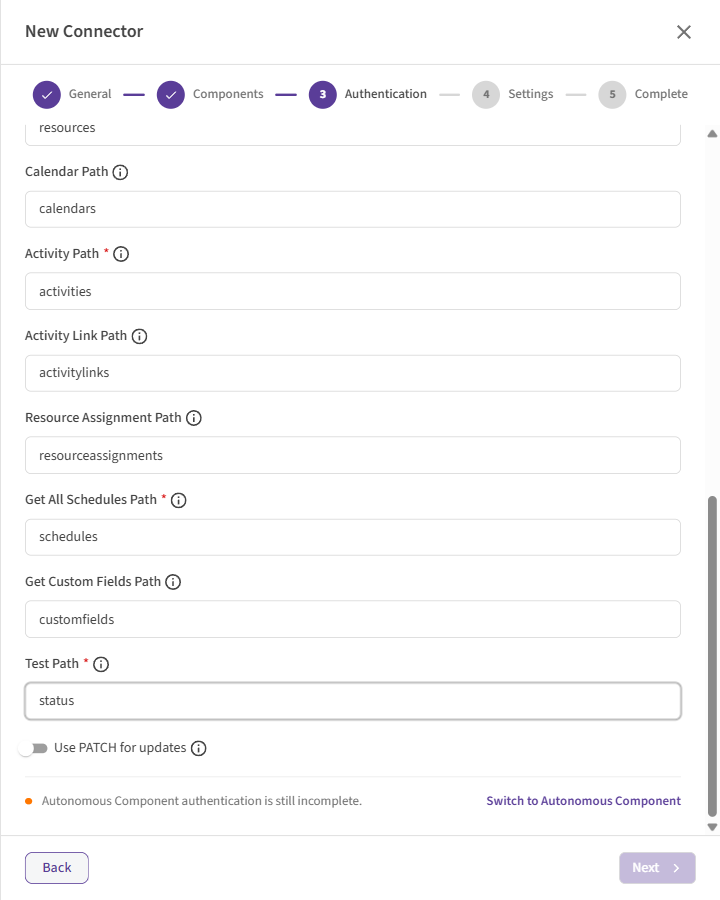 Step 3, scrolled down: the remaining paths and Use PATCH for updates.
What happens when an optional path is empty? SchedEx skips that part of the schedule. For example, with no Calendar Path, calendars are not read or written. The transfer log notes it.
Always use an address that starts with
https://. Your sign-in details travel with the requests. SchedEx also acceptshttp://, but then the token is sent unprotected.
Option A: Service Token
SchedEx sends a fixed token with every request, in the Authorization header. Works in both
components. This is the only method for the Autonomous Component.
| Field | What it means | Example |
|---|---|---|
| Service Token (required) | The token the API owner gave you. SchedEx stores it encrypted. Select the eye icon to show what you typed. | •••••••••••• |
| Service Token Scheme | The word SchedEx puts in front of the token. SchedEx sends Authorization: <scheme> <token>. If you leave it empty, SchedEx uses Bearer. |
Bearer or ApiKey |
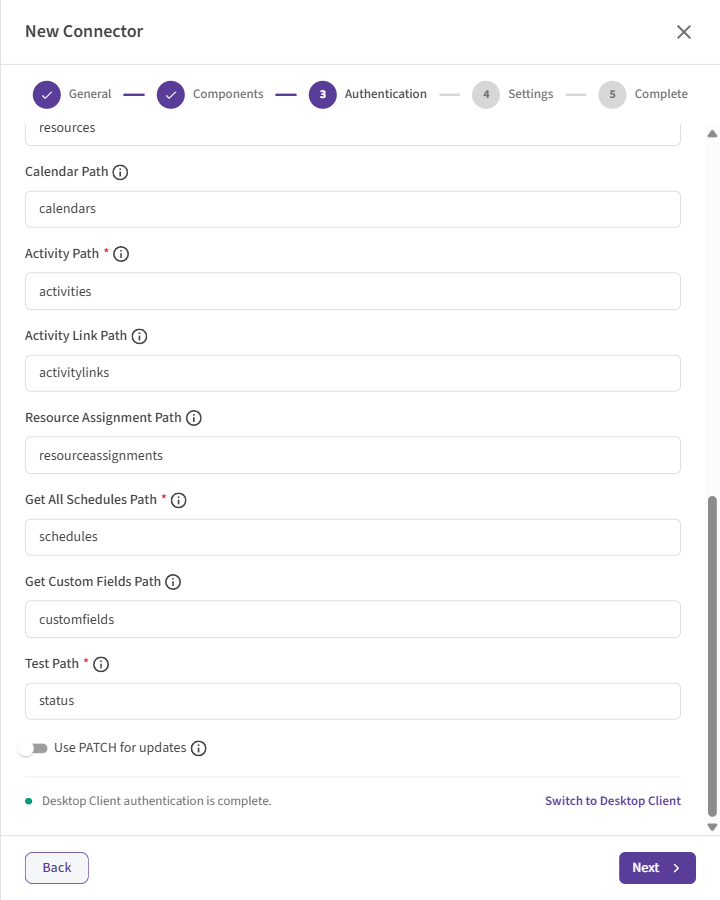 Service Token on the Autonomous Component tab. The bottom line shows the state of the Desktop Client profile.
Done with this method? Skip the other options and go to Step 4: Settings.
Option B: Microsoft Entra ID Sign In
Use this when your organization protects the API with Microsoft Entra ID, so that you sign in with your Microsoft work account. Works only in the Desktop Client.
| Field | What it means | Example |
|---|---|---|
| Authority (required) | The Microsoft sign-in address for your organization. | https://login.microsoftonline.com/<your-tenant-id> |
| Client ID (required) | The Application (client) ID of the app registered for the API in Microsoft Entra ID. Found in the Azure portal under App registrations → your app → Overview. | xxxxxxxx-xxxx-xxxx-xxxx-xxxxxxxxxxxx |
| Scopes (required) | The permission SchedEx asks for when it signs in. Usually the app's address followed by /.default. |
api://<your-app-id>/.default |
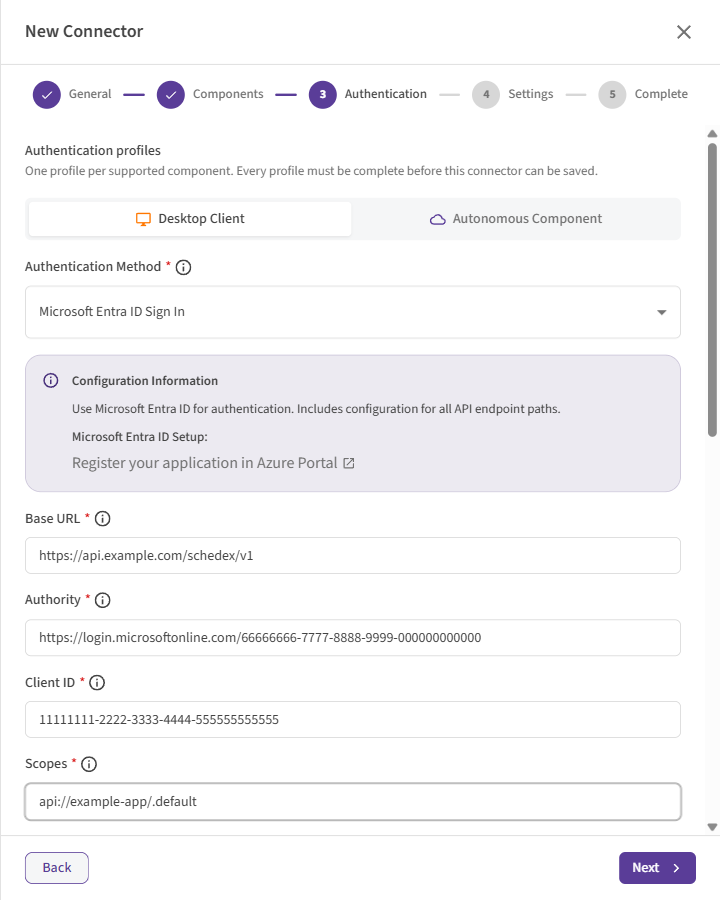 Microsoft Entra ID Sign In: Authority, Client ID and Scopes.
What you will notice: the first time the connector talks to the API, a Microsoft sign-in window opens. Sign in with your work account. The desktop client then remembers the sign-in on your PC, so you are not asked every time.
Microsoft Entra ID Sign In works only in the Desktop Client. The Autonomous Component cannot open a sign-in window. The list on the Autonomous Component tab still offers it, but do not choose it there: choose Service Token.
Select Next when all required fields are filled in.
7. Step 4: Settings
All settings on this step are optional. The default values work for most APIs. Change them only when you have a reason to.
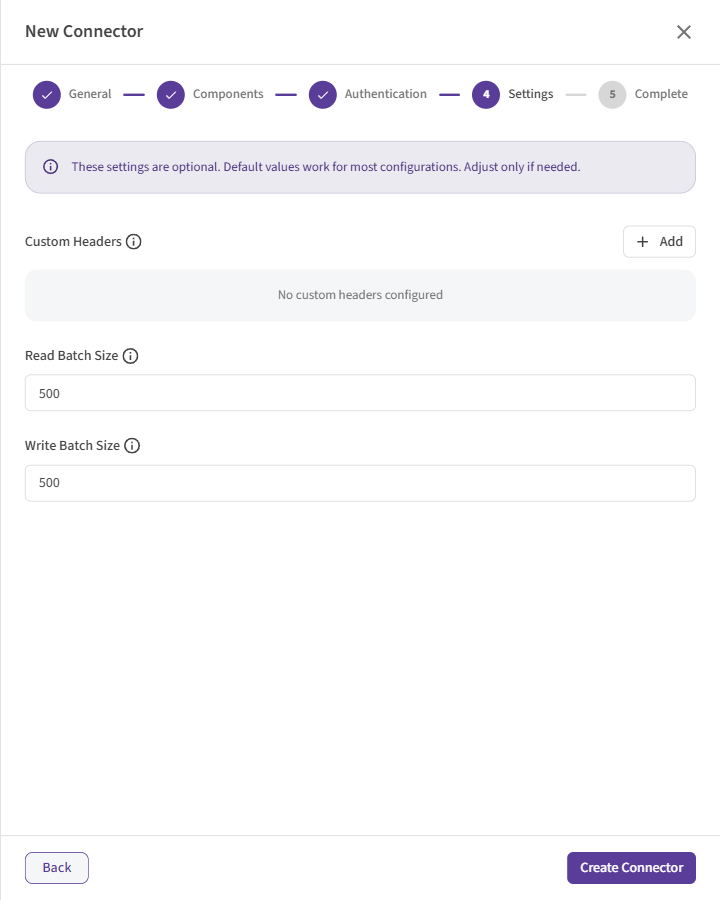 Step 4: optional settings. The defaults suit most APIs.
| Setting | What it means | Default |
|---|---|---|
| Custom Headers | Extra pieces of information that SchedEx sends with every request to the API. Only needed when a gateway in front of the API asks for them, for example a subscription key. Select Add, then enter a Header Key and a Header Value. You can switch a header off without deleting it. See Setting Custom Headers for a Connector. | None |
| Read Batch Size | How many items SchedEx asks the API for in one request when it reads (one "page"). For schedules with more than 50,000 activities, a larger value such as 10000 is recommended. Lower it if the API times out on large reads. |
500 |
| Write Batch Size | How many items SchedEx creates, changes or deletes in one request when it writes into the API. Lower it if the API rejects large requests or times out. | 500 |
Both batch sizes must be whole numbers of at least 1.
Select Create Connector to save.
Each connector needs its own address. Two connectors for the same component cannot use the same Base URL. SchedEx stops you from saving a duplicate.
8. Step 5: Complete, test and persist
The last step confirms that the connector is saved and lists the next steps. Select View Connector to open it, or Done.
The connector cannot exchange data yet. Two things are left. On a PC that can reach the API, use the SchedEx desktop client:
- Test the connector. In the desktop client, open Connectors and select Test on the
connector's row. SchedEx calls the Test Path.
- If the test works, you see the message that the API sends back. Its wording is up to the API owner.
- Test Failed: followed by a message means something is wrong. See section 9.
- With Microsoft Entra ID Sign In, a Microsoft sign-in window may open during the test.
- Persist the connector. Select Persist on the same row. SchedEx reads the list of schedules from the Get All Schedules Path, and the API's extra fields from the Get Custom Fields Path if you filled it in. You can then select them in Configs. When it finishes you see Host System data stored successfully!
If transfers run on the Autonomous Component
A test in the desktop client runs from your PC. It proves that your PC can reach the API, not that the server where the Autonomous Component runs can. To check the server:
- Persist from the server. In the SchedEx web app, open Setup > Connectors, open the connector and select Persist Within 3 Minutes. The Autonomous Component picks up the request and reads from the API itself.
- Ask a Tenant Admin to check the dashboard. In Clients > Autonomous Component > Dashboard, the Connectors panel shows each connector's health and its latest persist. The connector should be Healthy and its persist Completed. If it is Unhealthy, point at the error icon to see why. See Reading the Autonomous Component Dashboard.
Check the connector later
In the web app, Setup > Connectors shows every connector's Status and Last Health Check. A connector that has not been checked for more than 7 days is marked as such: run Test again to refresh it. Test and persist again whenever the address, the token or the schedules change.
More about testing and persisting: Testing and Persisting a Connector.
9. Messages and what to do
While you fill in the wizard
| Message | What it means | What to do |
|---|---|---|
| URL/Path is required | The Base URL is empty. | Enter the address from the API owner. |
| Please enter a valid URL starting with http:// or https:// | The Base URL does not start with http:// or https://. |
Enter the full address, starting with https://. |
| Service token is required | Service Token: the token is empty. | Enter the token. |
| Authority is required, Client ID is required, Scopes is required | Microsoft Entra ID Sign In: one of the three fields is empty. | Fill in Authority, Client ID and Scopes. |
| Test Path is required, Get All Schedules Path is required, Schedule Path is required, Activity Path is required | A required path is empty. | Enter the path from the API owner. |
| Must be at least 1 | A batch size is 0 or empty. | Enter a whole number, for example 500. |
| A connector with this URL or path already exists. Please update the URL or path and try saving again. | Another connector for the same component already uses this Base URL. | Use the existing connector, or check the address. |
| A connector with this title already exists. Please choose a different title and try again. | The Connector Name is taken. | Choose another name. |
| Next stays grey | A required field is empty or not valid, or the other component's profile is incomplete. | Look for fields marked in red, and check the line at the bottom of the Authentication step. |
When you test, persist or transfer
Messages that start with Generic Rest Api Error: come from the API. The text in brackets is the type of error, for example (NotFound). The rest is what the API sent back.
| Message | What it means | What to do |
|---|---|---|
| Test Failed: with the API's own message | The API answered, but reported that it is not healthy. | Send the message to the API owner. |
| Test Failed: with a sign-in or Unauthorized error | The API does not accept the token or the Microsoft sign-in. | Check the token and the Service Token Scheme with the API owner. With Microsoft sign-in, check Authority, Client ID and Scopes. |
| Generic Rest Api Error: (Forbidden): … | The sign-in works, but the user or token may not use this endpoint. | Ask the API owner to grant access. |
| Generic Rest Api Error: (NotFound): … | The address does not exist on the API. | Check the Base URL and the path. Look for a / at the start of the path, a space, or a typing error. |
| Generic Rest Api Error: The request could not be completed because the host system did not return a valid response. | The API returned an error without any explanation. | Send the time of the error to the API owner. |
| The response received from the generic REST API could not be processed. … | The API answered, but not in the format SchedEx expects. | Send the full message to the API owner. They can compare the answer with the Implementation Guide. |
| Test Failed: with a message that the server cannot be reached or found | The PC or server cannot reach the API. | Check the Base URL. Check that the PC is on the company network or VPN, if the API is only reachable there. |
| The API call was successful, no schedule data was available for this project. | The API found no schedule with this ID. | Check that the schedule exists, and that Schedule ID Query Parameter has the name the API expects. |
| Failed to fetch host fields. Exception: … (during persist) | The Get Custom Fields Path did not work. The schedules are still stored. | Check the path, or leave it empty if the API has no extra fields. |
| The Resource URL was not configured, skipping importing resources (and the same for activity links and resource assignments) | That path is empty, so SchedEx did not write that part. | Fill in the path if you want that data transferred. |
| Transfer aborted: 'Only Include Specified Mappings' is enabled but the connector's 'Use PATCH for updates' setting is off. … | The receiving Config only sends mapped fields, which needs PATCH. | Switch on Use PATCH for updates on the connector (if the API supports PATCH), or switch off Only Include Specified Mappings in the Config. |
| This connector is no longer available. Refresh the connector list and try again. | The connector was deactivated, or it has no Desktop Client profile. | Refresh the list. To test from the desktop client, make sure Desktop Client is selected in Step 2. |
| This connector test is already running or waiting to start. | A test of this connector is already in progress. | Wait for it to finish. |
10. Questions and answers
The service token changed. What do I do? Edit the connector in SchedEx, enter the new token on the Authentication step (on each tab that uses it) and save. Then run the test again. Nothing needs to change on users' PCs.
Can the Desktop Client and the Autonomous Component use different sign-ins? Yes. Each gets its own tab in Step 3. The Base URL and the paths are shared by both.
Which paths do I really need? Test, Get All Schedules, Schedule and Activity are required. Fill in the others only if the API has those endpoints. SchedEx then also exchanges calendars, resources, activity links, resource assignments or custom fields.
Should I switch on Use PATCH for updates? Only if the API owner confirms that the API supports PATCH. You need it if a receiving Config uses Only Include Specified Mappings: with PATCH, fields you have not mapped stay as they are in the API's system.
Some custom fields are missing after persist. Why? SchedEx only stores custom fields whose names use letters, numbers, spaces and underscores. Fields with other characters in their names are skipped. Ask the API owner to rename them.
Does SchedEx delete data in the API's system? Only as part of conflict handling, and only activities, activity links and resource assignments. A normal transfer creates and updates data.
Can I change the connector later? Yes. Open the connector and edit it. Run the test again after you change the address, a path or the sign-in.
11. Glossary
| Term | Meaning |
|---|---|
| API | A way for one computer program to talk to another. Here: the interface of the planning system that SchedEx connects to. |
| Autonomous Component | A SchedEx service that runs on a server and performs transfers automatically, without a person. |
| Base URL | The start of the web address that all of the API's endpoints share. |
| Connector | The SchedEx object that knows how to reach one planning system. |
| Custom header | An extra piece of information sent with every request, for example a key a gateway asks for. |
| Desktop Client | The SchedEx program that runs on a user's PC. |
| Endpoint | One address on the API for one kind of data, such as activities or calendars. |
| HTTPS | The standard secure connection used on the web. The address starts with https://. |
| Microsoft Entra ID | Microsoft's sign-in service for work accounts (formerly Azure Active Directory). |
| PATCH / PUT | Two ways of sending a change. PUT replaces the whole item. PATCH changes only the fields that are sent. |
| Path | The part of an address that comes after the Base URL, for example activities. |
| Persist | Reading the list of schedules and the API's extra fields into SchedEx, so they can be used in Configs. |
| Query parameter | A name and value added to an address after a ?, for example ?scheduleId=23. |
| REST API | A common type of web interface that programs use to exchange data. |
| Service token | A secret key that lets SchedEx use the API without a person signing in. |
12. Related articles
- Creating, Editing and Copying a Connector
- Testing and Persisting a Connector
- Setting Custom Headers for a Connector
- Reading the Autonomous Component Dashboard
For developers who build the API:
Was this article helpful?
That’s Great!
Thank you for your feedback
Sorry! We couldn't be helpful
Thank you for your feedback
Feedback sent
We appreciate your effort and will try to fix the article