TABLE OF CONTENTS
- Introduction
- At a glance
- What to ask your Schedule Analytics administrator for
- Open the connector wizard
- Step 1: General
- Step 2: Components
- Step 3: Authentication
- Step 4: Settings
- Step 5: Complete, test and persist
- Messages and what to do
- Questions and answers
- Glossary
- Related articles
Introduction
This article shows you, step by step, how to create an Schedule Analytics connector. This connector lets SchedEx exchange schedules with Schedule Analytics, through the Schedule Analytics API. SchedEx can read a schedule from Schedule Analytics and send it to a partner, and it can receive a schedule from a partner and store it in Schedule Analytics.
Who can do this: a user with the Tenant Setup role in SchedEx.
You do not need to be technical. Most values come from your Schedule Analytics administrator. Section 2 lists exactly what to ask them for.
Not sure this is the right connector? Read Creating, Editing and Copying a Connector for an overview of all connector types. To test the connector after you create it, see Testing and Persisting a Connector.
1. At a glance
Creating the connector takes about five minutes once you have the values from your Schedule Analytics administrator.
- Ask your Schedule Analytics administrator for the values in section 2.
- Fill in the five-step wizard in SchedEx (sections 3 to 7).
- Test and persist the connector in the SchedEx desktop client (section 8).
Checklist before you open the wizard:
- I have the Schedule Analytics API address (the Schedule Analytics URL).
- I have a service token from Schedule Analytics, or we sign in to Schedule Analytics with a Microsoft work account.
- I know whether transfers run on a person's PC (Desktop Client), on a server (Autonomous Component), or both.
- The report schedules that SchedEx will read from or write to exist in Schedule Analytics, and the account behind the token can see them.
2. What to ask your Schedule Analytics administrator for
Ask your Schedule Analytics administrator or IT department for the items below. Tell them that SchedEx will use the Schedule Analytics API, and whether it will connect from users' PCs (Desktop Client), from a server (Autonomous Component), or both.
| Ask for | Why SchedEx needs it | Where it goes |
|---|---|---|
| The Schedule Analytics API address. | So SchedEx can find your Schedule Analytics. | Step 3: the Schedule Analytics URL field |
| A service token for SchedEx, ideally for a service account whose token does not expire soon. | So SchedEx can sign in to Schedule Analytics. Needed for the Autonomous Component. | Step 3: Service Token |
| Only if you sign in to Schedule Analytics with Microsoft work accounts: the Authority, Client ID and Scopes of the Microsoft Entra ID app that protects Schedule Analytics. | Needed for Microsoft sign-in in the Desktop Client. | Step 3: Authority, Client ID, Scopes |
| Access for that account to the report schedules SchedEx will use. To send data, it must be able to read them. To receive data, it must also be able to import new data into them. | So SchedEx can list, read and, if needed, write your schedules. | Set up in Schedule Analytics by the administrator |
| Only if there is a gateway in front of Schedule Analytics: the name and value of any extra header the gateway asks for, for example a subscription key. | The gateway rejects requests without it. | Step 4: Custom Headers |
| Confirmation that the Schedule Analytics API can be reached from users' PCs or the Autonomous Component's server. | SchedEx connects to Schedule Analytics directly from there. | Network, set up by IT |
How SchedEx keeps these values safe: the passwords, client secrets and tokens you enter in the wizard are encrypted with AES-256 before SchedEx saves the connector. The encryption key is kept in Azure Key Vault, separate from the database. Custom header values are not encrypted. Read more in Checking your connectors.
3. Open the connector wizard
- Select Setup in the top menu.
- On the Connector List card, select New Connector.
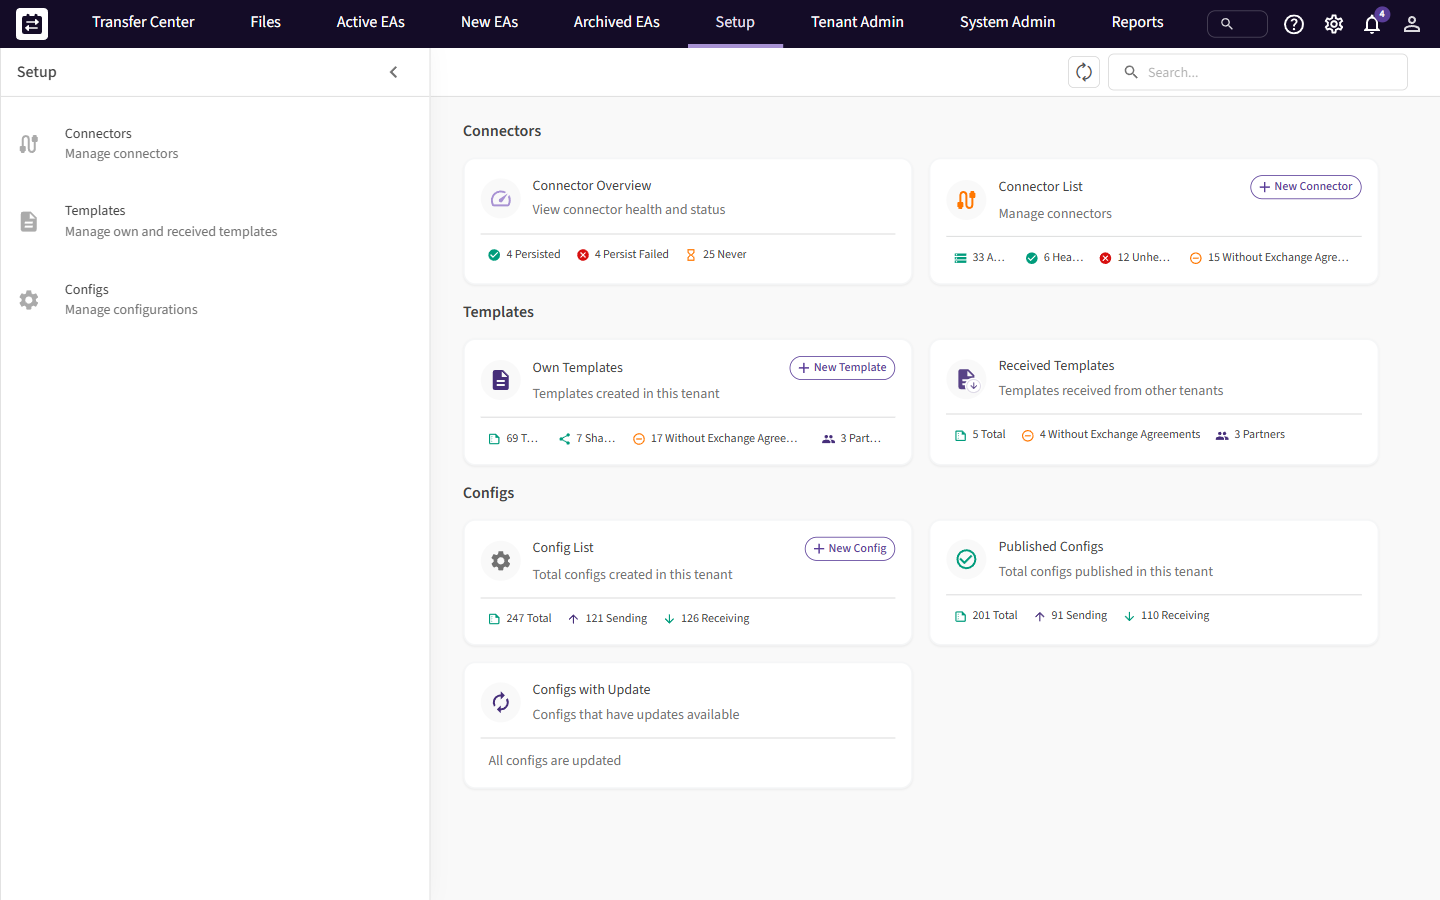 The Setup page. New Connector is on the Connector List card.
The New Connector wizard opens on the right. It has five steps: General, Components, Authentication, Settings and Complete. Every field has an ⓘ icon. Point at it to see a short help text. Next stays grey until every required field on the step is filled in.
4. Step 1: General
| Field | What to enter |
|---|---|
| Connector Name (required) | A name that tells your colleagues which Schedule Analytics this is, for example Schedule Analytics Production. The name is shown everywhere the connector is used, such as in Configs and Exchange Agreements. |
| Host System (required) | Select the Schedule Analytics card. It is near the top of the list of host systems. |
| Import from existing (optional) | Copies the settings of a connector you already have, so that you only change what is different. |
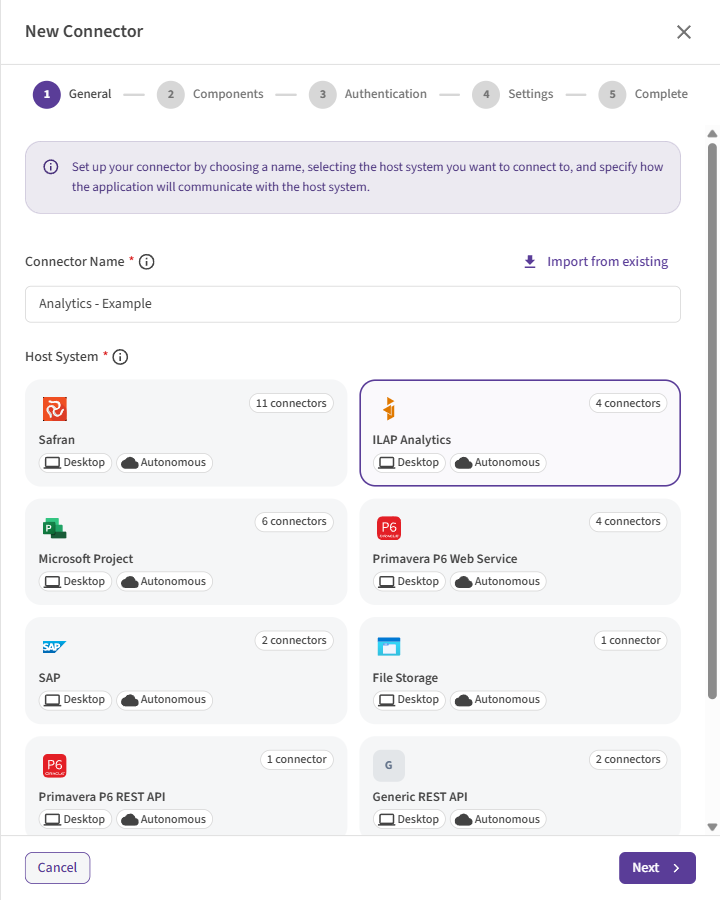 Step 1: the Schedule Analytics card selected.
Name in the wizard: Schedule Analytics was earlier called ILAP Analytics. Until the screens are renamed, the wizard still shows that name on the host system card and on the URL field (ILAP Analytics URL).
Select Next.
5. Step 2: Components
An execution component is the SchedEx program that runs the transfer and talks to Schedule Analytics.
| Option | What it means | Choose it when |
|---|---|---|
| Desktop Client | The SchedEx desktop program on a user's PC. Someone must be signed in to start a transfer. | People start transfers by hand, or you want to sign in with a Microsoft work account. |
| Autonomous Component | A SchedEx service that runs on a server, without a person. | Transfers must run automatically on a schedule. |
You can select both. The connector then gets one sign-in profile for each component, and you fill in both in the next step. They can use different sign-in methods. For example, the Desktop Client can use Microsoft sign-in while the Autonomous Component uses a service token.
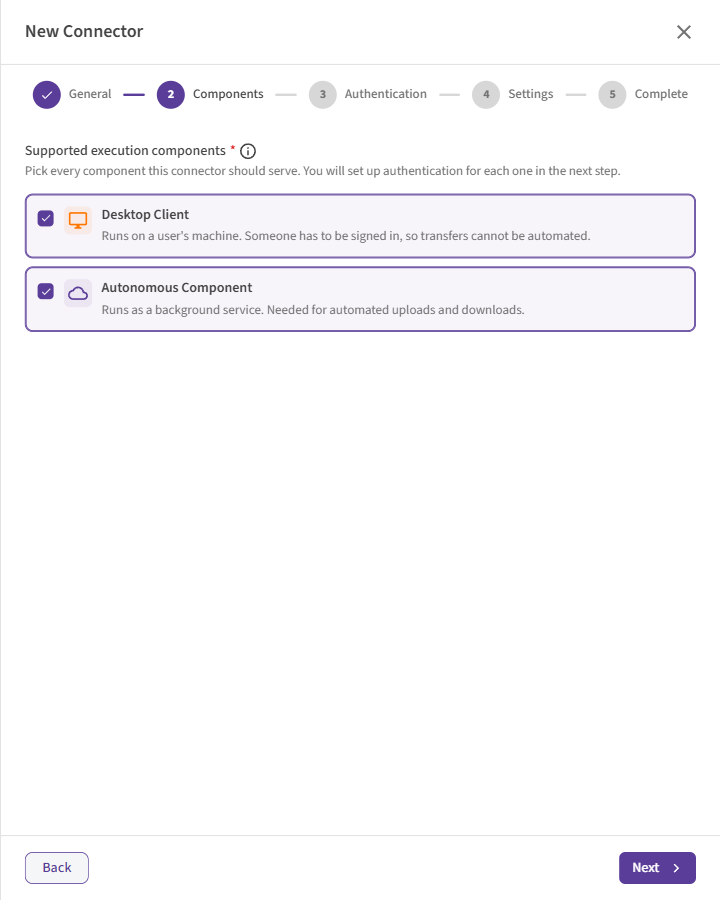 Step 2 with both components selected. Step 3 then shows a tab for each one.
SchedEx connects to Schedule Analytics directly from where the component runs: the user's PC or the Autonomous Component's server. The Schedule Analytics API must be reachable from there.
Select Next.
6. Step 3: Authentication
If you selected both components in Step 2, you see two tabs: Desktop Client and Autonomous Component. Fill in both. The line at the bottom tells you when the other profile is still incomplete, and Switch to … takes you to it.
First choose the Authentication Method: how SchedEx proves to Schedule Analytics who it is. The fields below the list change to match your choice. A short note under the list explains the method you selected.
| Method | You enter | Desktop Client | Autonomous Component |
|---|---|---|---|
| Service Token | Schedule Analytics URL and a service token | Yes | Yes |
| Microsoft Entra ID Authentication | Schedule Analytics URL, Authority, Client ID and Scopes | Yes | No |
Schedule Analytics URL (every method)
| Field | What it means | Example |
|---|---|---|
| Schedule Analytics URL (required) | The address of your Schedule Analytics API, exactly as your Schedule Analytics administrator gives it to you. It must start with https:// or http://. |
https://analytics.yourcompany.com/api/ |
Always use an address that starts with
https://. Your sign-in details travel with the requests.
Option A: Service Token
SchedEx sends a token, issued by Schedule Analytics, with every request. Works in both components. This is the only method the Autonomous Component can use.
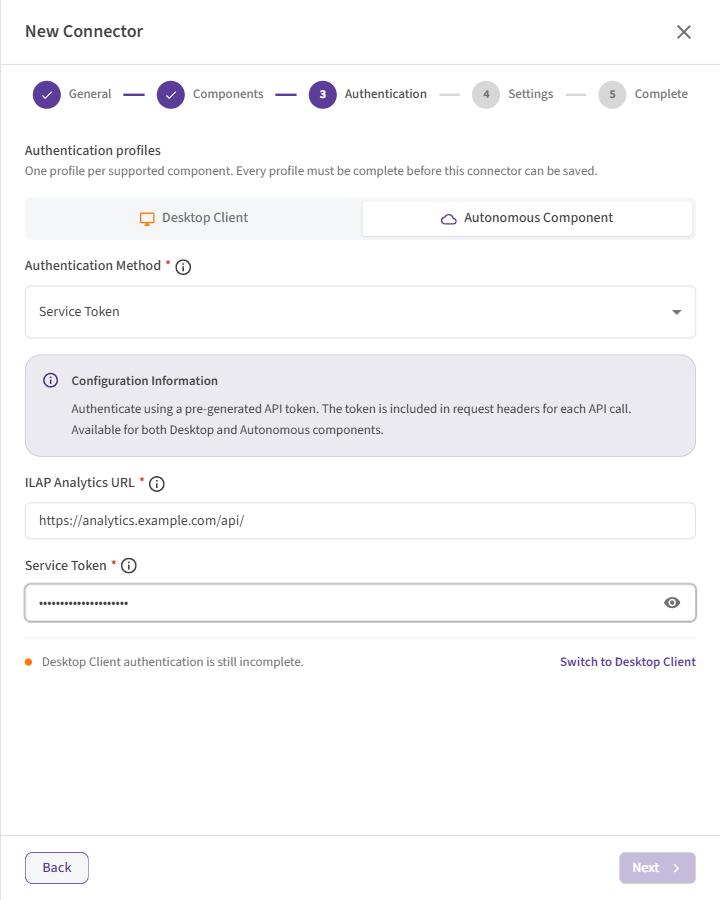 Service Token on the Autonomous Component tab.
| Field | What it means |
|---|---|
| Service Token (required) | The token that Schedule Analytics issued for SchedEx. Paste it in full. SchedEx stores it encrypted, and hides it as you type. Select the eye icon to check what you pasted. |
When the token expires, transfers stop. Ask your Schedule Analytics administrator when the token expires, and put a reminder in your calendar to replace it in time.
Option B: Microsoft Entra ID Authentication (Microsoft sign-in)
Use this when your organization protects Schedule Analytics with Microsoft Entra ID, so that you sign in to Schedule Analytics with your Microsoft work account. The note under the method list links to App registrations in the Azure portal, where your IT department finds the values.
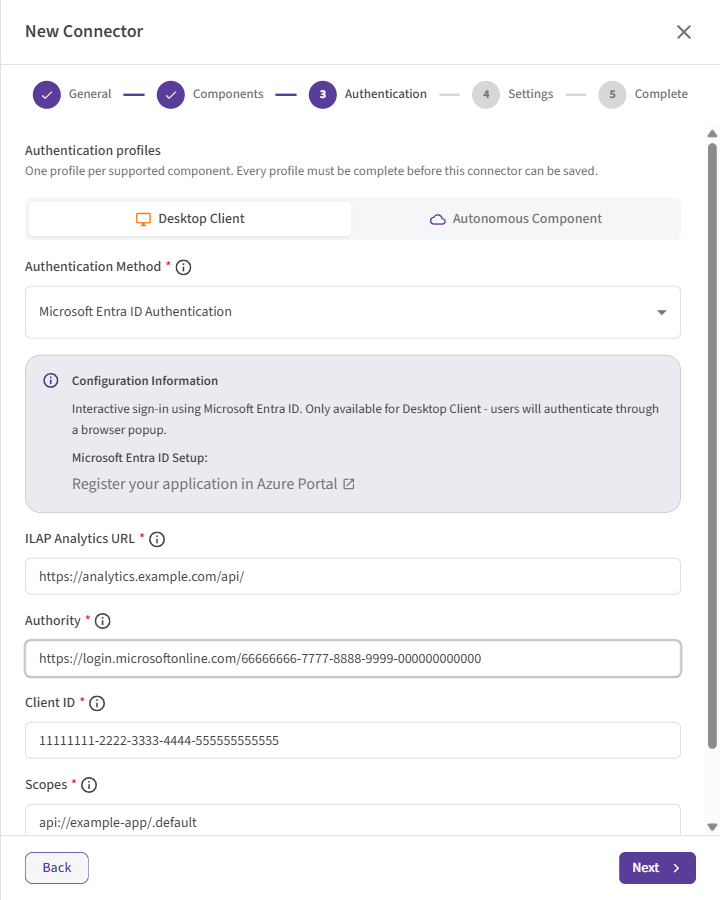 Microsoft Entra ID Authentication: Authority, Client ID and Scopes.
| Field | What it means | Example |
|---|---|---|
| Authority (required) | The Microsoft sign-in address for your organization. | https://login.microsoftonline.com/<your-tenant-id> |
| Client ID (required) | The Application (client) ID of the Entra ID app registered for Schedule Analytics. Found in the Azure portal under App registrations → your app → Overview. | xxxxxxxx-xxxx-xxxx-xxxx-xxxxxxxxxxxx |
| Scopes (required) | The permission SchedEx asks for when it signs in. Usually the app's address followed by /.default. |
api://<your-app-id>/.default |
What you will notice: the first time the connector runs, a Microsoft sign-in window opens. Sign in with your work account. The desktop client then remembers the sign-in on your PC, so you are not asked every time. Signing out of the desktop client clears it, and you sign in again next time.
Microsoft Entra ID Authentication works only in the Desktop Client. The Autonomous Component cannot open a sign-in window, so the method is not offered on the Autonomous Component tab. Use Service Token there.
Select Next when all required fields are filled in.
7. Step 4: Settings
All settings on this step are optional. The default values work for most Schedule Analytics installations. Change them only when you have a reason to.
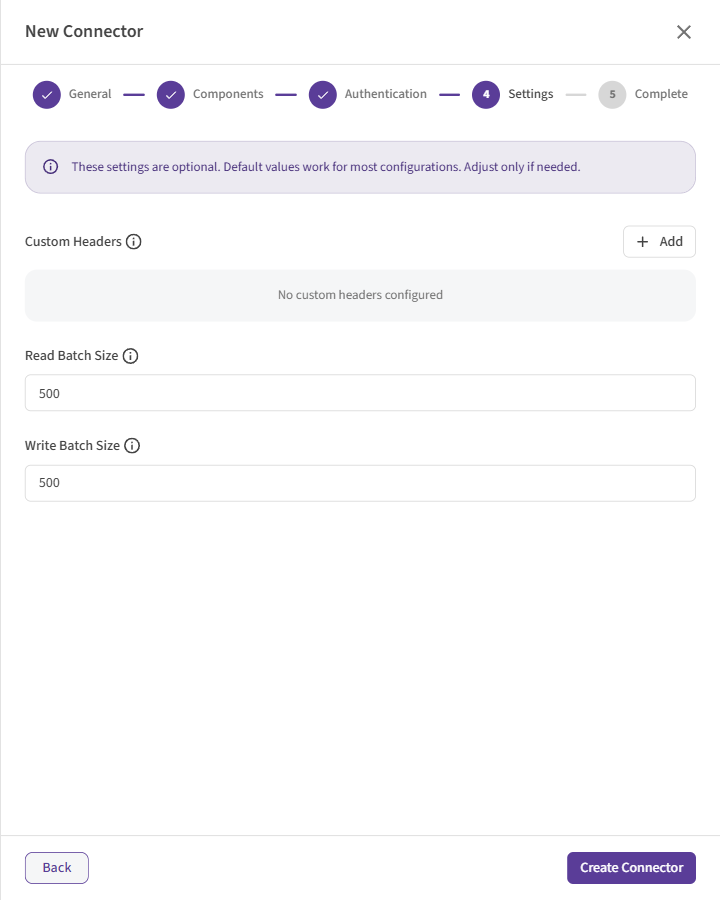 Step 4: optional settings. The defaults suit most Schedule Analytics installations.
| Setting | What it means | Default |
|---|---|---|
| Custom Headers | Extra pieces of information that SchedEx sends with every request to Schedule Analytics. Only needed when your IT department has put a gateway in front of Schedule Analytics that asks for them, for example a subscription key. Schedule Analytics itself never requires them. Select Add to enter a name and a value. Each header you add needs both a name and a value. See Setting Custom Headers for a Connector. | None |
| Read Batch Size | How many activities SchedEx reads from Schedule Analytics in one go when it sends a schedule. Newer Schedule Analytics versions use it. For schedules with more than 50,000 activities, a larger value such as 10000 is recommended. Lower it if Schedule Analytics times out on large reads. |
500 |
| Write Batch Size | How many items (activities, resources, calendars and so on) SchedEx sends to Schedule Analytics in one go when it receives a schedule. Lower it if Schedule Analytics rejects large requests or times out. | 500 |
Select Create Connector to save.
Each connector needs its own address. Two Schedule Analytics connectors for the same component cannot use the same Schedule Analytics URL. SchedEx uses the connector to keep track of transferred data over time, so it stops you from saving a duplicate.
8. Step 5: Complete, test and persist
The last step confirms that the connector is saved. Select View Connector to open it, or Close.
The connector cannot exchange data yet. Two things are left. Both run from the SchedEx desktop client on a PC that can reach Schedule Analytics:
- Test the connector. In the desktop client, open Connectors and select Test on the
connector's row. SchedEx signs in to Schedule Analytics and calls its test service.
- A confirmation message from Schedule Analytics means the address, the sign-in and the network all work.
- Test Failed: followed by a message means something is wrong. See section 9.
- With Microsoft Entra ID Authentication, a Microsoft sign-in window may open during the test.
- Persist the connector. Select Persist on the same row. SchedEx reads the list of report schedules from Schedule Analytics, and the metadata fields of each report schedule type, so that you can select them in Configs. When it finishes you see Host System data stored successfully!
Persist reads every report schedule the account can see. If a report schedule is missing in SchedEx, make sure it exists in Schedule Analytics and the account has access to it, then persist again.
Before the first transfer, make sure that in Schedule Analytics:
- The report schedule that SchedEx reads from or writes to exists. SchedEx always works with a report schedule, never with a free-standing project.
- The metadata fields you want to map are set up on that report schedule's type. Fields that do not exist in Schedule Analytics are skipped, and the transfer log lists them.
- Only if the Config adjusts the cutoff date: the report schedule uses one of the points in time that SchedEx supports: Daily, Weekly Sunday or Monthly Last Sunday.
If transfers run on the Autonomous Component
A test in the desktop client runs from your PC. It proves that your PC can reach Schedule Analytics, not that the server where the Autonomous Component runs can. To check the server:
- Persist from the server. In the SchedEx web app, open Setup > Connectors, open the connector and select Persist Within 3 Minutes. The Autonomous Component picks up the request and reads from Schedule Analytics itself.
- Ask a Tenant Admin to check the dashboard. In Clients > Autonomous Component > Dashboard, the Connectors panel shows each connector's health and its latest persist. The connector should be Healthy and its persist Completed. If it is Unhealthy, point at the error icon to see why. See Reading the Autonomous Component Dashboard.
Check the connector later
In the web app, Setup > Connectors shows every connector's Status and Last Health Check. A connector that has not been checked for more than 7 days is marked as such: run Test again to refresh it. Test and persist again whenever the Schedule Analytics address, the service token or the report schedules change.
More about testing and persisting: Testing and Persisting a Connector. Its appendix lists the most common reasons a Schedule Analytics test fails: no network access to the Schedule Analytics API, the Schedule Analytics API is not running, wrong Microsoft Entra ID settings, or missing access rights for the user.
9. Messages and what to do
While you fill in the wizard
| Message | What it means | What to do |
|---|---|---|
| URL/Path is required | The Schedule Analytics URL is empty. | Enter the address from your Schedule Analytics administrator. |
| Please enter a valid URL starting with http:// or https:// | The address is not a complete web address. | Enter the full address, starting with https://. |
| Service token is required | Service Token: the token is empty. | Paste the token from your Schedule Analytics administrator. |
| Authority is required, Client ID is required or Scopes is required | Microsoft Entra ID Authentication: one of the three fields is empty. | Fill in Authority, Client ID and Scopes. |
| Header key is required or Header value is required | A custom header has no name or no value. | Fill in both, or remove the header. |
| A connector with this URL or path already exists. Please update the URL or path and try saving again. | Another Schedule Analytics connector for the same component already uses this address. | Use the existing connector, or check the address. |
| Next stays grey | A required field is empty or not valid, or the other component's profile is incomplete. | Look for fields marked in red, and check the line at the bottom of the Authentication step. |
When you test, persist or transfer
| Message | What it means | What to do |
|---|---|---|
| Test Failed: with Schedule Analytics Api Error: and a sign-in or authorization error | Schedule Analytics does not accept the token or the Microsoft sign-in. | Check that the token is complete and has not expired. With Microsoft sign-in, check Authority, Client ID and Scopes with your IT department. Make sure the account has access in Schedule Analytics. |
| Test Failed: with a message that the server cannot be reached or found | The PC or server cannot reach Schedule Analytics. | Check the Schedule Analytics URL. Check that the PC is on the company network or VPN, if Schedule Analytics is only reachable there. |
| This connector is no longer available. Refresh the connector list and try again. | The connector was deactivated, or it has no Desktop Client profile. | Refresh the list. To test from the desktop client, make sure Desktop Client is selected in Step 2. |
| This connector test is already running or waiting to start. | A test of this connector is already in progress. | Wait for it to finish. |
| The requested Schedule Analytics schedule (…) is unavailable or no longer exists. | The report schedule used in the Config was deleted, or the account cannot see it. | Make sure the report schedule exists in Schedule Analytics and the account has access to it. Persist again, and update the Config if needed. |
| This report schedule uses a point-in-time type (…) we don't support yet. Supported types are Daily, Weekly Sunday, and Monthly Last Sunday… | The Config adjusts the cutoff date, but the report schedule uses another point in time. SchedEx keeps the original cutoff date and logs a warning. | Ask your Schedule Analytics administrator to change the report schedule's point in time, or switch off cutoff adjustment in the Config. |
| The schedule contains Planned Work Hours on … activities, but no activities have an Early Start or Early Finish date. | Schedule Analytics needs dates to spread planned hours over time. | Map an Early Start or Early Finish date for at least one activity in the Config, then run the transfer again. |
| Please note that there are already … requests being processed by the API. Your request has been added to the queue. | Information only. Schedule Analytics is busy with other imports and processes yours after them. | Nothing. The schedule appears in Schedule Analytics when its turn comes. |
10. Questions and answers
The service token expired or was replaced. What do I do? Edit the connector in SchedEx, paste the new token on the Authentication step (on each tab that uses it) and save. Then run the test again. Nothing needs to change on users' PCs.
Can the Desktop Client and the Autonomous Component use different sign-ins? Yes. Each gets its own tab in Step 3. A common setup is Microsoft sign-in for the Desktop Client and a service token for the Autonomous Component.
Why does the Autonomous Component tab only offer Service Token? Microsoft Entra ID Authentication needs a person to sign in in a browser window. The Autonomous Component runs without a person, so it can only use a token.
Do I need custom headers? Only if your IT department has put a gateway in front of Schedule Analytics that asks for them. Schedule Analytics itself does not.
Will a transfer into Schedule Analytics overwrite or conflict with earlier data? No. Each time SchedEx sends a schedule to Schedule Analytics, Schedule Analytics stores it as new data in the report schedule. That is why SchedEx does not check for conflicts when it writes to Schedule Analytics.
I signed in with Microsoft as the wrong user. How do I switch? Sign out of the SchedEx desktop client and sign in again. The next test asks you to sign in to Microsoft again.
Can I change the connector later? Yes. Open the connector and edit it. Run the test again after you change the address or the sign-in.
11. Glossary
| Term | Meaning |
|---|---|
| Report schedule | The place in Schedule Analytics where a schedule and its versions over time are kept. In SchedEx, each report schedule shows up as one schedule you can select in a Config. |
| Report schedule type | A kind of report schedule in Schedule Analytics. It decides which metadata fields the report schedule has. |
| Metadata field | A custom field in Schedule Analytics, for example on activities. After a persist, SchedEx offers these fields for mapping. |
| Service token | A long secret text that Schedule Analytics issues so that a program can sign in without a person. |
| Persist | Reading the list of report schedules and fields from Schedule Analytics into SchedEx. |
12. Related articles
Was this article helpful?
That’s Great!
Thank you for your feedback
Sorry! We couldn't be helpful
Thank you for your feedback
Feedback sent
We appreciate your effort and will try to fix the article