TABLE OF CONTENTS
- The overall EA creation process
- The elements in the EA form
- Step 1: The EA Creation wizard for Owner
- Owner Wizard Step #1: Define Title, Role, Template and Partner
- Owner Wizard Step #2: Specify destination (or source) schedule of transfer
- Owner Wizard Step #3: Set up transfer duration and frequency
- Owner Wizard Step #4: Defining Host System Parameters (HSP)
- Optional Owner Wizard Step #5: Defining upload filter (if owner is sender)
- Optional "Internal Transfer" mode (if owner and partner in same organization)
- Step 2: The EA Creation wizard for Partner
- Step 3: Sign EA
- Resolving conflict for upload and download
- The options menu for the EA edit form
- Download data for support
- Settings available when sending Connector is "Autonomous"
Introduction
Before you can exchange data, you need to create an Exchange agreement (EA). This agreement defines what data you will transfer, between which parties, how often and more.
The process of creating an EA looks a little different depending on the role that you have in the EA, where the owner of the EA does most of the work in setting it up.
Not sure about this? Or do you want to learn more about EAs first? Check out this article: Exchange agreements (EAs).
This document is mainly about creating an EA, but it also covers how to start editing here.
The overall EA creation process
The EA creation process consists of 3 sequential process steps:
Step 1: Owner follows a 4 step wizard (with one additional step if they on rare occasions are senders - where sending filter is defined).
Step 2: The Partner follows a 3 step wizard (with one less step on the rare occasion they are receiver - in which case they do not need to define a filter).
Step 3: The Partner signs the agreement and the Owner finalizes it with their signing. The EA is then "active".
In Step 1 and 2 above the Template is selected by owner and each party specifies which Connector and ScheduleId to use in transfer. Rhetorical question:
How do we know which fields will be used in sending and receiving end to make the "fine details" of the transfer take place (i.e. field mappings)?
Answer: The pre-defined (by Setup User) Config on sender side will be used that matches the combination of Template, Connector, ScheduleId and sending direction, and similarly the Config to use on receiver side will be uniquely selected and used.
The elements in the EA form
In order to see the button (1) your organization need to have been approved as "Can be Owner" by System Admin, and you need to have the role as Setup User. When this button is pressed, a wizard will guide you through the steps.
But before looking at this, let's take a moment to become familiar with the form (described below):
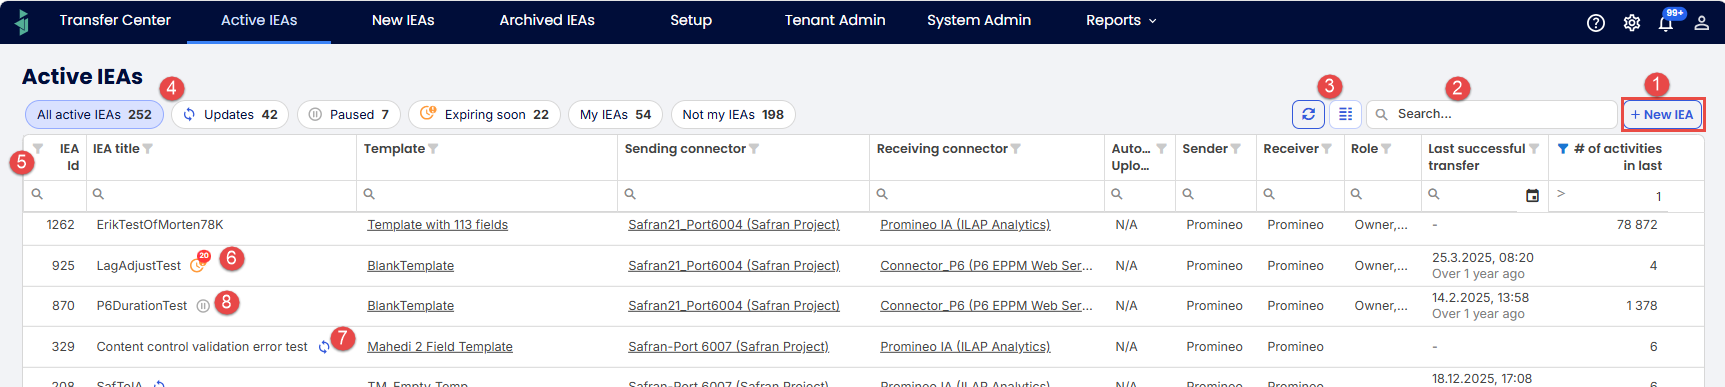
The various elements of the Active EAs form. Described in table below:
| Item | Description |
| 1 | Button to start the wizard for making a new EA (visibility depends on your role). |
| 2 | Filtering can be done in 3 ways: a. This item (2) shows a Search box for limiting the EAs seen in grid based on visible columns matching the search text. b. See (4) above and below: The predefined filter buttons. c. The filters that are built into the grid columns (5) The final filter used will be the combined effect of all 3 of these. NOTE: The grid column filter can be edited in an editor found under the grid:  |
| 3 | Layout/Export options: see this article for more info. |
| 4 | Predefined filters: Buttons for quick filtering of grid based on status of EA: "Updates available in Configs", "Paused", "Expiring soon" - if less than 40 days til expiration, where the number of days remaining will be indicated by red number: "Updates available in Configs", "Paused", "Expiring soon" - if less than 40 days til expiration, where the number of days remaining will be indicated by red number: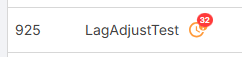 The icon(s) will be shown in grid's "EA Title" column (as seen above) for EAs where the condition is true. By pressing "All active EAs" you will "neutralize" the effect of the current predefined filter. The icon(s) will be shown in grid's "EA Title" column (as seen above) for EAs where the condition is true. By pressing "All active EAs" you will "neutralize" the effect of the current predefined filter.Fun fact: The buttons "My EAs" and "Not my EAs" are only shown if you have the role as Tenant Admin. |
| 5 | These are the columns in the grid (but can be customized by user): EA Id: A auto assigned number of increasing value. EA title: The title (name) of the EA Template: The Template used by the EA (click to navigate to Template page). Sending connector: The Connector used for sending data (hyperlink to details). Receiving connector: The Connector used for receiving data (hyperlink to details). Automated uploads: "On", "Off", or "N/A". More info later in article. Sender: The Tenant sending the schedule. Receiver: The Tenant receiving the schedule. Role: The Role you have in the EA (Owner, Partner, or blank). Last successful transfer: The time and date at which last transfer was successful. # of activities in last successful upload: (self explanatory...) |
| 6 | "Expiring Soon"-status for an EA. The small number in icon indicates how many days remaining until expiration. |
| 7 | "Pending Update"-status for an EA. This means that there are changes made in related Configs, and for these changes to propagate to EA, you need to manually confirm this (by pressing the button and following wizard). |
| 8 | "Paused"-status for an EA. This means that the EA has been paused and will no longer be creating any scheduled transfer events. More info later in article. |
Step 1: The EA Creation wizard for Owner
Owner Wizard Step #1: Define Title, Role, Template and Partner
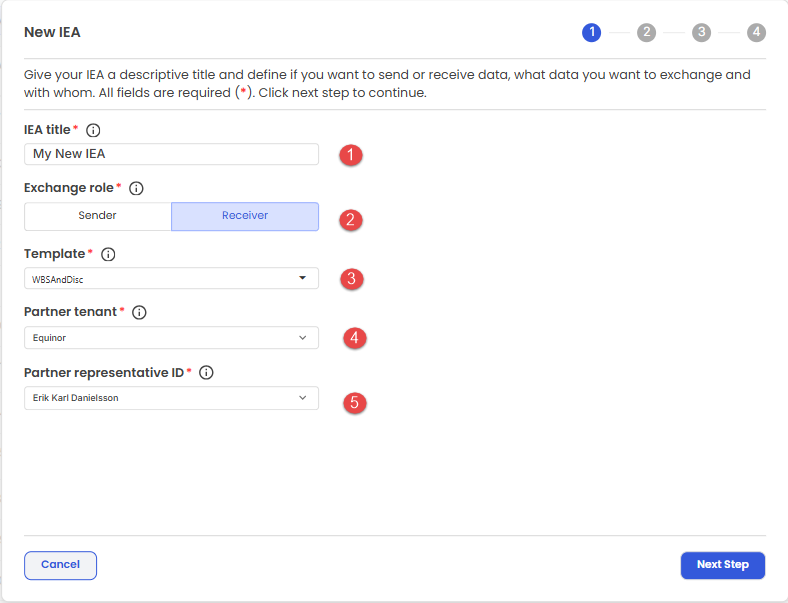
The first step in the EA creation wizard.
- Title: Create a descriptive title for the EA.
- Exchange role: Define whether you want to be the Receiver (most common) or Sender of data.
- Template: Select which Template to us (specifying which predefined type of data to transfer). If you can’t find the right Template, contact a Setup user in your organization. More about Templates in this article.
- Partner Tenant: Select in which company the person you want to exchange data with works.
- Partner representative: Select who you want to exchange data with. Must be an existing user registered in IDE for the partner Tenant.
Owner Wizard Step #2: Specify destination (or source) schedule of transfer
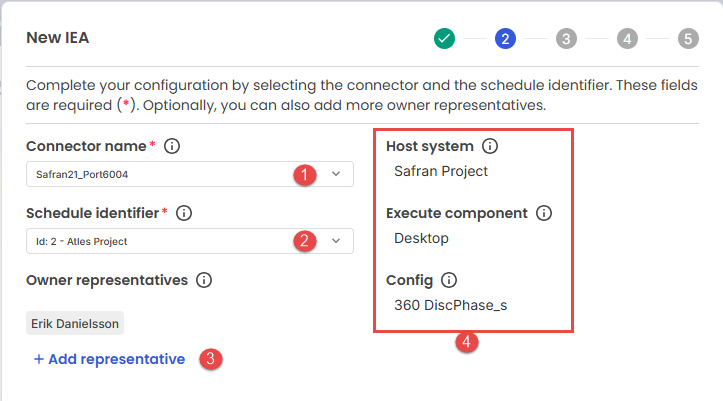
The second step of the wizard.
- Connector name: Select which connector to use for receiving (or sending) . If you can’t find your Connector in the list, see (*). More about Connectors on this page.
- Schedule identifier: Select which ScheduleId you want to use as receiving schedule (or in rare occasions sending schedule). If you can't find the ScheduleId in the list, see (*).
- Owner representatives: Add more people other than yourself to represent your side of the agreement.
- Host system and Execute component will be automatically filled out when the Connector is selected.
Config will be automatically shown when the Schedule identifier is selected (that matches the unique combination of Connector + Template + ScheduleId + Receiver/Sender Direction).
(*) If you can’t find any item in the list of Connectors or Schedule Ids, this means that no Config has been made for this unique Template + Connector + ScheduleId + "Direction(Sending/Receiving) combination. You need to contact a setup user in your organization to have this created.Owner Wizard Step #3: Set up transfer duration and frequency
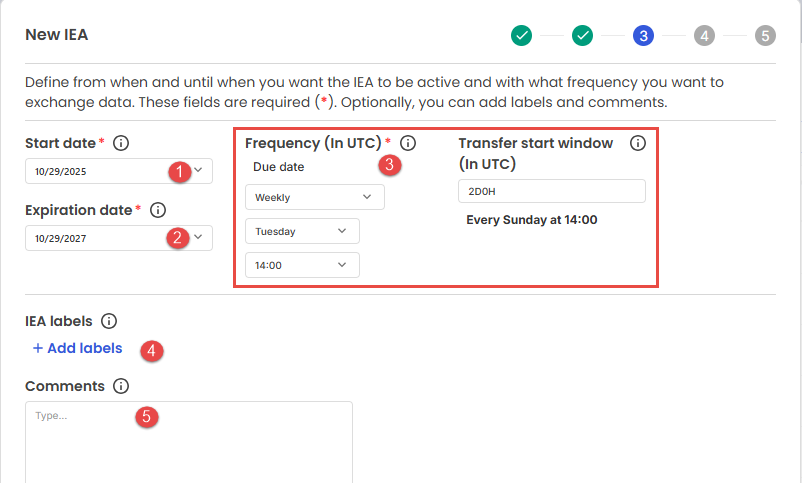 The third step in the EA creation wizard.
- Start date: Select when you want the EA to be activated and start creating transfer events.
- Expiration date: Select when you want the EA to expire and stop creating transfer events.
- Frequency: Select the frequency by which you want to exchange data. Details here.
- Labels: Make you EA easily identifiable with labels. This is optional.
- Comments: Add extra information about the EA here. This is also optional.
Owner Wizard Step #4: Defining Host System Parameters (HSP)
This page will look quite different depending on which Connector (Host System) the owner has set, as well as which Sender/Receiver role the owner has - see separate article. The default settings for each of these controls have been defined in owner's sending or receiving Config, but (importantly!) can be overridden in the EA, so that they live an "independent life".
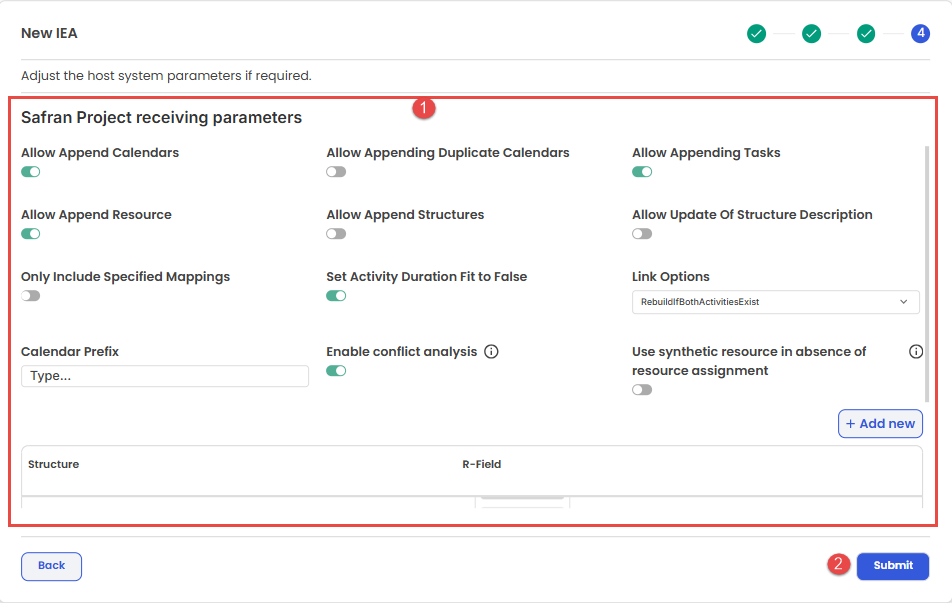
The fourth step in the EA creation wizard.
- HSPs for Owner: Content of form depends on which Connector (Host system) and Sender/Receiver role the owner selected in Wizard's Step 1.
- Submit button: By pressing this button, the owner has completed the setup work, and baton is handed over to Partner to run their part of the wizard (see below). In case you are also the receiver (i.e it is an "internal transfer"), you will see a button for making a shortcut in the setup and signing process.
Optional Owner Wizard Step #5: Defining upload filter (if owner is sender)
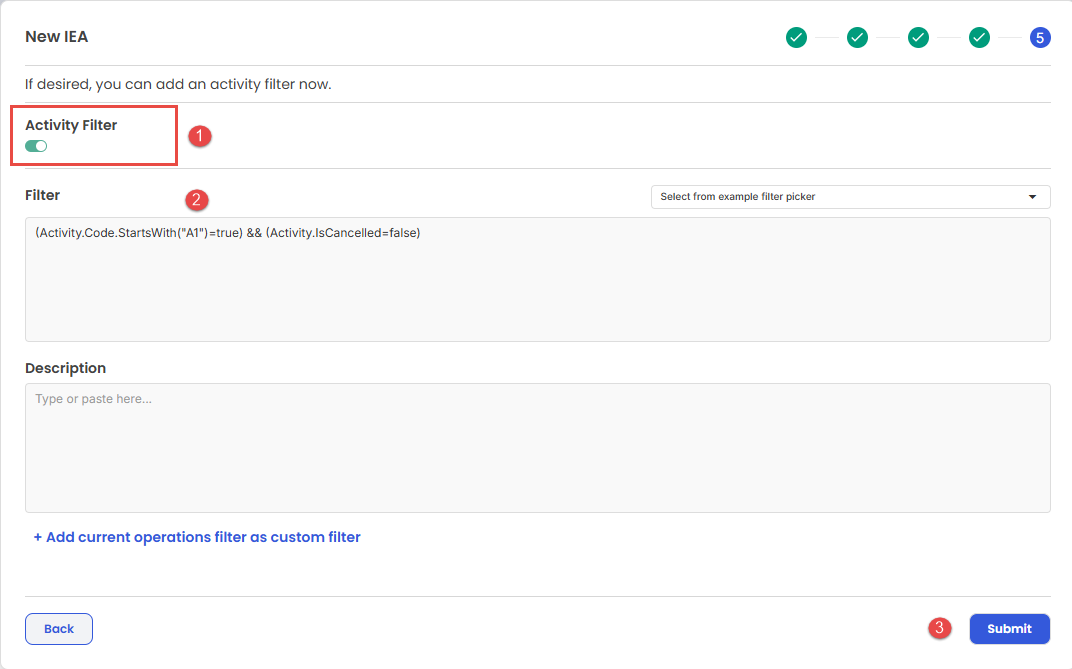
The possible fifth step in the EA creation wizard - shown only on the rare occasion that Owner is the sender and need to define the filter for data to be transferred.
- Toggle Filter "Active state": This is default turned on and expects a filter to be defined, but if you want to upload all data from your schedule, then turn this to "off".
- Filter definition: See separate article for more info on defining filters.
After pressing the Submit button (in Step 4 or 5 depending on sender/receiver role), you will see a summary of the information you have given for the EA so far (note that the next 2 screenshots represent two possible screens to be seen):
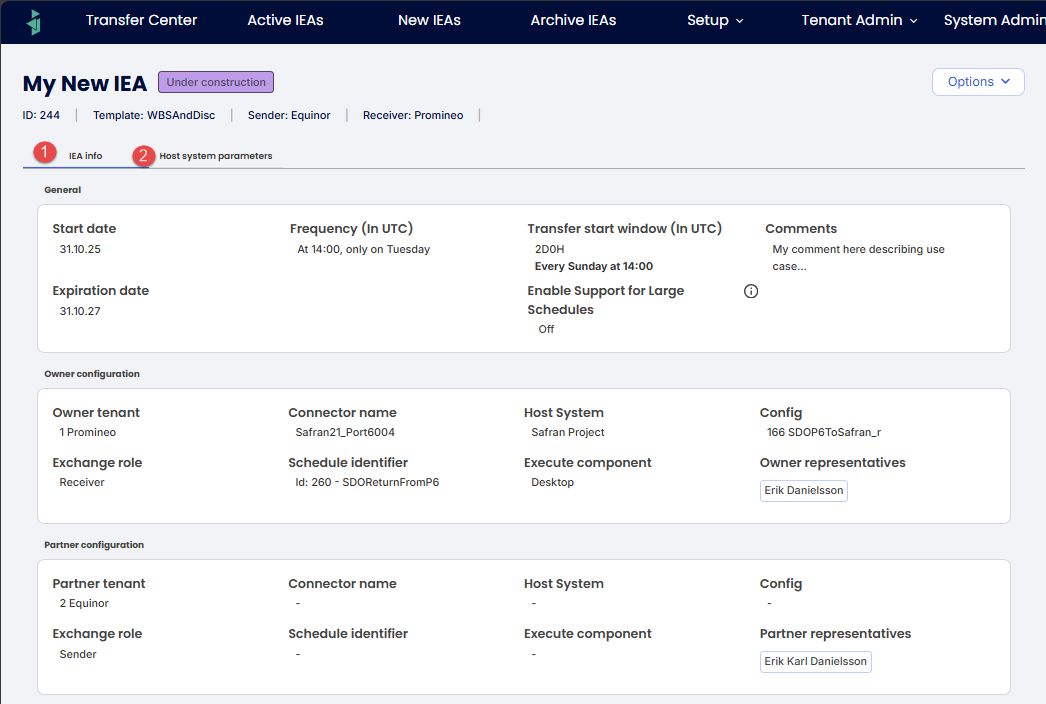
The screen seen if you are collaborating with a partner outside your organization. Note that the last section needs to be filled out by Partner and signed before you as an Owner can do the final signing.
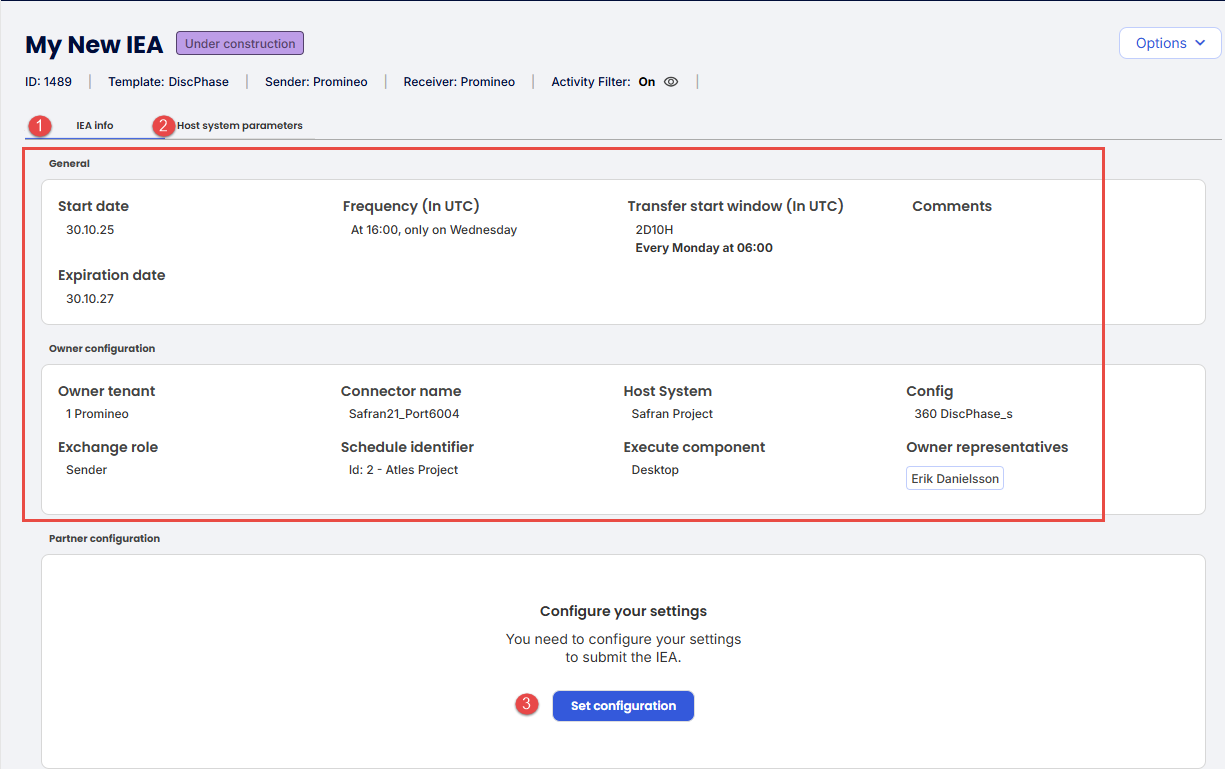
The screen seen if you are doing an "internal transfer", i.e. the Owner and Partner the same Tenant (organization).
- EA Main info submitted by Owner.
- Host System Parameter (HSP) overview defined in wizard's Step 4
- "Start Partner Wizard"-button: This button is ONLY shown if the owner and partner are in same organization, and is described in section below. Otherwise this button is not shown.
Optional "Internal Transfer" mode (if owner and partner in same organization)
IF (and only if) you are both the Owner and Partner for an EA (i.e. the EA is a so called "internal transfer"), then you will see this button and will be able to start the "Partner Wizard" (se next section) by pressing this button. After this you will be led straight into the signing process, that will also be much simpler: You can sign in one quick operation for both owner and partner (since you are both).
Step 2: The EA Creation wizard for Partner
Once the Owner is done with running the wizard (Step 1), the Partner will see the EA in "New EAs" tab, and by clicking the item will start the Wizard:
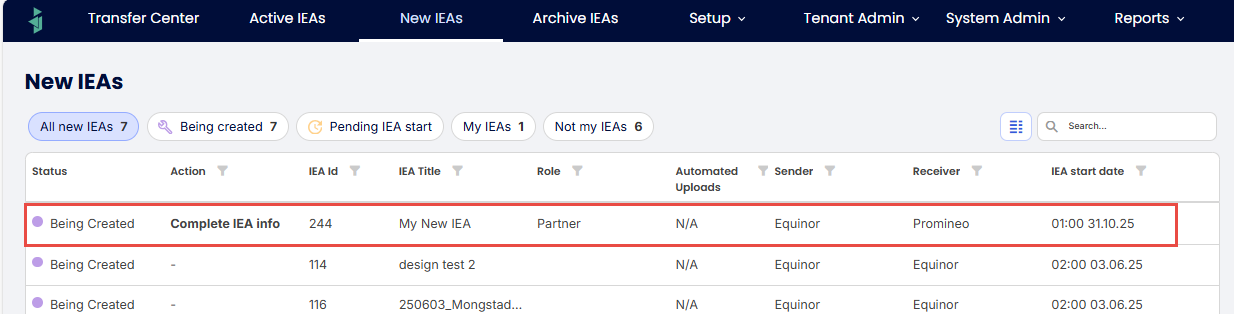
Screenshot showing the Partner screen, where new EA is awaiting completion (Partner running Wizard as shown below).
Partner Wizard Step #1: Specify source (or destination) schedule of transfer
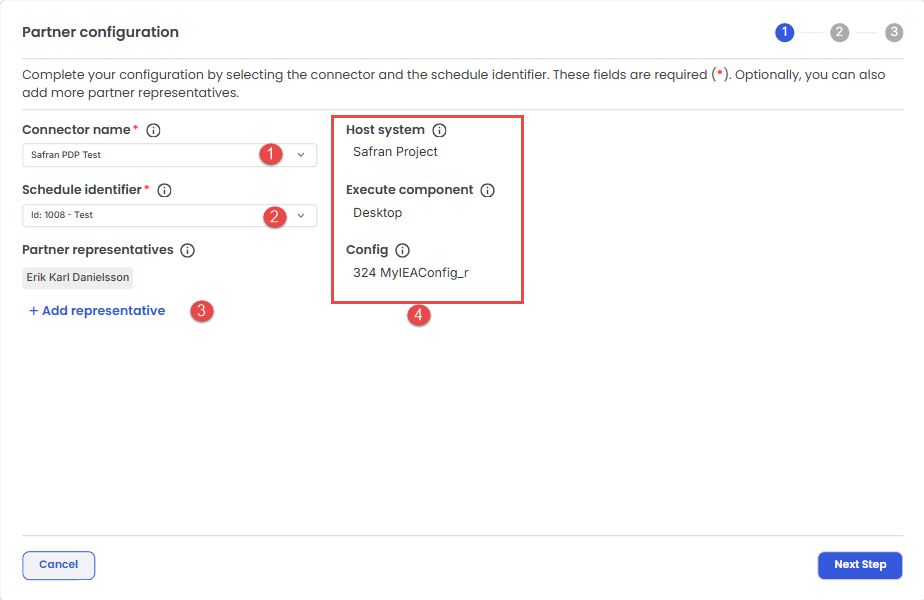
Partner Wizard step 1 is identical to Owner Wizard Step 2.
Partner Wizard Step #2: Defining Host System Parameters (HSP)
This page is identical to Owner Wizard Step 4, and will (here as well) look quite different depending on which Connector (Host System) the owner has set, as well as which Sender/Receiver role the owner has. The default settings for each of these controls have been defined in partner's sending or receiving Config, but (importantly!) can be overridden in the EA, so that they live an "independent life".
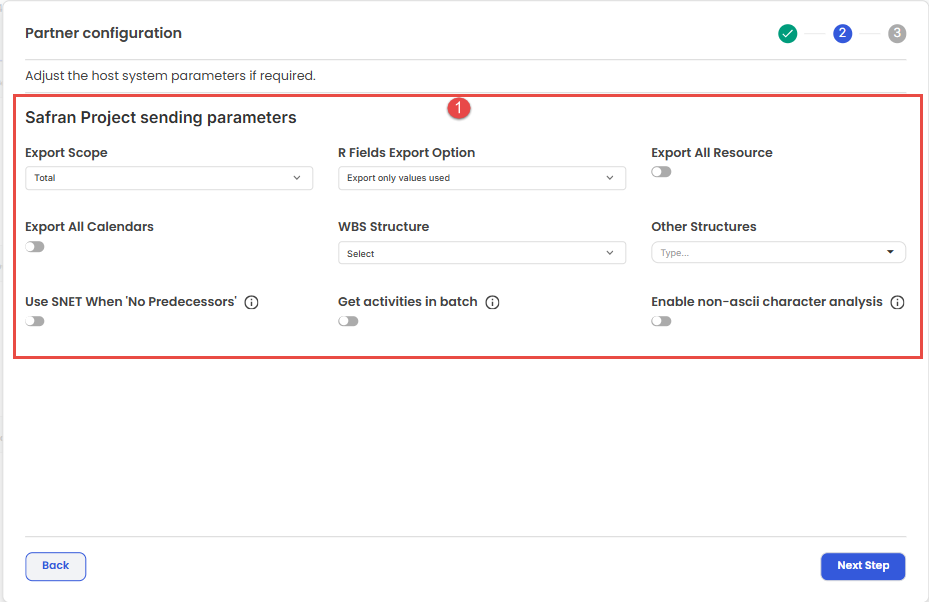
Partner Wizard Step 2 is identical to Owner Wizard Step 4.
Partner Wizard Step #3: If Partner is Sender (typical case) - Define upload Filter
This step needs to be done by whoever has the Sender role in the EA (either done in Owner Wizard Step 5 or here in Partner Wizard Step 3).
Step 3: Sign EA
When the Partner has completed Step 2 (Running the Partner Wizard), this form will be seen with a complete summary of Settings (1) as well as Host System Parameters for both Sender and Receiver (2) shown in separate tabs. The Partner can start the signing process (Owner always signs last) by pressing button (3):
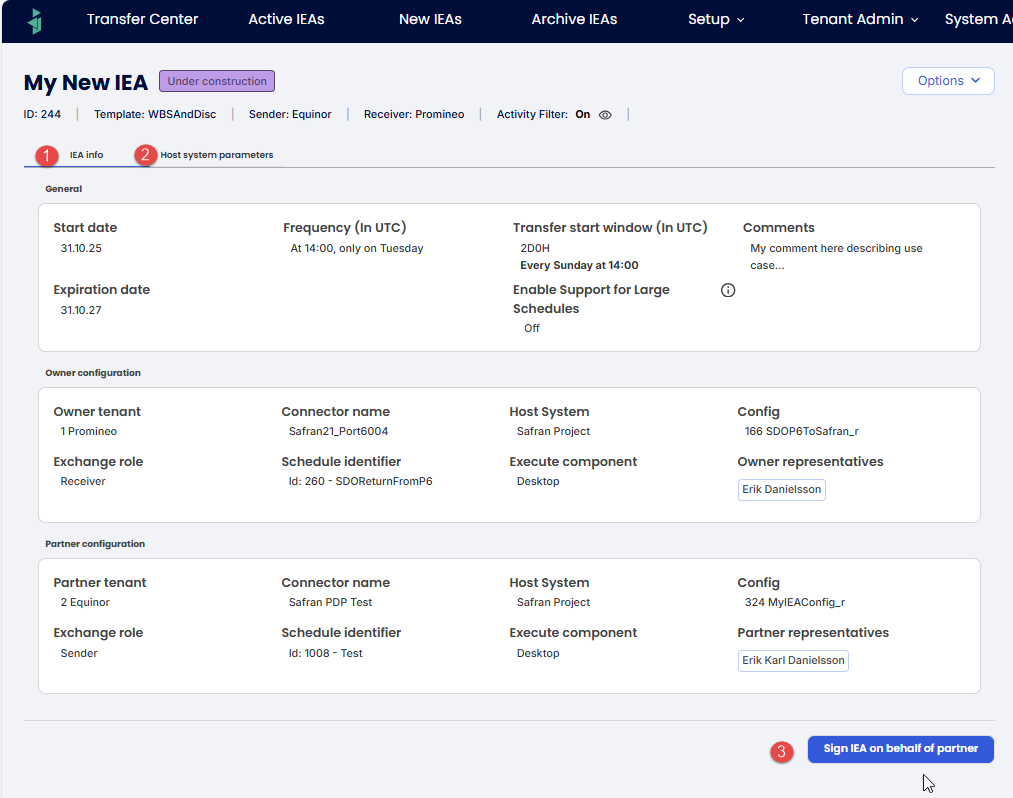
When Partner Wizard is completed, the signing process can start (by pressing (3)).
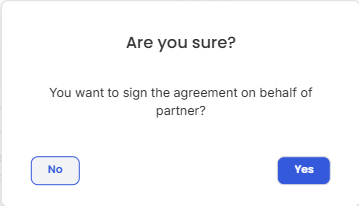
Partner needs to confirm that they want to sign the agreement, before Owner signs.
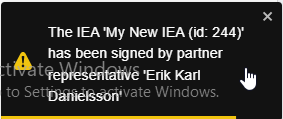
Owner will be given a notification that Partner has signed.
The Owner can now "seal the deal" by opening the EA and signing it - making it "active" and found in the "Active EAs" tab.
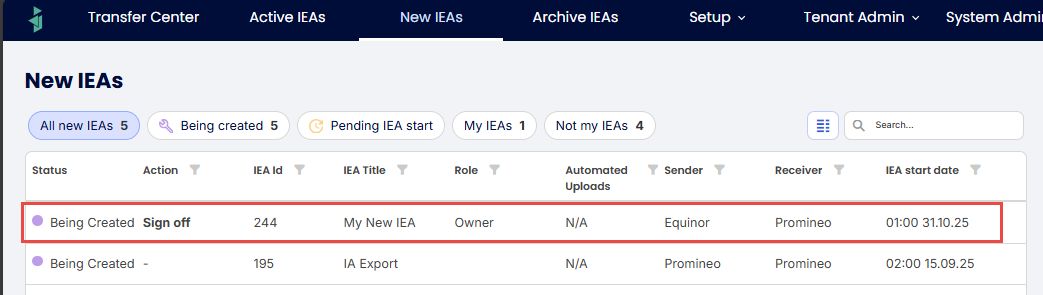 The final step is for the Owner to sign off on the EA.
Once this is done, the EA (when opened) will show the signatures at bottom left of form:

Each active EA will show the "signatures" of both parties and the date and time of signing.
Resolving conflict for upload and download
In early 2026, a new concept was introduced in that addresses what will happen if some planning object (e.g. an activity) is deleted from source - what should happen at destination?
It was decided that deleted objects in source should also force a delete in destination - according to the new philosophy named "Source is King" - always strive to make the source data be reflected in the destination data.
In the EA you will see settings to control if and (in case of receiver) how the conflicts should be resolved (default for automatic resolution is 'off' for both sender and receiver):
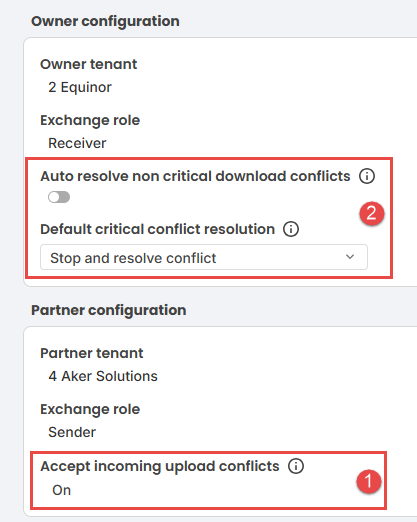 The controls for sender and receiver to control how conflict resolution is handled.
More information on this can be found here.
The options menu for the EA edit form
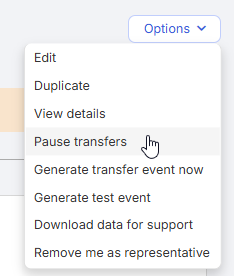
| Item | Description |
| Edit | Start Edit mode for the EA. The information in this article about creating an EA also applies to editing one. |
| Duplicate | Make an identical copy of the EA with "Copy of" |
| View details | Show (read only) all details of the EA, including Host System Parameters (HSP) for both sender and receiver. |
| Pause transfers | Will result in EA being "paused", i.e not continuing to generate transfer events. UI will reflect this status in form, as well as in the row of the grid for EA with the "paused" icon:  Text will change to "Resume transfer" after pressed. Text will change to "Resume transfer" after pressed. |
| Generate transfer event now | You may want to press this button for the following reasons: 1. You have an EA with Frequency set to "On Demand" that you wish to create a transfer for. 2 You (for whatever reason) want to make an extra transfer in between scheduled transfers. You will get a message explaining why you cannot generate a new event, in case you already have a pending event from previous pression on "Generate transfer event now" for the EA (in which case this has to be "Skipped". |
| Generate test event | In case you want to generate test data from Upload (50 first rows for that passes the upload filter for the EAs sending schedule), then you can press this button and go to the Desktop Client to press the "Upload"-button. |
| Download data for support | See section below this table for details. |
| Add me as representative | Only available for Tenant Admins. Allows adding your user to the list of representatives (on either sender or receiver side, depending on what side your Tenant has of the transfer). Text will change to "Remove me as representative" after pressed. |
Table describing the function for each of the various "Options" (submenu).
Download data for support
In case you press the EA Options-menu called "Download data for support" you will see a file in your Downloads folder (typically), having the name "ExchangeAgreement_<EAId>.json:
 This file, when opened (in VisualStudio Code for example) will have all the details relating to the setup of the EA. Here is a screenshot where each section is collapsed (in order to show what is there):
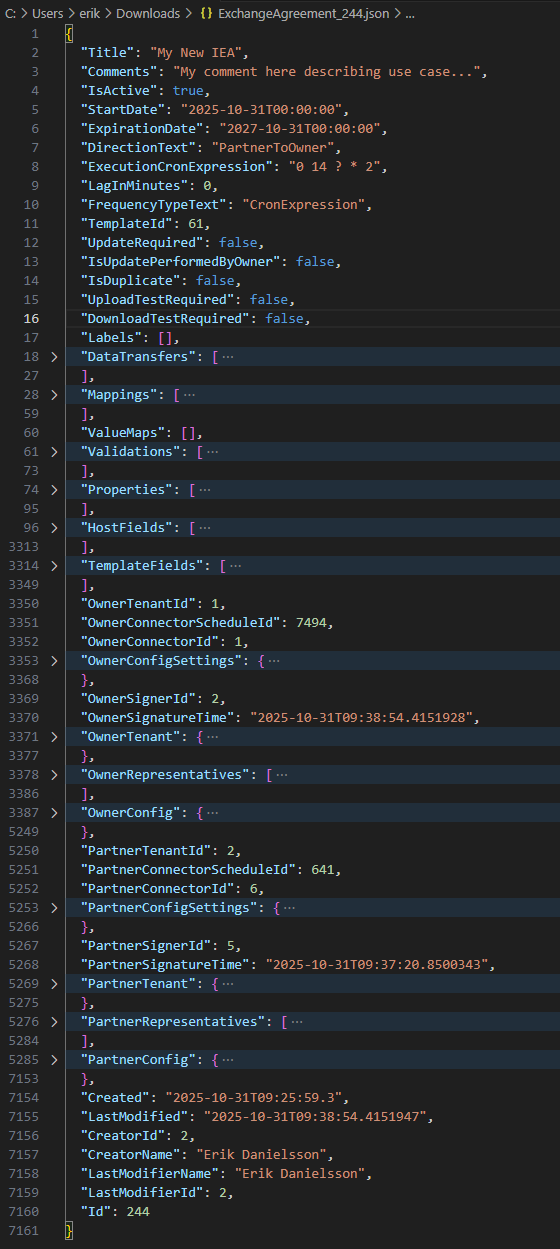 The content of the downloaded file where each section has been collapsed for overview.
Settings available when sending Connector is "Autonomous"
There are 2 settings available for an EA, but only when the sending Connector is using "Autonomous Client" as Executing Component.
These are described in next 2 subchapters.
Automatic Uploads
In the case that your EA uses a sending Connector that is using "Autonomous Client" as the so called "Executing Component", you will see a control called "Automatic uploads".
Turning this on (default) will ensure that the sending schedule is automatically uploaded at the point in time defined by the Frequency settings.
Turning this off will require a manual upload (i.e. pressing "Upload"-button in Transfer Center), and after the deadline it will be marked as "Overdue" (with orange color in Transfer center).
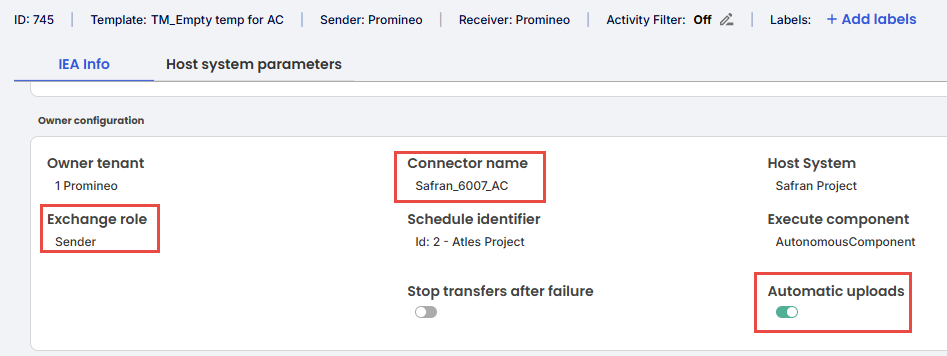
Screen showing Automatic uploads (only visible if sending Connector is "Autonomous").
Stop transfer after failure
In screenshot above you can see a control called "Stop transfer after failure", and if turned "on", will cause all future events from this EA to be stopped until the user has resolved the issue.
Was this article helpful?
That’s Great!
Thank you for your feedback
Sorry! We couldn't be helpful
Thank you for your feedback
Feedback sent
We appreciate your effort and will try to fix the article