TABLE OF CONTENTS
- Introduction
- Step 1: General
- Step 2: Configuration
- Step 3: Settings (and Save Connector)
- Step 4: Review Saved Connector
- How to start using your connector?
Introduction
This article will describe the wizard for creating and editing a Connector.
The entry point for launching the wizard is the Setup Form's (only available to Setup Admins) "+New Connector"-button:
 The Connector setup wizard is launched by pressing 1->2->3 in screenshot above.
Copying a connector is also supported by transferring information from one connector to another, using "import from existing"-button described in the first step seen in section below.
The UX options in both steps 2 and 3 of the wizard are depending on the choices made in Step 1, but the good news is that each setting comes with a "information icon":
... it describes the function of the setting in its proper context. Therefore this article will not elaborate on these explanations but leave to the user to read the information by hovering over these icons.
Step 1: General
Here you will need to give the connector a name (1), select which Host System it should be used for (3) and which Execution Component (4) it should use. You can also copy settings from other existing connectors (2). Then press "Next" (5) to continue to the next step:

Step 1 of the Connector wizard.
The list of currently supported Connectors is listed in table below with some comments:
| Connector Type | Comments |
| Safran | Safran SchedEx API needs to be purchased and installed for each Tenant. |
| Primavera P6 Web Service | The original method for interacting with P6 data. |
| Primavera P6 REST API | The most recent addition for connecting with P6. |
| MS Project | Supports upload only transfers (currently not download). Can read .mpp file from specified folder, SharePoint site, or file upload on Web. |
| SAP | Uses a specially designed ShedEx SAP Gateway (needs to be installed) for SAP R3 in order to read/write data. An S/4HANA version is tentatively planned to be released by end of 2026. |
| ILAP Analytics | (to be renamed later). Gives the foundation for complete schedule lifecycle reporting. |
| File Storage | Allows for reading files based on the current (ISO 15926-13) standard and the upcoming (ISO 23726-100 |
| Excel | Allows using Excel as a container for defining a schedule. More info here. |
| Generic Rest API | Connector Type for allowing your IT team to connect any schedule data that is not found above in this list. More info here. |
The only difference between editing a connector vs. creating one is that the header text "New Connector" is replaced with "Edit Connector" (see screenshot above).Step 2: Configuration
Depending on the choice of Host System in Step 1, you will se a list of available Authentication Methods (1) and depending on the choice, the UX at (2) will change. Again - please read the information icons to gain insight into what each setting means.
When all required information is filled out the "Next"-button (3) will be enabled:
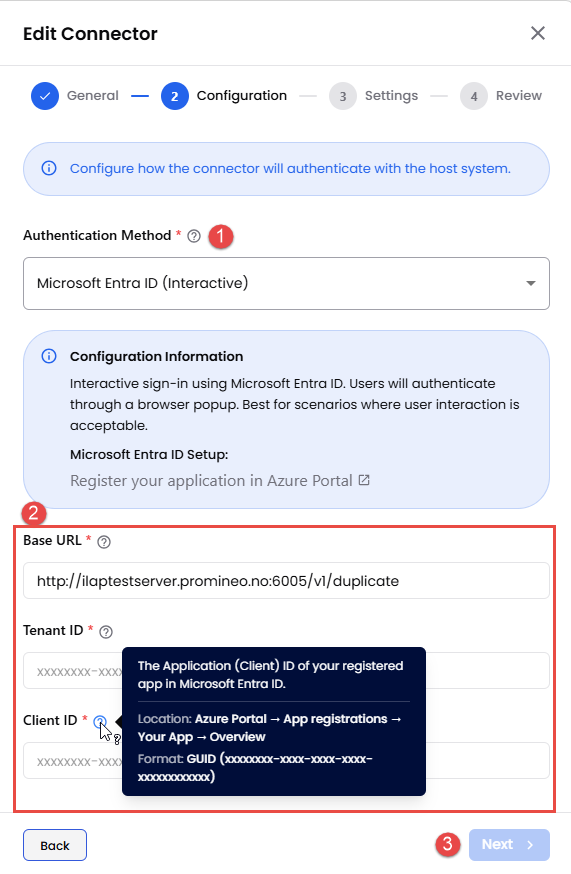
Step 2 of the Connector wizard.
A connector needs to have a unique url, as the generated Id of the connector is an integral part of tracking the lifecycle information of transferred data (most notably activities), uniquely identifying each of them throughout their "life".
If two connectors could point to the same url (I.e. the same source of data), then one activity would in reality be represented using 2 different internal IDs, and this would violate the uniqueness requirement.

NOTE 1: You will therefore be prevented to create 2 connectors with same url in step 3 (when trying to save the connector).
NOTE 2: A "url" will for file-based connectors be a folder reference (E.g. MSProject).
Step 3: Settings (and Save Connector)
Depending on the setting in Step 1, the UX will display different options (1).
None of the settings here needs to be punched by user, as default values will be given automatically, but please read the information provided by the "?-icons" so you know what the setting does.
Press "Create Connector"-button to save connector and move to Step 4 (Review Saved Connector):
 Step 3 of the Connector wizard.
Here is more information on Custom Headers (will later be found as "?-icon").
Step 4: Review Saved Connector
The last step in the wizard is just a confirmation of key info of the newly created connector.
You can either close the form by pressing "Close", or the "View Connector"-button to view/edit the connector:
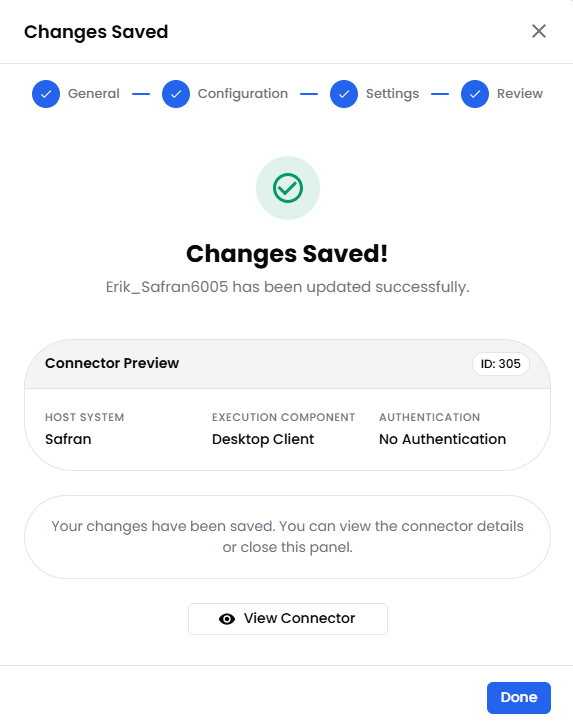
The last step of the wizard confirms that you connector changes were saved.
How to start using your connector?
After creating a Connector, you need to do one more thing:
Test it to verify that it works (I.e. that it can reach the source of the data), and "Persist" it so that IDE can know which schedules it contains as well as user field setup.
This is described in detail here.
Was this article helpful?
That’s Great!
Thank you for your feedback
Sorry! We couldn't be helpful
Thank you for your feedback
Feedback sent
We appreciate your effort and will try to fix the article