What this lets you do
When you exchange schedules as files through Web storage, SchedEx keeps those files for you — the source files you upload and the received files that transfers produce. This guide covers the two Files module tabs you use to keep that storage in order:
- Manage Files — a single, cross-agreement view of every web-storage file, where a Tenant Admin can also set file retention (how long files are kept before SchedEx deletes them automatically).
- Schedules & Templates — an overview of all your web-storage file connectors and the schedules or Excel templates on each.
For how to actually drop a file and run a transfer, see the File-based drop point guide and the per-format guides.
TABLE OF CONTENTS
- Who this is for
- The Manage Files tab
- File Retention Settings
- The Schedules & Templates tab
- Related guides
Who this is for
- Anyone who sends or receives file-based transfers can open Manage Files and Schedules & Templates to see their stored files, schedules and templates.
- Deleting a file and changing File Retention Settings are Tenant Admin actions.
The Manage Files tab
Open Files → Manage Files. Unlike the Sender Files and Receiver Files tabs (which show one side at a time), Manage Files is a cross-agreement view of every file held in your Web storage.
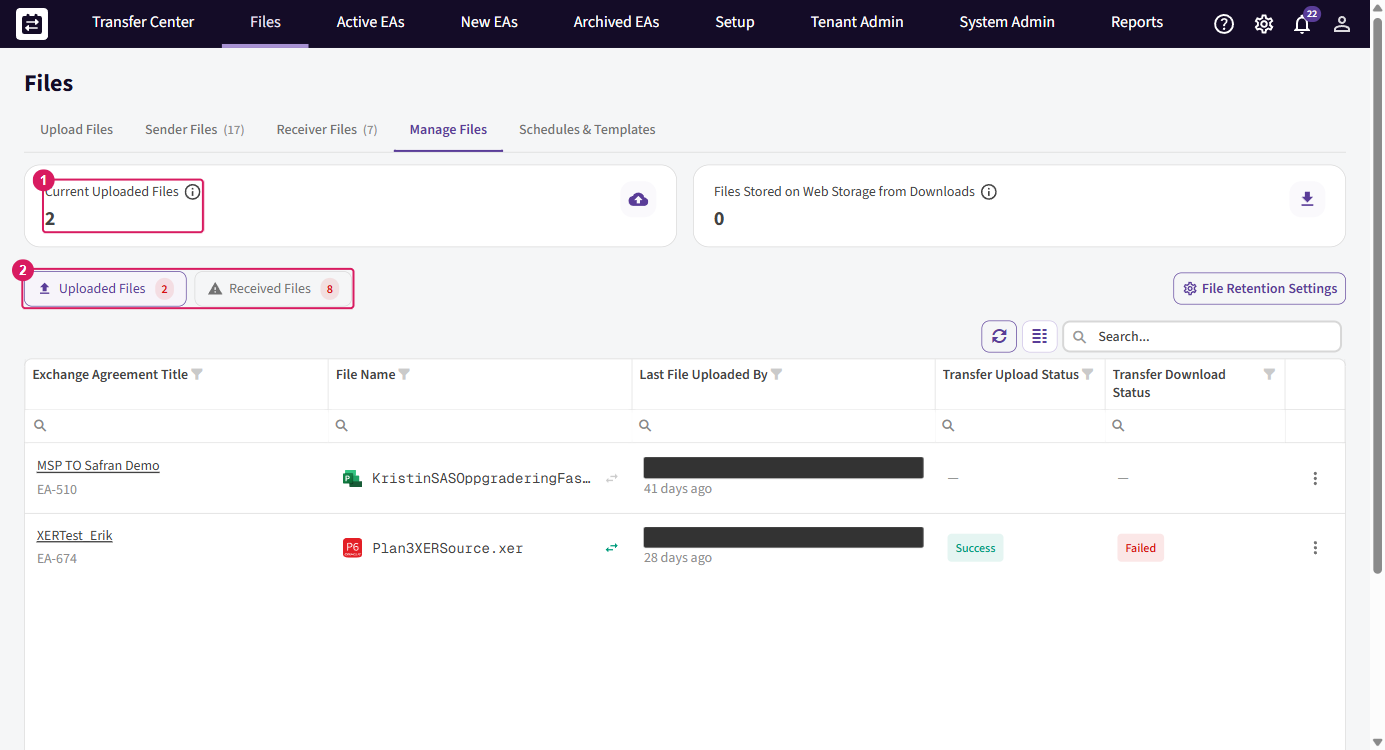
- Summary cardsat the top:
- Current Uploaded Files — how many source files (the files you dropped) are currently stored.
- Files Stored on Web Storage from Downloads — how many received files (transfer output) are currently stored.
- Two sub-tabsswitch what the grid lists:
- Uploaded Files — the source files, per Exchange Agreement.
- Received Files — the files produced for the receiving side.
- File Retention Settings — opens the retention dialog (Tenant Admin only). See the next section.
The grid columns are:
| Column | What it shows |
|---|---|
| Exchange Agreement Title | The agreement the file belongs to (with its EA-#### id; click to open it). |
| File Name | The stored file, with its host-system icon (.mpp, .xer, .xlsx). |
| Last File Uploaded By | Who uploaded the current file, and when. |
| Transfer Upload Status | The status of the sending (upload) side — e.g. Success, Failed, or — if none yet. |
| Transfer Download Status | The status of the receiving (download) side. |
Each row has a Row actions menu (⋮): open the Exchange Agreement, download the file, and — for a Tenant Admin — delete it.
Warning: Deleting a file here removes it from Web storage. If a transfer still needs it, that transfer can no longer run until a new file is uploaded. Deleting a file while a transfer is actively running is blocked.
File Retention Settings
File retention controls how long SchedEx keeps web-storage files before deleting them automatically, so storage does not grow forever. It is a Tenant Admin setting and applies to Web storage files only. Open it from the File Retention Settings button on the Manage Files tab.
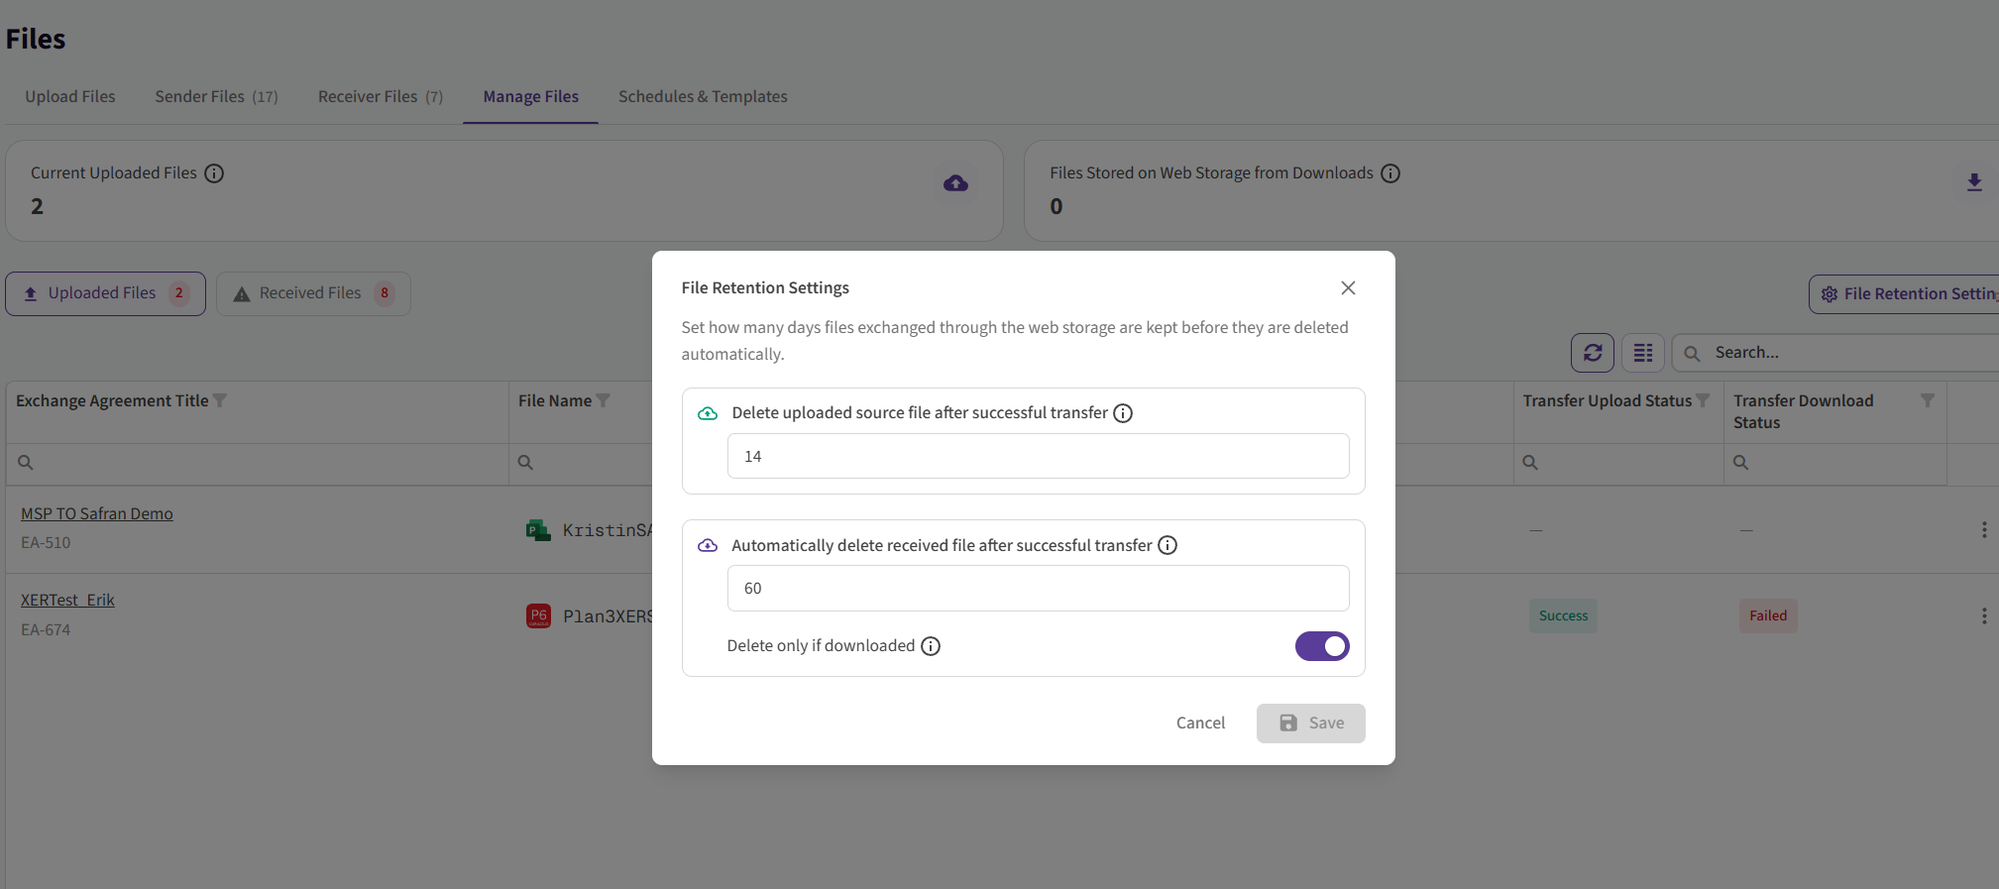
The dialog sets how many days files exchanged through Web storage are kept before automatic deletion. There are two independent periods — one for each kind of file — plus a safety toggle:
| Setting | What it controls | Default |
|---|---|---|
| Delete uploaded source file after successful transfer | How many days the source file you uploaded is kept after the transfer succeeds, then deleted. | 14 |
| Automatically delete received file after successful transfer | How many days the received (output) file stored on Web storage is kept after a successful transfer, then deleted. | 60 |
| Delete only if downloaded (toggle) | Applies to the received file: when on, SchedEx deletes it only if a user actually downloaded it. A received file that was never retrieved is kept, so you don't lose it. | On |
Tip: Leave a period blank to keep that kind of file indefinitely (no automatic deletion). The clock always starts after a successful transfer, not from the upload time.
Note: This is the one place the two file types are treated separately. The source file is the file you dropped in Upload Files; the received file is the output a transfer produced for the receiving side (see the two-file pattern in the file hub). Each has its own retention period.
Select Save to apply. The settings take effect for future automatic cleanups across all of the tenant's web-storage agreements.
The Schedules & Templates tab
Open Files → Schedules & Templates for an overview of every web-storage file connector in your tenant and what lives on it — without opening each connector one by one.
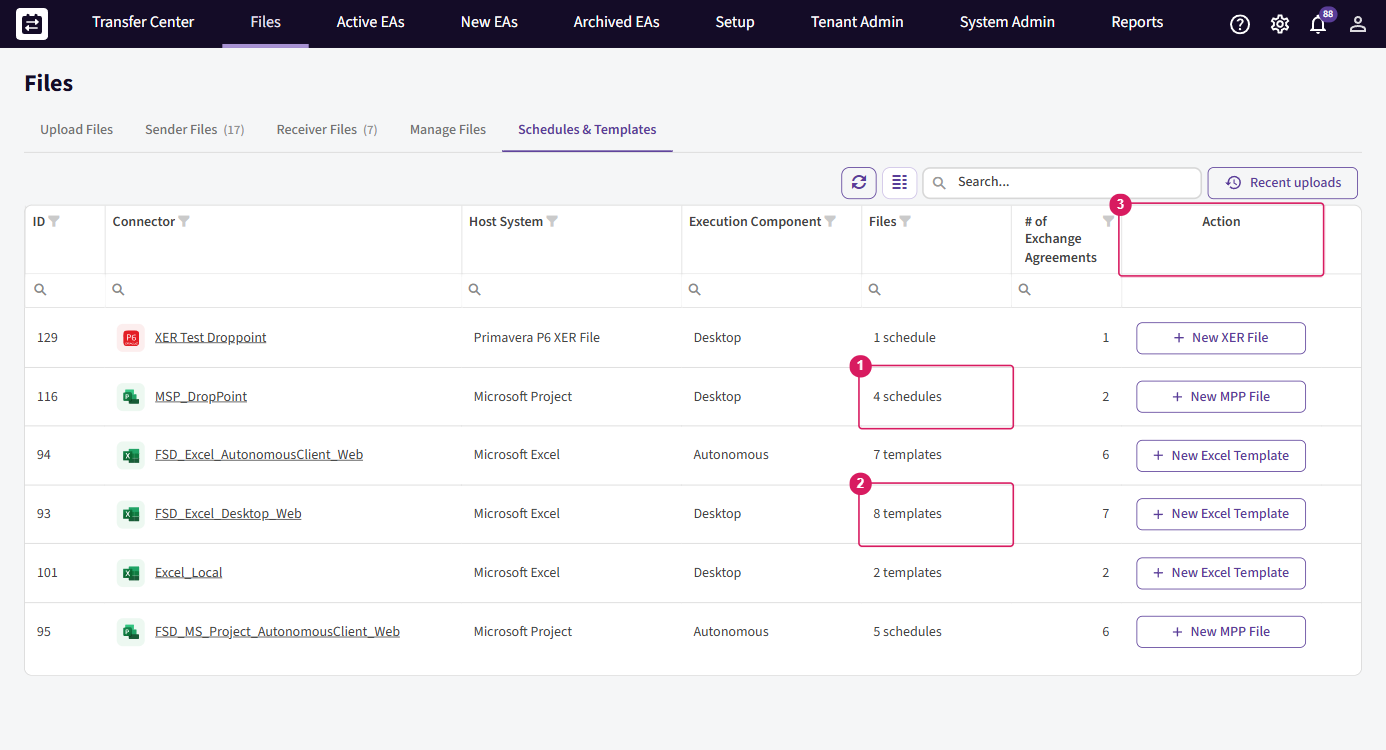
The grid lists each file connector with:
| Column | What it shows |
|---|---|
| ID / Connector | The connector (with its host-system icon); click the name to open it. |
| Host System | Microsoft Project, Primavera P6 XER File, or Microsoft Excel. |
| Execution Component | Whether the connector runs on the Desktop Client or the Autonomous Component. |
| Files | The count — schedules for MSP/XER connectors, templates for Excel connectors. |
| # of Exchange Agreements | How many agreements use this connector. |
| Action | A menu to drill in — View Schedules (MSP/XER) or View Templates (Excel). |
This tab is where you confirm, at a glance, that a connector has the schedule or template a file needs before you drop it:
- For Microsoft Project and Primavera P6 XER, the count is schedules — each created by persisting a representative file (see the MSP and XER guides).
- For Excel, the count is templates — each built with the Excel Template Wizard (see the Excel guide).
Related guides
- File-based drop point (web storage) — the overview of staging, uploading, downloading and the Files module.
- Per-format guides: Microsoft Project, Primavera P6 (XER), Excel.
- Contributor tenant — inviting a third party to upload or download files.
- Glossary — shared SchedEx terms.
Was this article helpful?
That’s Great!
Thank you for your feedback
Sorry! We couldn't be helpful
Thank you for your feedback
Feedback sent
We appreciate your effort and will try to fix the article