TABLE OF CONTENTS
- Introduction
- First: allow support log sharing
- Where support logs live
- Upload logs from the desktop client
- Request logs from the Autonomous Component
- The reference number
- Removing a log file
- Who can do what
- Status values
- Related guides
Introduction
When the support team needs to investigate a transfer, they need its logs. SchedEx lets you send those logs securely from inside the product: it collects the log files, encrypts them, stores them, and the support team retrieves them from their end. You never email a log file around.
This guide shows you how to:
- turn on log sharing for an agreement (required before any log can be sent),
- upload logs from the desktop client,
- request logs from the Autonomous Component,
- find your logs in the Support Logs list and read the reference number,
- remove a stored log file when it is no longer needed.
First: allow support log sharing
Logs can only be sent for an agreement when log sharing is turned on for your side of it. The setting is Allow support log sharing, and it exists separately for each side (owner and partner) on the Exchange Agreement details page.
Allow support log sharing — When enabled, support logs for this Exchange Agreement's transfers can be uploaded to assist troubleshooting. Turn off to disable log uploads from this side.
The rule is per side:
- Your side's setting controls whether you can upload (or request) logs.
- If your side has it off, SchedEx blocks the upload and tells you to enable it: "Support log sharing is turned off for this Exchange Agreement. Enable it from the Exchange Agreement details page to upload logs."
- The other side can still view logs that have been shared — turning your side off only stops your side from uploading.
So before you try to send a log, make sure Allow support log sharing is on for your side of that agreement.
Where support logs live
A Tenant Admin opens the Support Logs list to see every log that has been requested or sent for the tenant.
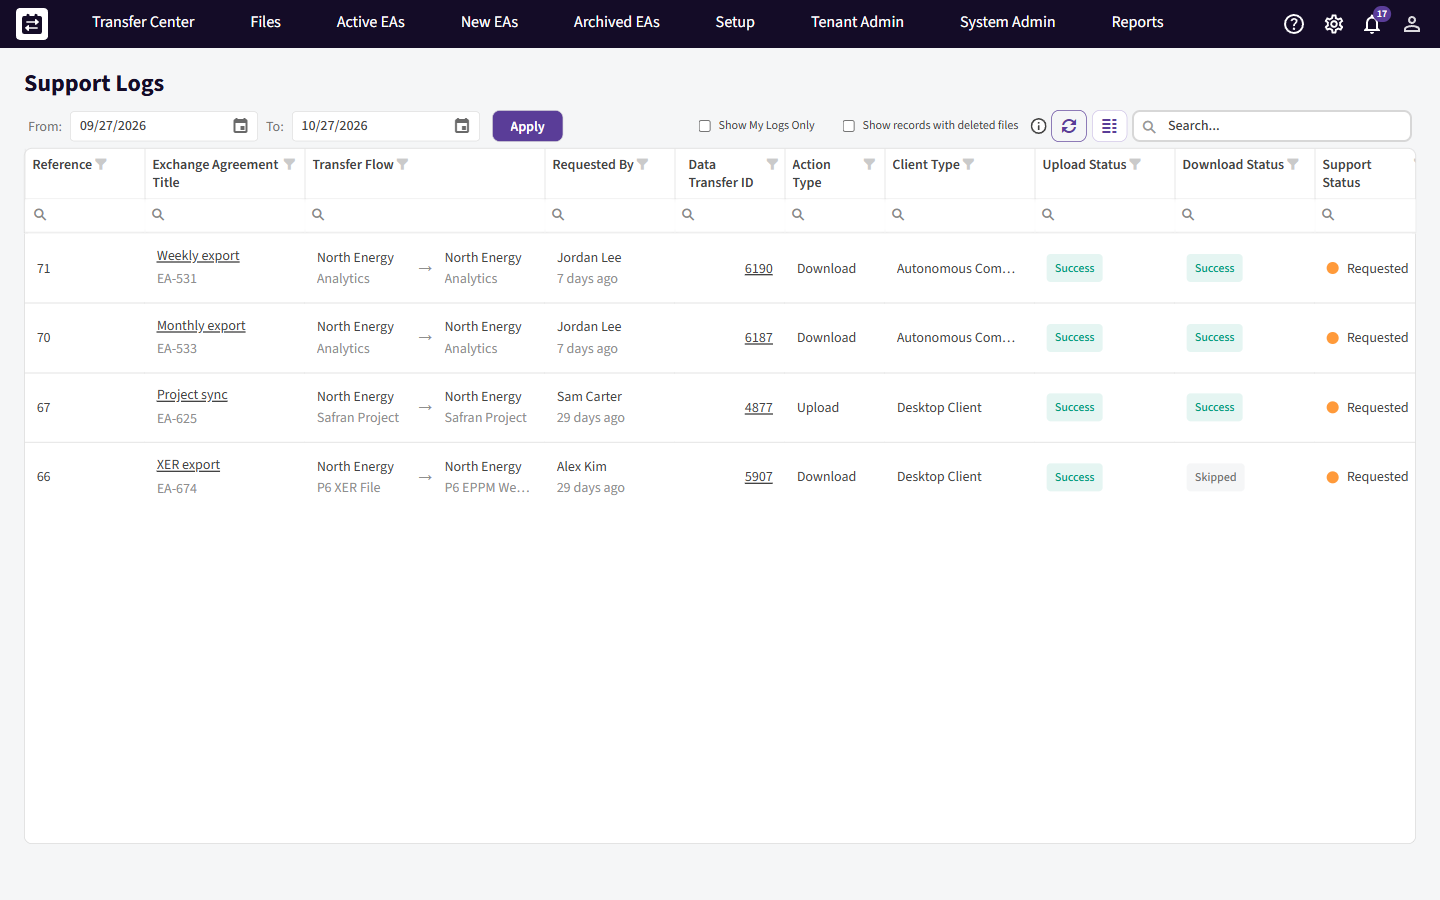
Each row shows:
| Column | What it shows |
|---|---|
| Reference | The log's number (see The reference number). A chip shows if the file has been removed. |
| Exchange Agreement Title | The agreement the log belongs to. |
| Transfer Flow | The sender → receiver direction. |
| Requested By | Who requested or uploaded the log. |
| Data Transfer ID | The transfer the log is for. |
| Action Type | Upload or Download. |
| Client Type | Where the log came from — usually Autonomous Component or Desktop Client (an analytics or internal client can also appear). |
| Upload / Download Status | The transfer's status on each side. |
| Support Status | Where support has got to (see Status values). |
A toolbar gives you a date range, a search box, a refresh button, a Show My Logs Only filter, and Show records with deleted files (to include logs whose file has already been removed).
Upload logs from the desktop client
When a transfer runs on the desktop client, you can send that transfer's logs straight from the client:
- Open the transfer (or its history) in the desktop client.
- Choose the option to upload the support log for that transfer.
- The client zips the local logs and uploads them, showing progress.
On success it confirms with the reference, for example: "Support log uploaded successfully. Reference: SupportLog_12345." The log then appears in the Support Logs list with Client Type = Desktop Client.
Request logs from the Autonomous Component
Logs that live on the Autonomous Component are not on your machine, so instead of uploading them yourself you ask the Autonomous Component to upload them. You do this from the transfer in the Transfer Center:
- Open Transfer Center → Performed.
- On the transfer's row, open the actions menu and choose Request Autonomous Component to Upload Log.
- SchedEx confirms: "Autonomous Component log upload requested. This may take a few minutes." The option then reads Autonomous Component Log Upload: Requested.
The Autonomous Component picks up the request on its next pass, collects and uploads the logs, and the row's file becomes available to support. The log appears with Client Type = Autonomous Component.
The Request Autonomous Component to Upload Log option only appears when the transfer actually ran on the Autonomous Component and log sharing is on for your side. If sharing is off, the option is disabled with a tooltip telling you to enable it on the agreement.
The reference number
Every log has a reference number — this is what you quote to support. In the list, the Reference column shows the plain number (for example 12345); hover it to see the full reference, which includes the environment (for example SupportLog_test_12345). When a log file is retrieved it is named with that full reference (for example SupportLog_12345.zip in production).
Quote the reference number in your support conversation so the team can find the exact log.
Removing a log file
Once support no longer needs a log, a Tenant Admin can remove its file to free storage:
- In the Support Logs list, open the row's actions and choose Remove log file.
- If support has not marked the case complete, SchedEx asks you to confirm: "Support has not been completed yet. Remove the log file anyway? The ticket row will remain visible."
- Confirm. SchedEx reports "Support log file removed."
Removing the file deletes the stored archive but keeps the row in the list (with a removed chip) so there is still a record that the log existed. To see such rows, turn on Show records with deleted files.
Who can do what
| Action | Who |
|---|---|
| Turn on Allow support log sharing | An admin editing the Exchange Agreement (per side). |
| Upload a log from the desktop client | The person running that transfer on the desktop, with sharing on for their side. |
| Request an Autonomous Component log upload | A representative who can see the transfer, with sharing on for their side. |
| View the Support Logs list | A Tenant Admin (for the tenant's logs). |
| Remove a log file | A Tenant Admin, for their own tenant's logs. |
| Download the log file / resolve the case | The support team. End users send logs; support retrieves and works them. |
So your part is to enable sharing, send the log (upload or request), quote the reference number, and later remove the file if you wish. The support team downloads and resolves it.
Status values
The Support Status on each row moves through:
- Requested — a log has been asked for (for example an Autonomous Component upload), but the file is not in yet.
- Active — the file has arrived and the case is open.
- On Hold — paused by support.
- Completed — support has finished with it.
Support sets these — they are not something you change.
Related guides
- Reading the Autonomous Component Dashboard — see what the Autonomous Component is doing.
- Controlling transfers for the Autonomous Component — automatic vs. approved transfers.
- Glossary — shared SchedEx terms.
Was this article helpful?
That’s Great!
Thank you for your feedback
Sorry! We couldn't be helpful
Thank you for your feedback
Feedback sent
We appreciate your effort and will try to fix the article