TABLE OF CONTENTS
- Introduction
- Before you start
- Step 1 — Sign in
- Step 2 — Open the Files area
- Step 3 — Drop a file in the web app
- Step 4 — Drop a file in the desktop client
- What happens after you upload
- What you can and can't do
- Avoiding common errors
- Related guides
Introduction
Someone has added your organization to a SchedEx Exchange Agreement as a contributor, and given you the Send role. That means you can upload (stage) schedule files into that agreement — you don't own or manage the agreement, you just supply the files it needs.
This guide shows you how to sign in and drop a file, both in the web app and in the desktop client. If you want the background on what a contributor is, see Contributor tenant.
Before you start
You need three things:
| You need | Detail |
|---|---|
| A SchedEx sign-in | Your own organization's account. If you can't sign in, ask your administrator to make sure your user exists in SchedEx. |
| To be added as a contributor representative with the Send role | The owner or partner of the agreement does this (see Contributor tenant). Until they add you, the agreement won't appear for you. |
| The file, named to match the schedule | The file name (without the extension) must match the agreement's sender Schedule. This is how SchedEx knows where your file belongs. See Avoiding common errors. |
You can upload from either the web app or the desktop client — both do exactly the same thing. Use whichever you have.
Step 1 — Sign in
Web app
- Open SchedEx in your browser (the address your administrator gave you — for example
https://app.schedex.com). - Select Sign in.
- Complete your organization's login. SchedEx keeps you signed in on that browser.
Desktop client
- Open the SchedEx desktop client.
- Select Sign in — a login window opens for your organization's account.
- After you sign in, the client remembers you for that environment, so you won't have to sign in every time.
Step 2 — Open the Files area
Both the web app and the desktop client have a Files area. Open it:
- Web app: select Files in the top navigation.
- Desktop client: open the Files tab.
The agreements you contribute to appear here, marked with your role — the My Role column shows Contributor, so you can tell you are taking part as a contributor rather than as the owner or partner. Go to the Upload Files tab.
Step 3 — Drop a file in the web app
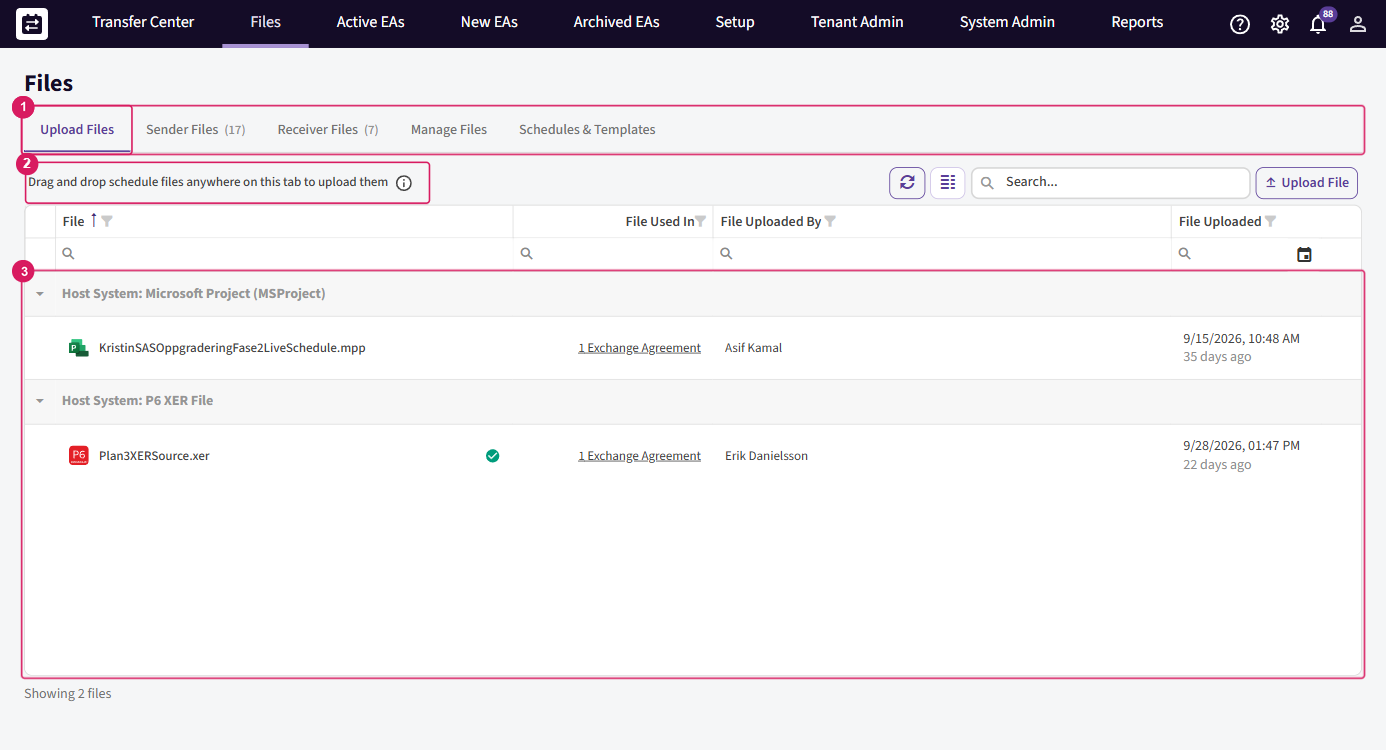
The Files module in the web app: (1) the Upload Files tab, (2) the drag-and-drop area, and (3) your uploaded files, grouped by host system.
- Make sure each file is named to match its schedule (see Avoiding common errors).
- On the Files → Upload Files tab, drag one or more files anywhere onto the tab — or select Upload File and choose one or several in the file picker.
- SchedEx opens an upload dialog listing every file and the Exchange Agreement(s) each one matches. Review the matches.
- The files upload. Depending on each agreement's schedule, SchedEx either starts the transfer straight away or holds the file until the next run.
One file is stored per schedule, so if several agreements send from the same schedule, a single file updates them all.
Note: You can upload several files at once — drag a selection onto the tab, or pick multiple files in the Upload File dialog. SchedEx matches each file to its schedule by name and uploads them together. Files that are the wrong type (anything other than
.mpp,.xer,.xlsx) or larger than 100 MB are skipped with a message, while the rest still upload. If two files resolve to the same schedule (for example the same name from two folders), only the newest is sent. The desktop client works the same way.
Step 4 — Drop a file in the desktop client
The desktop client has the same Files → Upload Files area and behaves identically — the same drag-and-drop, the same Upload File button (which also lets you select several files at once), and the same checks. Use it when you prefer working on the desktop.
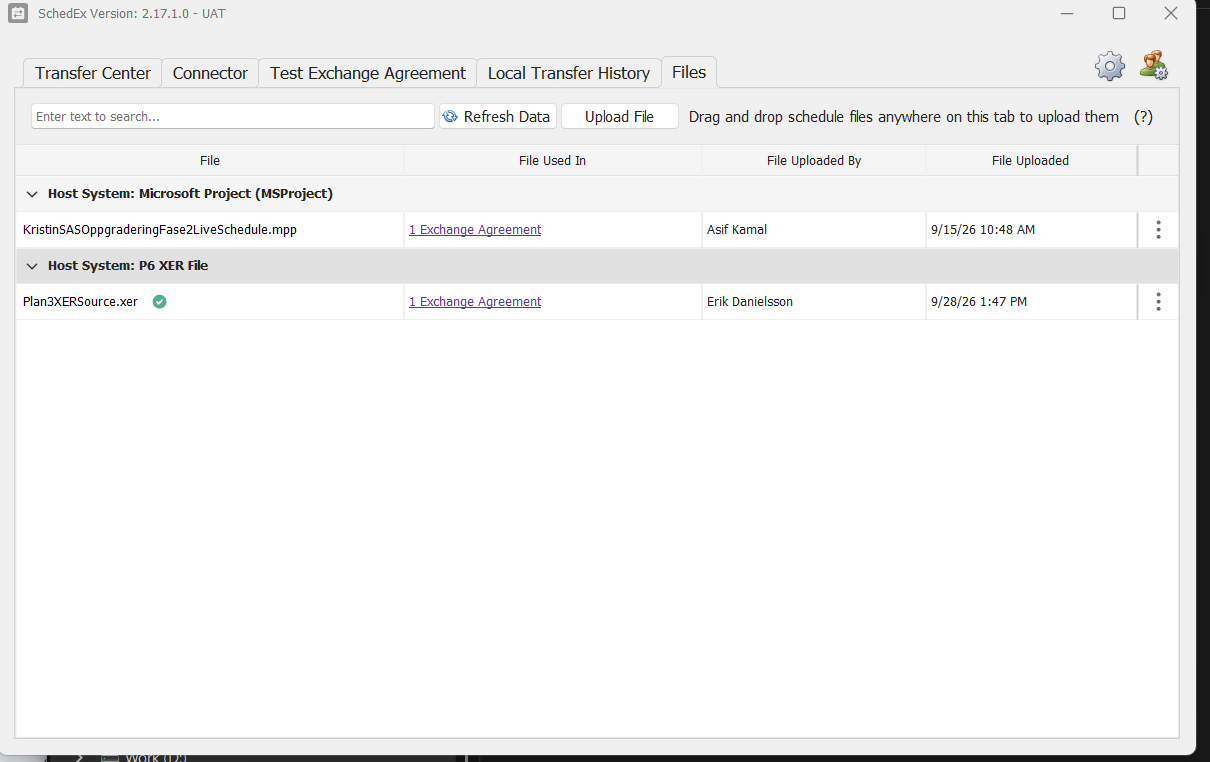
The desktop client's Files tab, with the Upload File button and the drag-and-drop area.
- Open the desktop client's Files tab.
- Drag one or more files onto the tab, or select Upload File and choose one or several.
- Review the matched agreement(s) in the upload dialog.
What happens after you upload
- Your file is stored securely in SchedEx's web storage.
- If the agreement runs On File Upload, a transfer starts immediately. Otherwise it runs on its schedule, or when the owner/partner runs it.
- A file-uploaded notification is sent to the agreement's owner and partner so they know your file has arrived.
- To send an updated version later, just drop the new file the same way (same name) — it replaces the stored one.
What you can and can't do
As a contributor with the Send role:
You can:
- Upload (stage) files into the agreement, from the web app or the desktop client.
- Download files from Files → Receiver Files — but only if you were also given the Receive role. With Send only, you upload.
You can't:
- Delete files — only a Tenant Admin of the owning organization can delete a file.
- Change the agreement — you can't edit its setup, schedule, or settings.
Avoiding common errors
| If you see… | It means… | Do this instead |
|---|---|---|
| Your file reaches no agreements | The file name doesn't match a schedule you contribute to | Rename the file so its name (without the extension) matches the sender Schedule exactly. Matching is case-insensitive but otherwise exact — spaces and characters must match. |
| "…cannot be uploaded. The maximum file size is 100 MB." | A file is over the limit | Reduce the file, or split the schedule. In a multi-file upload, only the oversized file is skipped — the rest still upload. |
| The agreement isn't listed at all | You haven't been added yet, or with the wrong role | Ask the owner/partner to add you as a contributor representative with the Send role. |
| "…cannot be uploaded. Only .xer, .mpp, .xlsx files are accepted." | A file isn't a supported type | Upload the correct format for that connector. When you drop several files, only the unsupported ones are skipped. |
For the full detail of naming, matching and results, see the File-based drop point guide and Upload Files.
Related guides
- Contributor tenant — what a contributor is, and how one is set up.
- File-based drop point (web storage) — the full overview of dropping files and how transfers run.
- Per-format guides: Microsoft Project, Primavera P6 (XER), Excel.
- Glossary — shared SchedEx terms.
Was this article helpful?
That’s Great!
Thank you for your feedback
Sorry! We couldn't be helpful
Thank you for your feedback
Feedback sent
We appreciate your effort and will try to fix the article