TABLE OF CONTENTS
- Introduction
- Where to find the page
- Accept new requests
- Choosing who gets an email
- What the email contains
- Change History
- Good to know
- Related guides
Introduction
Organizations that want to start using SchedEx can send a request through the Get started form on the SchedEx website. A System Admin decides what happens with those requests on the New organization requests page.
This guide shows you how to:
- choose which email addresses are told about each new request,
- add and remove those addresses,
- stop accepting new requests for a while, and turn them on again,
- see who changed the list, and when.
Who can do this: only System Admins can open the New organization requests page.
Where to find the page
Open the System Admin dashboard and go to the Application Settings section. Select the New Organization Requests card ("Choose who gets an email for each request"). The card shows how many email addresses are on the list.

The Application Settings section of the System Admin dashboard, with the New Organization Requests card.
Application Settings replaces the earlier Notifications section. It holds both Notification Settings and New Organization Requests.
Accept new requests
At the top of the page, Accept new requests controls whether the Get started form on the SchedEx website takes new requests at all. Select the button to switch between On and Off. The change is saved at once.
| Setting | What happens |
|---|---|
| On (the default) | New organizations can send a request from the SchedEx website. The people on the list get an email, and the visitor gets a "Thank you for your interest in SchedEx" email. |
| Off | The website does not accept requests. A visitor who sends the form sees "We are not accepting new requests at the moment. Please try again later." The request is not stored, and no emails are sent. |
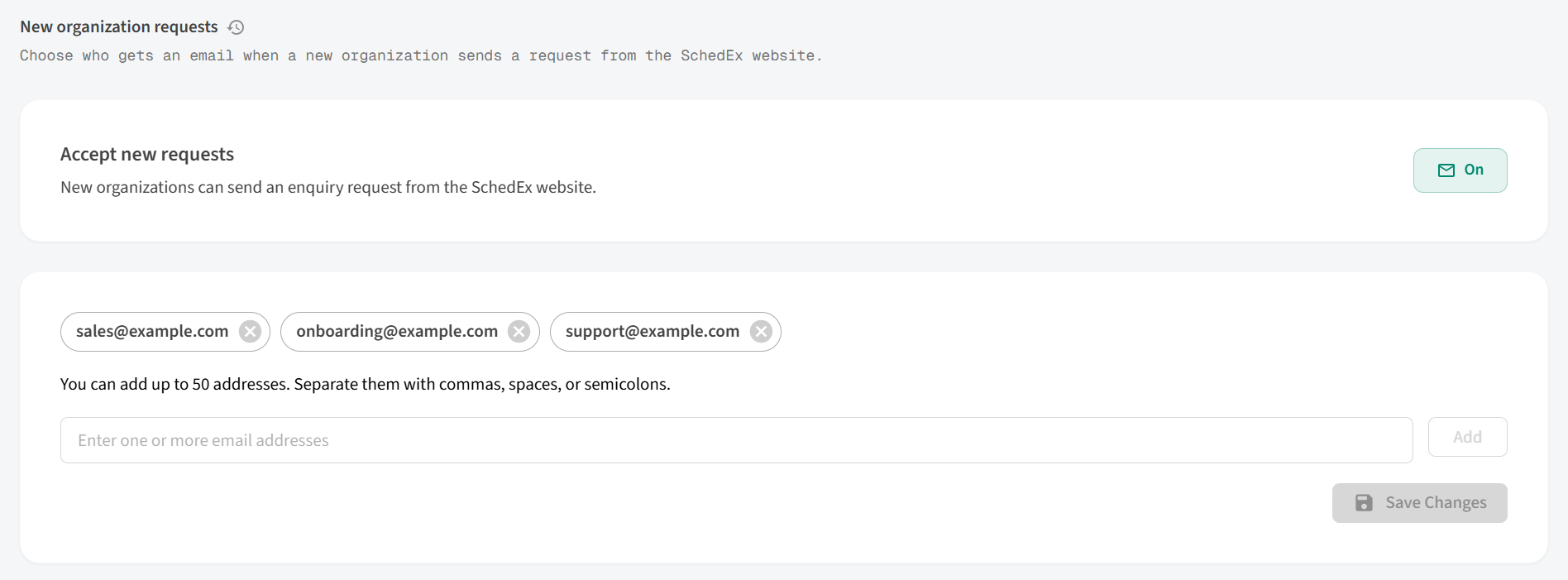
The New organization requests page: Accept new requests at the top, and the list of email addresses below it.
Choosing who gets an email
The card below Accept new requests holds the list of email addresses that get an email for each new request. The addresses don't need to belong to SchedEx users.
Adding addresses
- Type one or more email addresses in the field Enter one or more email addresses. To add several at once, separate them with commas, spaces or semicolons.
- Select Add, or press Enter. The addresses appear as chips above the field.
- Select Save Changes. Nothing is saved until you do.
Addresses are saved in lower case. An address that is already on the list is skipped, with a note such as "… is already in the list."
If an address can't be added, it stays in the field with a message:
- the address is not a valid email address,
- the address is longer than 320 characters ("Email address is too long. …"),
- the list already has 50 addresses ("You can add a maximum of 50 email addresses.").
Removing addresses
Select the × on an address chip to remove it, then select Save Changes.
The list can't be saved empty. If you remove every address, the page shows "Add at least one email address." and Save Changes stays disabled.
Undoing changes
Until you save, Reset puts the list back the way it was when you opened the page.
When the list is empty
If no address has ever been saved, the page says: "No email addresses are added. Until you add one, no one gets an email when a new organization sends an enquiry request."
In that case new requests are still received and stored, but nobody is told about them. System Admins don't get the email automatically. Add at least one address as soon as you start accepting requests.
What the email contains
Each address on the list gets an email with the subject New Contact Inquiry – SchedEx. It shows what the visitor typed in the Get started form:
| In the email | From the form |
|---|---|
| Name | First name and last name |
| Company | Company |
| The visitor's email address, as a link you can reply to | |
| Job Title | Job title, or "Not provided" |
| Comment | Comment, or "Not provided" |
The email ends with "Please review the inquiry and follow up with the contact as appropriate."
The visitor gets a separate email, Thank you for your interest in SchedEx, saying that the request has been received and that someone will be in touch.
Change History
Select the history icon next to the page title to open the Change History for the list. It shows each email address that was added or removed, who did it and when.
Good to know
- The emails for website requests are managed only on this page. You won't find them on the Notification Settings page, and turning all emails off there doesn't stop them. To stop new requests, turn Accept new requests off.
- The list is the same for the whole platform. It isn't set per organization.
- Turning Accept new requests off doesn't change the list. When you turn it on again, the same people are told about new requests.
Related guides
Was this article helpful?
That’s Great!
Thank you for your feedback
Sorry! We couldn't be helpful
Thank you for your feedback
Feedback sent
We appreciate your effort and will try to fix the article